How to Query Data to Excel
In Skyvia Query Excel Add-in, you get data from a data source to Excel for the web by creating and running queries. Query is an inquiry into the data source, using an SQL SELECT statement. Query is used to extract data from the source in a readable format according to the user's request.
Skyvia Query Excel Add-in allows creating a query to retrieve data to Excel either visually in Query Builder or simply by entering an SQL statement. You can create and run your query in a few simple steps:
1. Log In to Skyvia
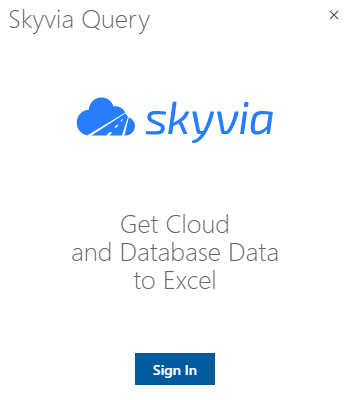
You must log in to Skyvia before you start using the add-in. If you are not logged in yet, hover over Skyvia Query and click the Sign In button.
After this, in the opened window, enter your Skyvia credentials (email and password) and click Sign In again. Then you may close this tab and return to your Excel workbook.
If you do not have a Skyvia account yet, you can register for free at https://app.skyvia.com/register. Note that you can query data 5 times per day completely free.
2. Open Query Editor
To open Query Editor, click  in the Skyvia Query window.
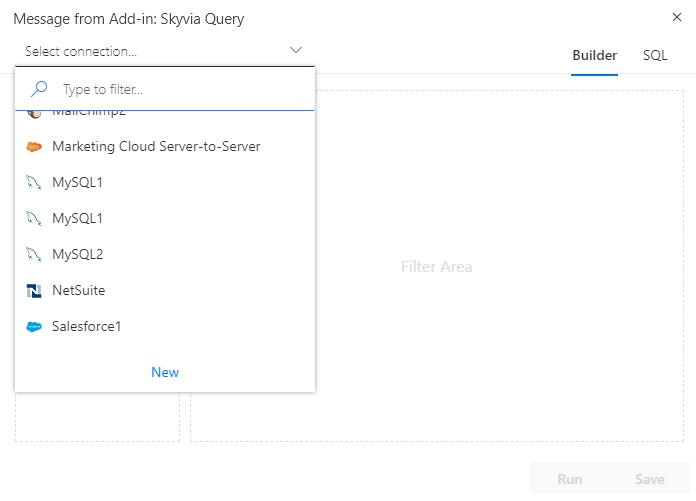
In the Query Editor, you can select a connection to the data source, configure and run your query. The Query Editor has two tabs — Builder and SQL. The Builder tab allows you to configure query visually, while the SQL tab allows you to specify an SQL statement to query your data.
3. Connect to Data Source
To query data, first you need to connect to the data source you want to query data from. For this, click the topmost drop-down list in the Query Editor.
If you already have the necessary connection created in Skyvia, select this connection from the list. You may enter a part of the connection name to filter the list and quickly find a connection. If you haven't created the necessary connection yet, you can create a new connection.
A connection allows Skyvia to access your data in a database or cloud application. Each connection has the name that you specify, by this name you find the necessary connection. To create a connection, click the New link at the bottom of the opened list.
The Select Connector page opens up, which contains all the available connectors — their names and types. Skyvia supports various connectors, including popular cloud applications, relational databases, cloud data warehouses and file storage services.
On this page, you can select the data source you want to work with. You may filter data sources by selecting the data source category in the All list on the left or by entering part of the connection name in the Type to filter box.

After you click a data source, a connection editor will open. In the connection editor, you will need to enter the connection name and other required parameters. What kind of parameters you need to enter will depend on the cloud app or database you select. You can find more details on certain connections in the Cloud Sources and Databases sections. After you create a connection, it will be available in the connection drop-down list of the Query Editor.
Note that you can create an unlimited number of connections to various data sources in your Skyvia account.
4. Configuring Query Visually
Skyvia offers a convenient visual Query Builder to define your queries visually. It allows you to quickly select which data to retrieve, configure data filters, sorting, and aggregations.
When you configure a query visually, Skyvia Query Add-in automatically generates the underlying SQL SELECT statement. You can view it by switching to the SQL tab of the Query Editor.
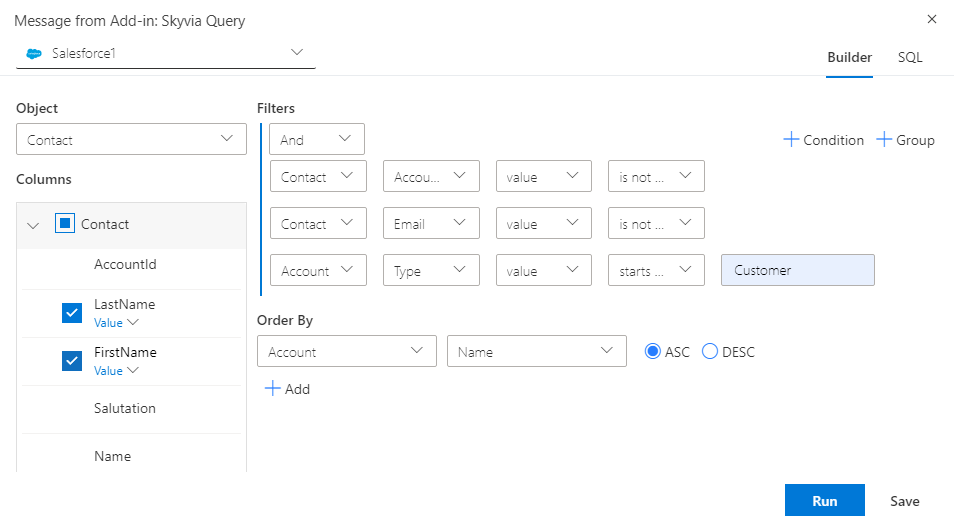
Selecting Data to Retrieve
When configuring a query, the first step is to determine what data you need. After you have selected a connection to query data from, you need to select the necessary table or cloud object in the Object list. Then simply select checkboxes for the object fields in the Columns box.
Querying Data from Multiple Tables (Objects)
Query Builder allows you to query data from multiple tables (objects) from a data source. For this, the objects must have a relation between them in the data source — a foreign key. You can select columns not just from the object that is currently selected in the Object list, but also from all the objects, to which the current object has foreign keys.
Thus, if you want to select data from more than one object, you should select an object that is lower in the hierarchy in the Object list. For example, if you need to get product information with prices from Salesforce, you will need to select the PricebookEntry object in the Object list, not Product.
When you select data from multiple objects, Skyvia Query Add-in automatically joins these objects by the corresponding foreign keys.
Columns List
The Columns list displays the selected object columns, as well as the columns of other objects, to which the current one has foreign keys. The columns are grouped by their objects. You can select or clear checkboxes for the columns to include or exclude columns from the query.
Note that the groups correspond to the foreign keys/relations, not to the objects. If an object has multiple foreign keys to the same object, the latter one will be present in the list multiple times, with names including the corresponding foreign key names. Thus, you can explicitly choose by which foreign key the objects are joined.
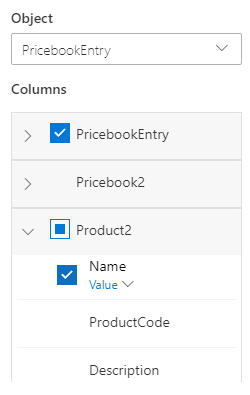
By default, the current table column group is expanded, and groups for all the foreign keys are collapsed. You can expand/collapse these groups by clicking down/up arrow in the left part of their header. The checkboxes, which are also located in the left part of a group header, allows you to quickly select and clear all the columns in the group.
Grouping and Aggregating Data
Skyvia Query Add-in allows you to group and aggregate data by some criteria. For example, you may quickly retrieve a list of customers with the numbers or sums of their orders, etc. To group and aggregate data, you simply select aggregation functions for columns you want to aggregate. Skyvia Query Add-in automatically groups data by all other selected columns.
Skyvia supports the following aggregation functions: COUNT, AVG, MIN, MAX, SUM. COUNT is supported for most of the column types, while other aggregations — only for columns with numeric data.
Applying Aggregations
To apply an aggregation, click the Value list near the name of a selected column and then select the necessary function from the list. Note that only the functions applicable to the type of the selected column are displayed in this list.
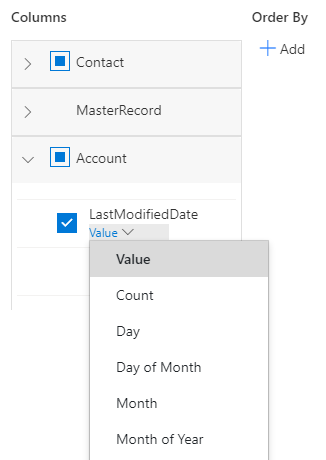
To remove a function from a column, click Value in the drop-down list.
Grouping Data By Time Periods
It is even more convenient to group and aggregate data by time periods because of handy functions that can be applied to datetime data.
Skyvia Query Add-in offers a number of functions that extracts a portion of date in a form, which is convenient for grouping by different time periods. For example, Day function returns only the date portion of a value, like "2020-03-23", allowing you to group results by a day. The following table lists functions, available for datetime columns:
| Function Name | Description | Example of a Returned Value |
|---|---|---|
| Day | Returns the date portion of a value | 2020-03-23 |
| Month | Returns the year and month portions of a value | 2020-03 |
| Quarter | Returns the year and quarter number | 2020,1 |
| Year | Returns the year portion of a value | 2020 |
| Day of Month | Returns the number of day in a month | 23 |
| Month of Year | Returns the number of a month | 3 |
| Quarter of Year | Returns the number of a quarter | 1 |
To group and aggregate data by a time period, simply select checkbox for a column (or columns) you want to aggregate data from and for date or datetime column, which you want to use for grouping. Then select the corresponding aggregation function for the column that you want to aggregate, and the corresponding date function (like Day, Month, Quarter, or Year) for the datetime column. The result will be grouped, respectively, by day, month, quarter or year. See an example of creating such report below.
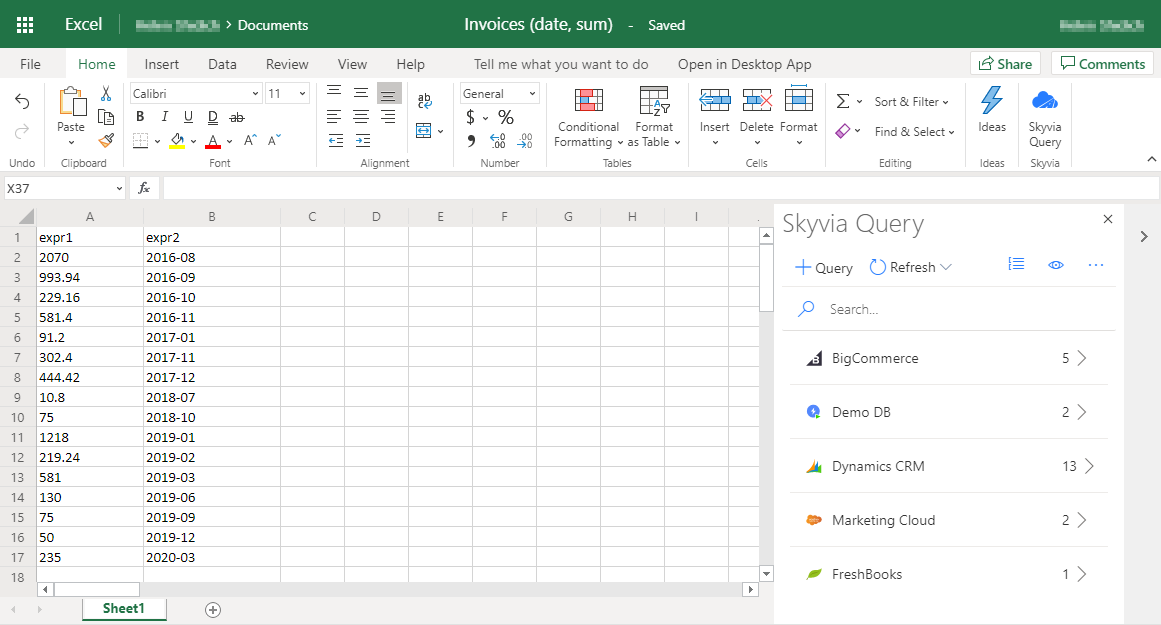
Example of Aggregating Data
Suppose we want to get total sum of the QuickBooks invoices per month. So we need to get and sum the invoices' total amount, grouping the result by the invoice date. We can do it in the following way:
-
First, we need to log in to Skyvia and open the Query Editor as described above.
-
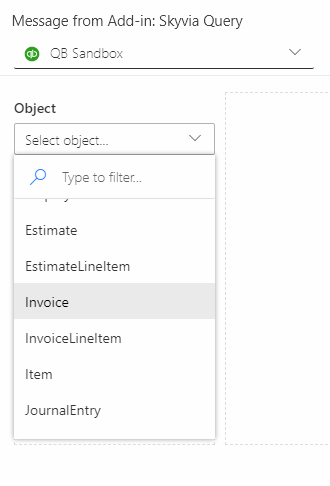
Then we select our QuickBooks connection and the Invoice object from it in the corresponding lists.
-
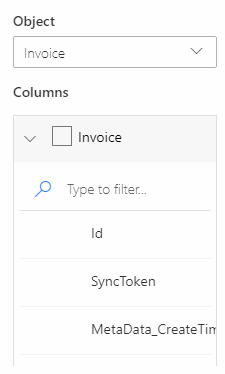
Clear checkbox for the Invoice table. We don't need all the Invoice fields, only the TxnDate and TotalAmt fields.
-
Select checkboxes for the TxnDate and TotalAmt fields.
-
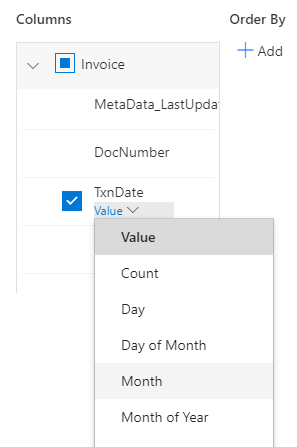
For the TotalAmt field, click Value and select Sum in the list.

-
For the TxnDate field, click Value and select Month in the list. This is how we get the sums for all invoices per month.
-
That's all, we can run our query.
Sorting Data
Configuring data sorting in Query Builder is easy. All you need is to select one or more columns for sorting either from the selected object or from its related objects and specify the sorting order — ascending or descending.
To add a sorting column, simply click the  button under the Order By heading. Then select an object and its field to order data by in the first and second lists, respectively. You may sort data by any column from the selected object or the objects it references, regardless of whether you select data from this column or not. If necessary, you may add more columns to the Order By list.
By default, Skyvia Query Add-in uses ascending sorting order. Click the DESC toggle if you need to change order for descending.
Filtering Data
To filter data, you can define various filter conditions for your queries in Query Builder. Read Filtering Data in Skyvia Query Add-in for more information about various filters and how to add them, etc.
Working with Query SQL Code
Note that this step is not required, and you may skip it.
While Query Builder is usually enough for most cases, sometimes you may need to configure your query more deeply and flexibly. In this case you may switch to direct editing of the query SQL code.
Switching between SQL and Builder Tabs
You can switch to the SQL code at any time — either immediately and create your SQL query from the scratch or configure your query in Query Builder first, and then tinker the automatically generated SQL code.
To view and edit the SQL code of the query, click the SQL tab in the top right corner of Query Editor.
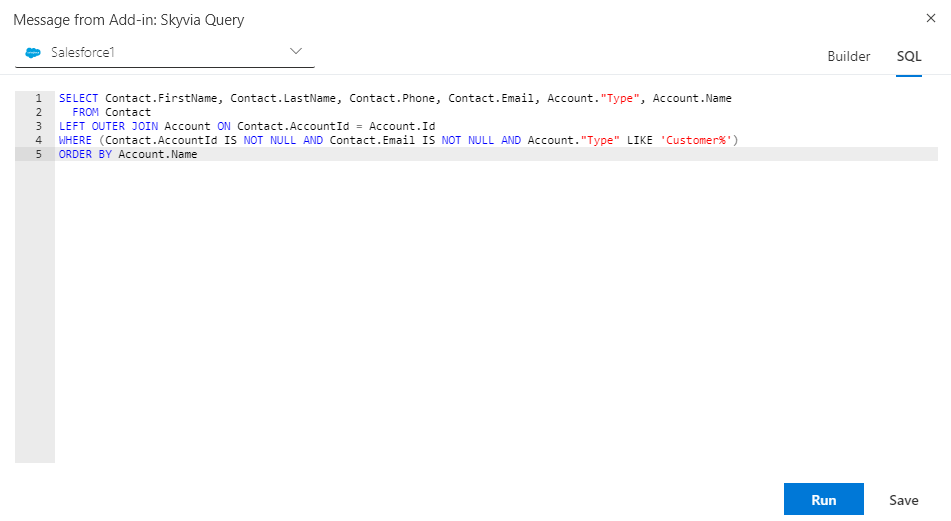
Please note that if you edit the generated SQL, you won't be available to edit this query visually in Query Builder any more.
SQL Syntax
When working with the database data, use the SQL syntax of the corresponding database. For cloud applications, use SQLite SQL syntax.
Running Your Query
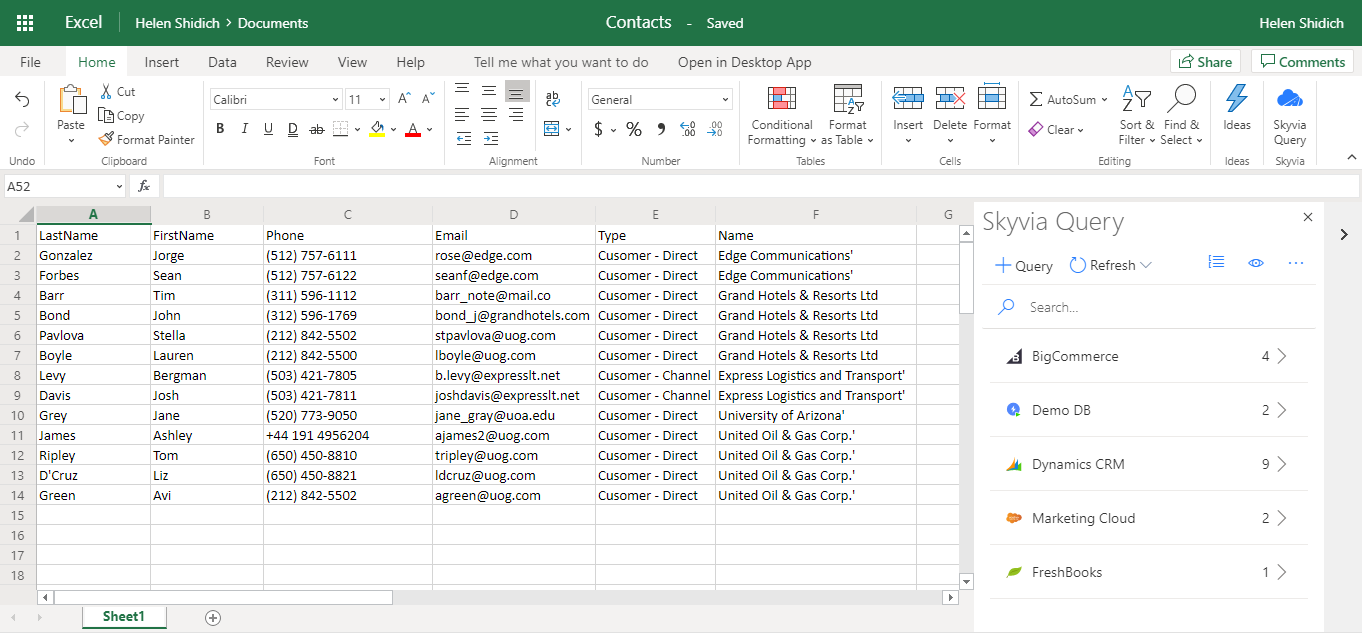
After you finished creating your query, whether visually or by typing SQL code, you can run your query by clicking the Run button. Skyvia will load the queried data to the Excel document. Note that it can take some time, depending on the number of the records, query complexity, and the speed of the data source itself.
What's Next
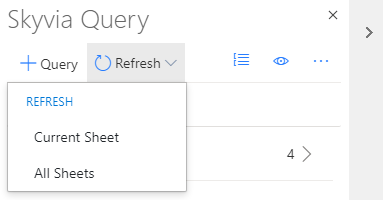
Refreshing Data
Skyvia Query Add-in remembers the query you have used for the sheet. Whenever necessary, you can refresh the queried data from the data source. For this, in the Skyvia Query toolbar, click Refresh list. You can choose to refresh either Current Sheet or All Sheets.
Modifying the Query
You can edit your query in the Skyvia Query editor simply by clicking in the Skyvia Query window on the left. The Query Editor with the current query will open, and you will be able to modify it, add filters, re-execute it, etc.
Skyvia Account Connection
If you share the workbook, your data source connection is not shared with it. Your data source connection is stored in Skyvia and is linked to your Skyvia account. If the users you share your workbook with have Skyvia Query Excel Add-in installed, they will be able to see the query SQL code, but they won't be able to change it or refresh data, unless they have the same connection in their own Skyvia accounts.
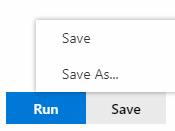
Saving Queries for Future Use
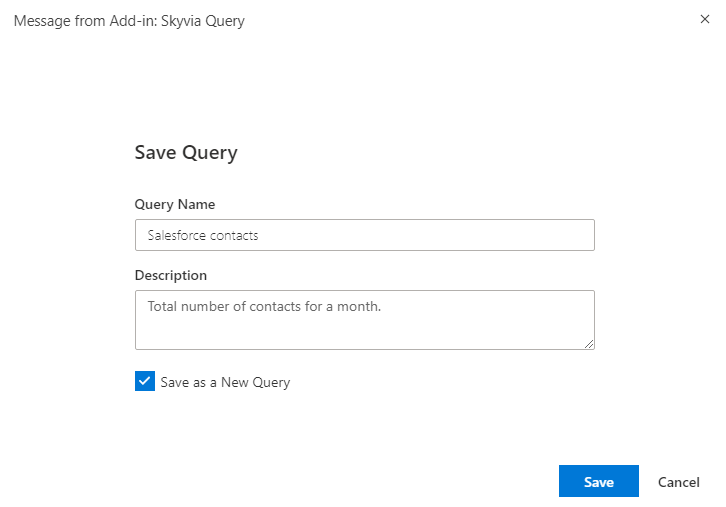
If you want to re-use the query you created for future use in other Excel workbooks, you can save it in our Query Gallery. Saved queries are stored in Skyvia, linked to your Skyvia account as well as connections. To save your query for future use, perform the following actions:
-
Click Save in the Query Editor. If you use an already saved query, you may then click Save to overwrite it or Save As to save the current query under a new name.
-
Enter the query name in the Query Name box.
-
Optionally specify a description for the query in the Description box.
-
Optionally select the Save as a New Query checkbox if you want to save a query as a new one.
You can open or delete a saved query in Skyvia later. You can also open query from Query Gallery in Excel Add-in.
Note that the Gallery already contains some predefined queries for different data sources for common use cases, which you can use directly or study in order to learn how to create your own queries.