Updating Existing Records and Inserting New Ones
In this tutorial we will show how to avoid creating duplicates when loading data. We will create a data flow that checks if a record from source is already present in the target. If the record is present, it will update it with data from the source. If there is no such record in target, we will insert it.
Suppose we have the following scenario. We have a Mailchimp subscriber list and the database table with the list of contacts and their Mailchimp statistics. New subscribers are added to the list, and statistics for existing ones is also updated. We want to add the new subscribers to the database table, and also keep existing records in the table up-to-date.
Target Table
This tutorial uses the following MySQL table as a target:
1
2
3
4
5
6
7
8
9
10
11
12
13
14
15
16
17
18
19
CREATE TABLE demobase2.listmembers (
Email varchar(100) NOT NULL,
ListID varchar(50) NOT NULL,
Status varchar(20) DEFAULT NULL,
EmailClient varchar(100) DEFAULT NULL,
UnsubscribeReason varchar(255) DEFAULT NULL,
AverageOpenRate double DEFAULT NULL,
AverageClickRate double DEFAULT NULL,
FNAME varchar(255) DEFAULT NULL,
LNAME varchar(255) DEFAULT NULL,
ADDRESS text DEFAULT NULL,
PHONE varchar(255) DEFAULT NULL,
LastUpdate datetime DEFAULT NULL,
CreatedDate datetime DEFAULT NULL,
VIP tinyint(1) DEFAULT NULL,
SubscriberID bigint(20) NOT NULL AUTO_INCREMENT,
PRIMARY KEY (SubscriberID)
)
ENGINE = INNODB;
This table is similar to the ListMembers Mailchimp object to make mapping simpler.
Creating Connections to Data Sources
First, you need to create connections in Skyvia. In our tutorial we will use a Mailchimp connection in a Source component and a MySQL connection in a Target component.
Read the Mailchimp and MySQL topics to find out how to configure settings of the specific cloud app and database as well as view the Connections topic to know how to create a connection following several simple steps.
Creating Data Flow
We start by creating a data flow using the following steps:
-
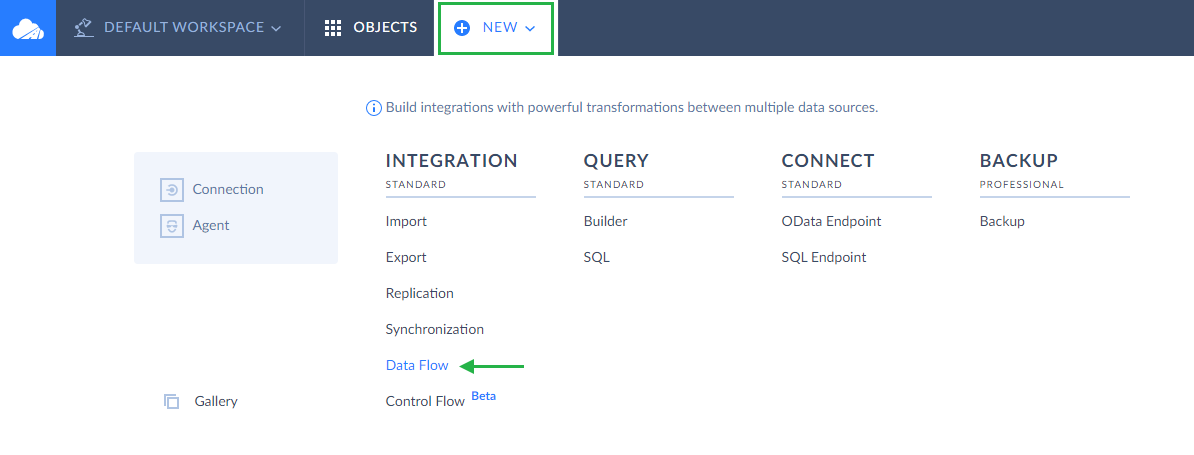
Click Create New in the top menu;
-
In the Integration column, click Data Flow;
-
In the open integration editor, rename your integration by clicking and editing the integration name. The default integration name is Untitled. Please note that if you omit this step, the integration name will remain Untitled in the list of created integrations.
Adding Source
Let's add the Source component that will query data from Mailchimp. Drag the Source component from the component list to the diagram. After this the Source details sidebar opens on the right.

In this sidebar, first we need to select the Mailchimp connection. Then we select the Execute query action.

After this we need to configure the query in the visual Query Builder. First, let's drag the ListMembers object from the connection object list to the Result Fields pane. Then click this object in the connection object list to expand the list of its field, and drag the ListID field to the Filters pane. Then enter the ID of the list to load subscribers from into the box on the Details pane on the right.
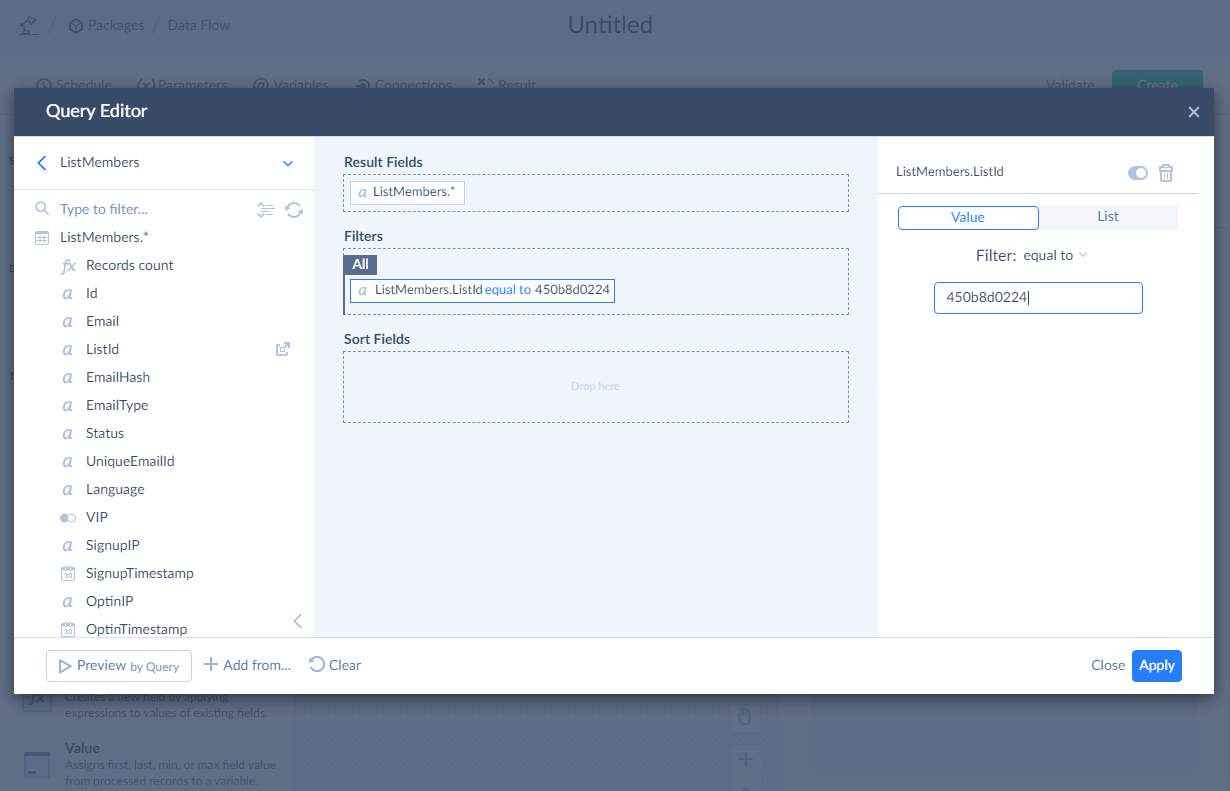
If you don't know a Mailchimp list ID, you can either get it in the Mailchimp itself or get it with the Skyvia Query tool.

Adding Lookup
After adding the source, we need to check whether the records are present in the target. For this, we will use the Lookup component. Let's add it to the diagram and connect the source output to the lookup input.

Let's select the MySQL connection and Lookup action. Then we need to select the target table, in our example it's listmembers. We will use Email as a lookup key because this column uniquely identifies a subscriber. As for the result column, let's select the SubscriberID column.
Then, we need to map the Email parameter in the Parameters list. Click  next to Email and, then, in the opened Mapping Editor window, click the Properties tab in the top right corner and select Email in the Properties list.

Lookup with the FirstOrDefault behavior, which is selected by default, puts input records to its regular output regardless whether it finds a match or not. For matched rows, the result columns are filled with the corresponding values from the lookup table, and if match is not found, they are filled with null values.
Adding Conditional Split
Now we need to split records that have a match in the target table and records with no match found. We will perform UPDATE for the records with a match, and INSERT — for records without a match. For this purpose, we can use the Conditional Split component. Drag it to the diagram and connect it to the lookup output.

Records, for which no match is found, have the null value in their SubscriberID column. So let's create a conditional output named Insert, for which we will specify the Condition: isnull(SubscriberID). Records, not matching this condition, are sent to the Default output, which is generated automatically.

Adding Target for Insert
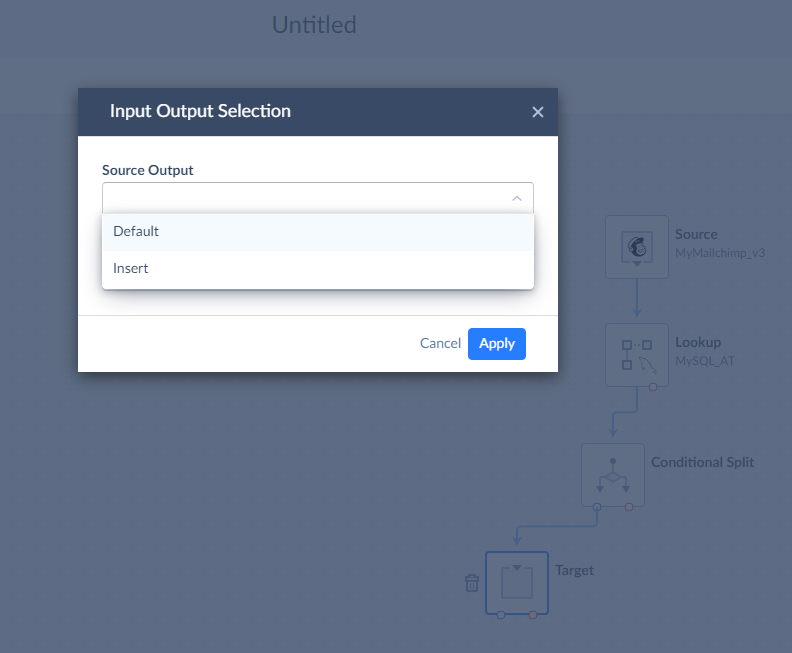
Drag the Target component from the component list to the diagram. Connect the Conditional Split component output to the Target component. When Skyvia asks, which output to select, select the Insert output.
First, we need to select our MySQL connection. After this, select Insert in the Actions list.
For the Insert action, we must select the table to insert to and map action parameters, which correspond to the target table columns. Let's select our listmembers table in the Table list and then select one of the parameters in the Parameters list to open the Mapping Editor.
In the Mapping Editor, first click the ![]() Auto Mapping button. It maps the action parameters to input properties with the same name automatically. Since corresponding columns have the same names in source and target, it maps all the parameters automatically.
Auto Mapping button. It maps the action parameters to input properties with the same name automatically. Since corresponding columns have the same names in source and target, it maps all the parameters automatically.

Let's also name this target component Insert to avoid confusion in future.
Adding Target for Update
After this, we need to add the Target component for updating records and connect it to the Conditional Split component output. Since only the Default regular output is not connected, Skyvia won't display the Input Output Selection dialog box this time.
Let's select the same MySQL connection and the Update action. Then we select the same listmembers table in the Table list. As for the lookup keys, we can use either Email again, or the SubscriberID column. Updating records by their SubscriberID is faster, so let's select SubscriberID.
After this, we only need to map the Update action parameters. For the purpose of our tutorial, we can just use automapping again. Select one of the parameters in the Parameters list to open the Mapping Editor and then click ![]() Auto Mapping.
Auto Mapping.
Let's also name this target component Update to avoid confusion in future.
Configuring Results Settings
To record the numbers of success and failed records, we need to count the success and error records in the data flow itself. We will use Row Count components to count the rows, store the numbers to variables, and use these variables in the Results Settings.
Variables
Let's start with adding variables. Click Variables on the toolbar. In the Variables sidebar, click the plus button. Enter the variable name, for example, SuccessInsert, and select Int64 in the Type list and then click Save.

Repeat these actions to add the FailedInsert, SuccessUpdate, and FailedUpdate variables.
Row Count Components
Now we need to add four Row Count components to the diagram. For each of the two Target components, connect one Row Count to the regular output (blue circle), and another — to the error output (red circle).
In each of the Row Count component connected to the regular output, select the corresponding success variable, and for Row Count component connected to the error output, select the corresponding error variable.

Result Settings
After we configured Row Count components, we need to set up the result settings. Click Result on the Data Flow editor toolbar to open the corresponding sidebar.
Here we need to specify what number to take as the number of success records, and what number — as a number of failed records. For the purpose of our tutorial, we can sum the number of successfully inserted and successfully updated records in the Success Rows box and sum the number of failed rows for inserting and updating in the Failed Rows box.

After this, the data flow is ready. If necessary, you can also add log objects and write error information to logs.
Other Integration Tools
A similar task of inserting and updating records can also be solved with a replication or an import with the UPSERT operation. However, data flow offers more flexibility. A replication can be used only to load cloud data to a database, and only if the table has the same structure as the cloud object. An import can load data to a cloud app as well as data flow. But data flow can be useful when you need to have different mapping for insert and update. For example, when you don't want to update certain columns that should be filled when creating a record.