How to Create Synchronization Task
After you have opened an integration details page either for existing integration or for a new one, click the Add new link or ![]() Edit button to open the Task Editor. Note that the integration should have valid source and target connection before creating or editing tasks. After the task editor is opened, perform the following steps:
Edit button to open the Task Editor. Note that the integration should have valid source and target connection before creating or editing tasks. After the task editor is opened, perform the following steps:
- If you want to synchronize several source cloud objects (or database tables) with one target object (or table) or vice versa, click the corresponding
 many-to-one or
  one-to-many buttons. If you synchronize one object or table from both sides, omit this step.
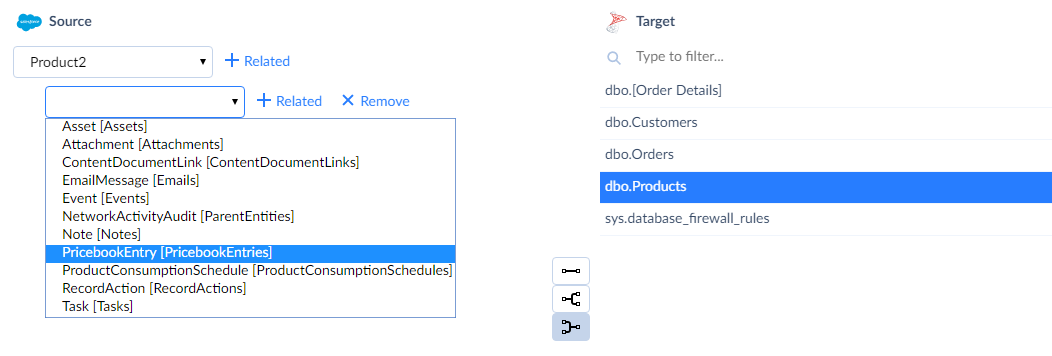
 - On a side with single object select the synchronized object from the list. If you perform one-to-one synchronization, do this for both sides. If you perform one-to-many or many-to-one synchronization, on the multiple side perform the following:
- Select the main object or table to synchronize data from the drop-down list box.
- Click the +Related button and select an object related to the main one in the new drop-down list box.
- Repeat the previous step until you add all the necessary related objects. Note that you can add not only objects related to the first one, but objects related to any of already added objects by clicking the +Related button near this object.
- Click Next step.
- Map target columns to the source data columns or expressions or lookup fields. The simplest way to import data is to map necessary target properties/columns to the source columns directly. For this, click a target property and then select the corresponding source file column in the drop-down list in the Source column. For more complex cases, when synchronized data has a different structure, see Mapping. Note that you should map at least the fields marked as Required. This mapping is applied when synchronizing target data with source data.
- Click Target to Source and configure mapping in the opposite direction. This mapping is applied when synchronizing source data with target data. Mapping can be different for different directions. For example, when source contains one column ‘FullName’, and target has two columns - ‘FirstName’ and ‘LastName’, you need to use different expressions for synchronizing source to target and target to source. When synchronizing target to source, you need to split the ‘FullName’ column values using the SUBSTRING function, and when synchronizing source to target, you need to concatenate values of two columns and add a space character between them.
- After you have mapped all the properties/columns you need, click Save to add the created task to the package.
For more information you can check tutorials How to Synchronize Product Data and How to Synchronize Zoho CRM Contacts with Mailchimp Subscribers.
When creating a one-to-many or a many-to-one synchronization task, it is possible to map a field on the One side first using the main table fields from the Many side, and after this select a related table from the many side, and map the same field on the One side using the related table fields from the Many side. This will result in the following behavior: when a record is created on the One side, first, the value based on the main table fields from the Many side is assigned to the field, and after this the record is updated, and this value is overwritten with the value based on the related table fields.