Filtering Data in Skyvia Query Add-in
Skyvia Query Add-in allows you to configure filters in Query Builder in order to filter queried data.
Skyvia Query Add-in supports three kinds of filters: value filters, list filters and relative filters. Value filters are supported for all field types. List filters are supported for fields with string data only. Relative filters are supported for the fields with date or datetime data only.
Adding Filter Condition
To add a filter condition, perform the following steps:
- In the Filters section, click
 .
. - In the first drop-down list, you need to select the object name to filter data by its field. By default, the current object, which is selected in the Object list, is used. You can also filter data by fields of its related objects.
-
In the second drop-down list, select the name of the field to filter the data by.
It’s not required that the field used in a filter is present in the returned data. You can filter data by any field of the object selected in the previous list.
-
In the third drop-down list, select the kind of the filter to use: value, relative, or list.
-
Value filters are the simplest ones. They simply compare the selected field with some value (or values) or check whether the field is null.
For example, the following filter checks if a string field “Type” begins with the word “Customer”:

-
Relative filters are available only for fields with date or datetime data. They check if the field value belongs to a time period that is relative to the current date. For example, whether the date belongs to current, next, or previous week, month, etc.
For example, the following filter checks if values of a datetime field “CreatedDate” belong to the previous month:

-
List filters are available only for fields with textual data. They allow you to specify a list of strings and to check if the field value belongs to this list.
For example, the following filter checks if a string field “Type” is equal to one of the list values:

To enter values, select them from the drop-down list.
-
-
In the third drop-down list select the comparison operator to use — equal to, not equal to, greater than, is null, etc. Note that different comparison operators are available for different field types.
- Depending on the selected kind of the filter, specify a value to correspond to, enter a list of values, or select a relative time period.
You can add as many filter conditions as you need.
To remove a condition, click ![]() next to the line of the corresponding condition on the right.
next to the line of the corresponding condition on the right.
AND and OR Filter Groups
By default, all the filter conditions are united with the AND logical operator. This means that a row must meet every filter condition to be retrieved to Excel for the web.
If you have several filter conditions and you want to query rows that match some of the query conditions, you may use OR operator instead. For this, click the drop-down list with And and select Or.
Adding or Removing Filter Groups
For more complex cases, conditions can be united into subgroups with their own AND or OR logical operators. Nested filter groups can contain their own nested filter groups and so on.
To add a condition group, click  button to the right of the parent group logical operator. After this you can add conditions and condition groups to the new condition group.
To remove a group from the filter, click ![]() next to the line of the corresponding group on the right.
next to the line of the corresponding group on the right.
Filter Example
We would like to show how to configure filters on a specific example. Let us suppose we need to get Salesforce accounts with Customer - Direct or Customer - Channel types added in the previous month.
We can do it in two ways — with usual value filters or with list and relative filters. Using relative and list filters in this case is more convenient, however we show both ways in order to demonstrate how to use value filters and filter groups.
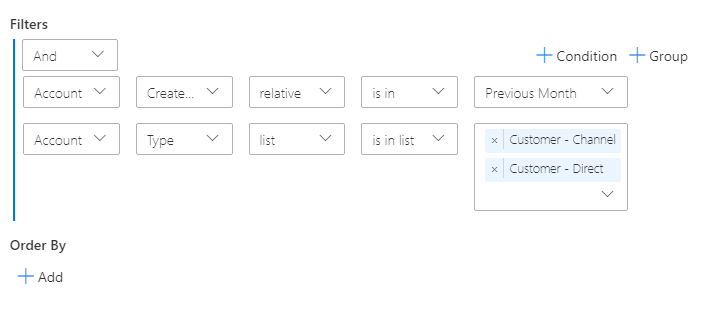
Example with Relative and List Filters
- If you are not logged in to Skyvia, log in. For this, hover over Skyvia Query and click Sign In.
- After this, in the opened window, enter your Skyvia credentials (email and password) and click Sign In again.
- In the Skyvia Query window, click
 .
. - In the topmost box of the Query Editor, select the connection to Salesforce.
- In the Object box, select Account.
- In the list below, select the Account fields to query.
- In the Filters section, click .
- In the first drop-down list of the condition, Account is already selected. In the second drop-down list, select CreatedDate.
- In the third drop-down list, select relative.
- In the fourth drop-down list, keep is in. In the rightmost drop-down list, select Previous Month.
- In the Filters section, click .
- In the first drop-down list of the condition, Account is already selected. In the second drop-down list, select Type.
- In the third drop-down list, select list.
- In the fourth drop-down list, keep is in list. In the rightmost drop-down list, select Previous Month.
- Then click Previous month in the Details pane.
- Enter Customer-Direct in the rightmost box and press Enter.
- Enter Customer-Channel in the rightmost box and press Enter.
That’s all, our query is ready. It looks like the following in the Query Editor:
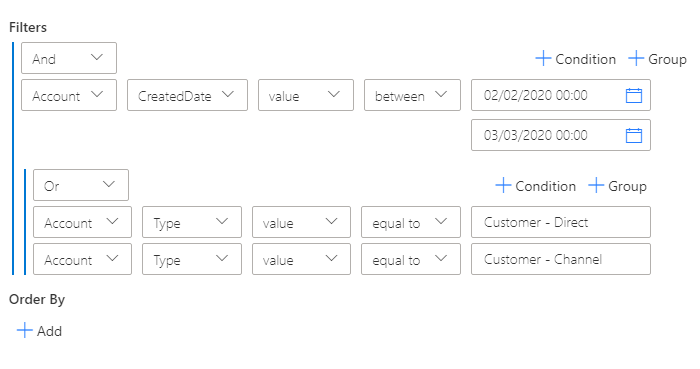
Example with Value Filters
- If you are not logged in to Skyvia, log in. For this, hover over Skyvia Query and click Sign In.
- After this, in the opened window, enter your Skyvia credentials (email and password) and click Sign In again.
- In the Skyvia Query window, click .
- In the topmost box of the Query Editor, select the connection to Salesforce.
- In the Object box, select Account.
- In the list below, select the Account fields to query.
- In the Filters section, click .
- In the first drop-down list of the condition, Account is already selected. In the second drop-down list, select CreatedDate.
- In the third drop-down list, value is already selected. In the fourth drop-down list, select between.
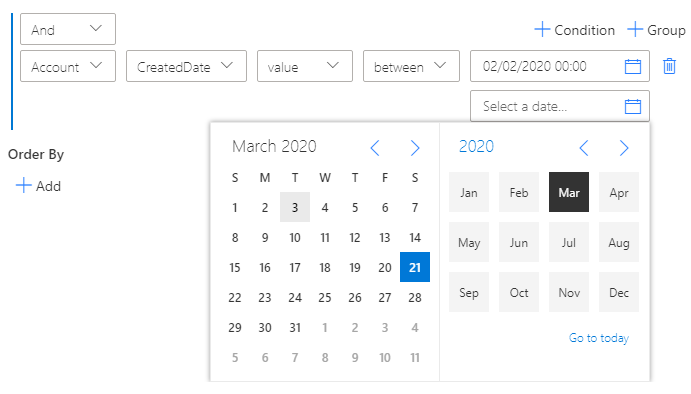
-
In the rightmost boxes, select the start and end date of the previous month.
- Now we need to specify the filter conditions for selecting records with Customer-Direct or Customer-Channel types. Note that we select records with any of these values, so we need to create a filter subgroup, which is satisfied if any of its conditions is met. Click the button.
- In the new group, click (the upper one).
- In the first drop-down list of the condition, Account is already selected. In the second drop-down list, select Type.
- In the third drop-down list, value is already selected. In the fourth drop-down list equal to is already selected. In the rightmost box, type Customer-Direct.
- Click in this group again.
- In the first drop-down list of the condition, Account is already selected. In the second drop-down list, select Type.
- In the third drop-down list, value is already selected. In the fourth drop-down list equal to is already selected. In the rightmost box, type Customer-Channel.
- In the drop-down list with the logical operator of this group, select Or.
After this our query is ready. It looks like the following in the Query Editor: