Restoring Data
When you need to restore data from a backup, open your backup and switch to its Snapshots tab. Then perform the following steps:
- Open the snapshot with the necessary data, browse its data, and select checkboxes for data you want to restore. You can select checkboxes for separate records or whole objects.
-
Click the Restore button and select the operation to apply for the selected data — Insert, Update, or Delete.
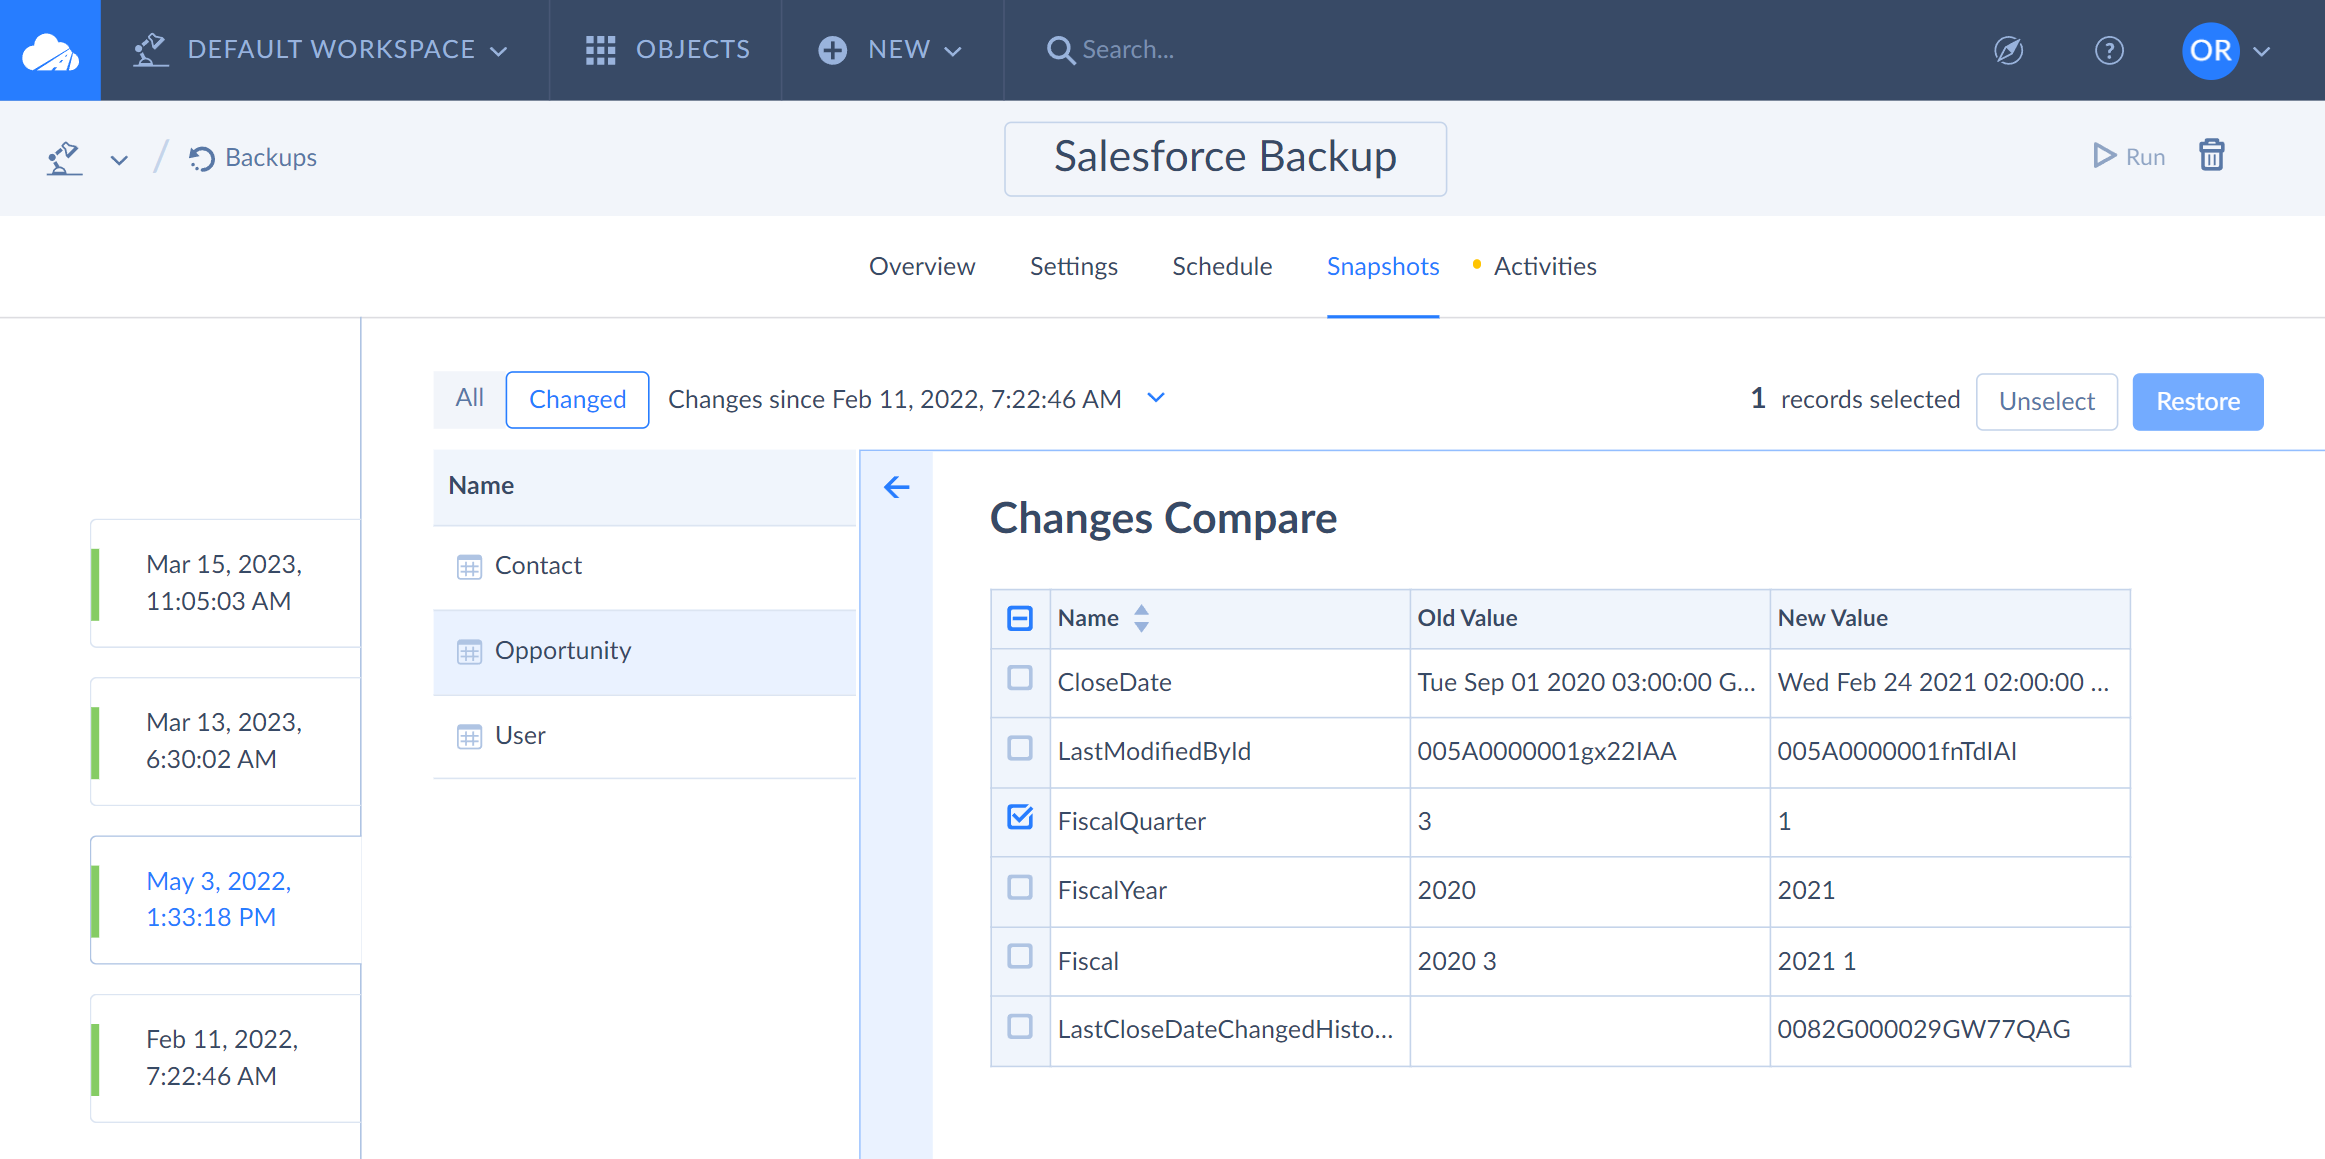
When restoring data while viewing data changes, you don’t need to select the operation manually. Skyvia selects the operation to apply that undoes the selected change:
- Inserted records are deleted.
- Deleted records are inserted.
- Updated records are updated with their previous values.
- For the Insert operation, you can optionally select another connection to restore data to in the Restore details dialog box. Then simply click Apply, and the data will be restored.
Restoring Related Data
Suppose you want to restore records with their relations, for example, the Salesforce account and all its contacts. You must select and restore all the required related records in one restore operation. If you restore them separately, the relations may be lost.
When a record is inserted in a cloud application, it gets a new Id value. When you restore the related records that reference it with an old backed up Id value, the relation cannot be restored using this old value. When you restore the related records in one operation, Skyvia retrieves the new IDs and builds relations between restored records. Skyvia cannot build relations between the records that have been restored separately.
Skyvia allows you to easily navigate by relations when browsing data and quickly select all the related records. Hover over the related record and click the ![]() button to open the related record details.
button to open the related record details.
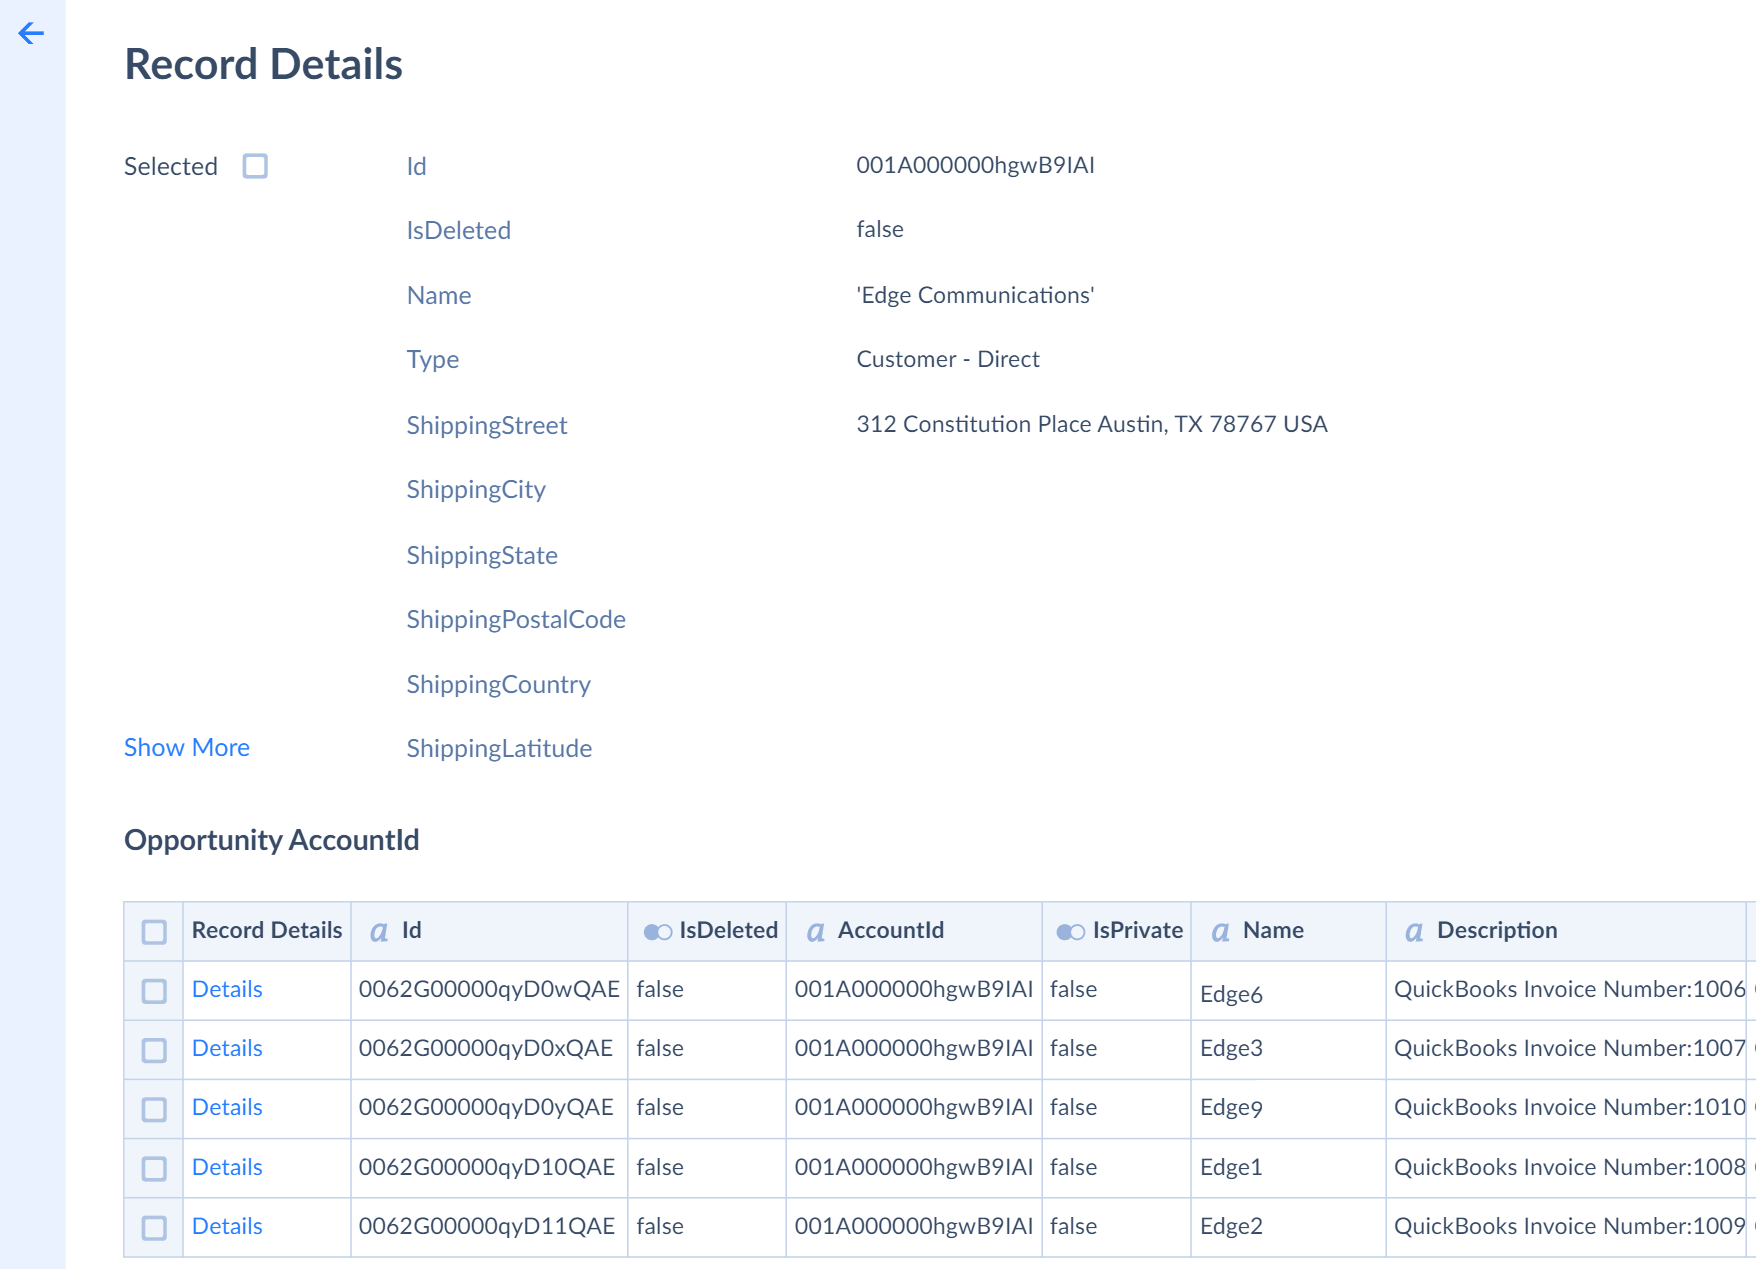
This page displays all its related Contacts and other records for an Account record. You can navigate to the details of these related contacts and see and select their related records. The foreign keys referencing parent records are displayed as links to their details, so you can easily navigate to them and select parent records, too. You can find more details here.
After you select all the necessary records, click Restore. Then select the operation to apply for the selected data - Insert, Update, or Delete and click Apply.
Finding and Restoring Specific Record
If you need to find and restore a specific record, you can use a backup search. Skyvia offers powerful data search functionality for your backups. You can search your backed up data by a fragment of one of its fields. For example, if you want to find a specific account in your backups, you can find it by a part of its name, address, phone, etc. You can find more information about backed up data search here.

Thus, you can easily find the necessary record and then use the Search in older backup/Search in newer backup buttons near the Search box to navigate to its newer/older versions to find the necessary version of the record. After you find it, select it and click Restore. Then choose the operation to apply for the selected data - Insert, Update, or Delete and click Apply.
Restoring Separate Field Values
Skyvia allows restoring even separate field values. If you made some undesired changes to a field and want to restore the previous value from the backup, you can do it in the following way:
- Find the necessary record using search as described here.
- Continue Search in older backup till you find the version of a record with the necessary value of the field you want to restore.
- Click the Search in newer backup button once to open a snapshot that was made after the change you want to revert.
- Click the Changed button to see the data changes. It should display the record as updated (with the
 mark).
 - Click the
 button to select the changed records.
 - Click Restore to revert the change.
Use this procedure for a case when an undesired change was made some time ago, several backups were already made since the change, and you don’t know which snapshot contains the necessary version of a record.
If you know exactly when the change was made, open the data of the necessary object in the first snapshot made after the change, find the necessary record using the Search button, and proceed directly to step 4. If no snapshots were made after the change, you will need to create one first.
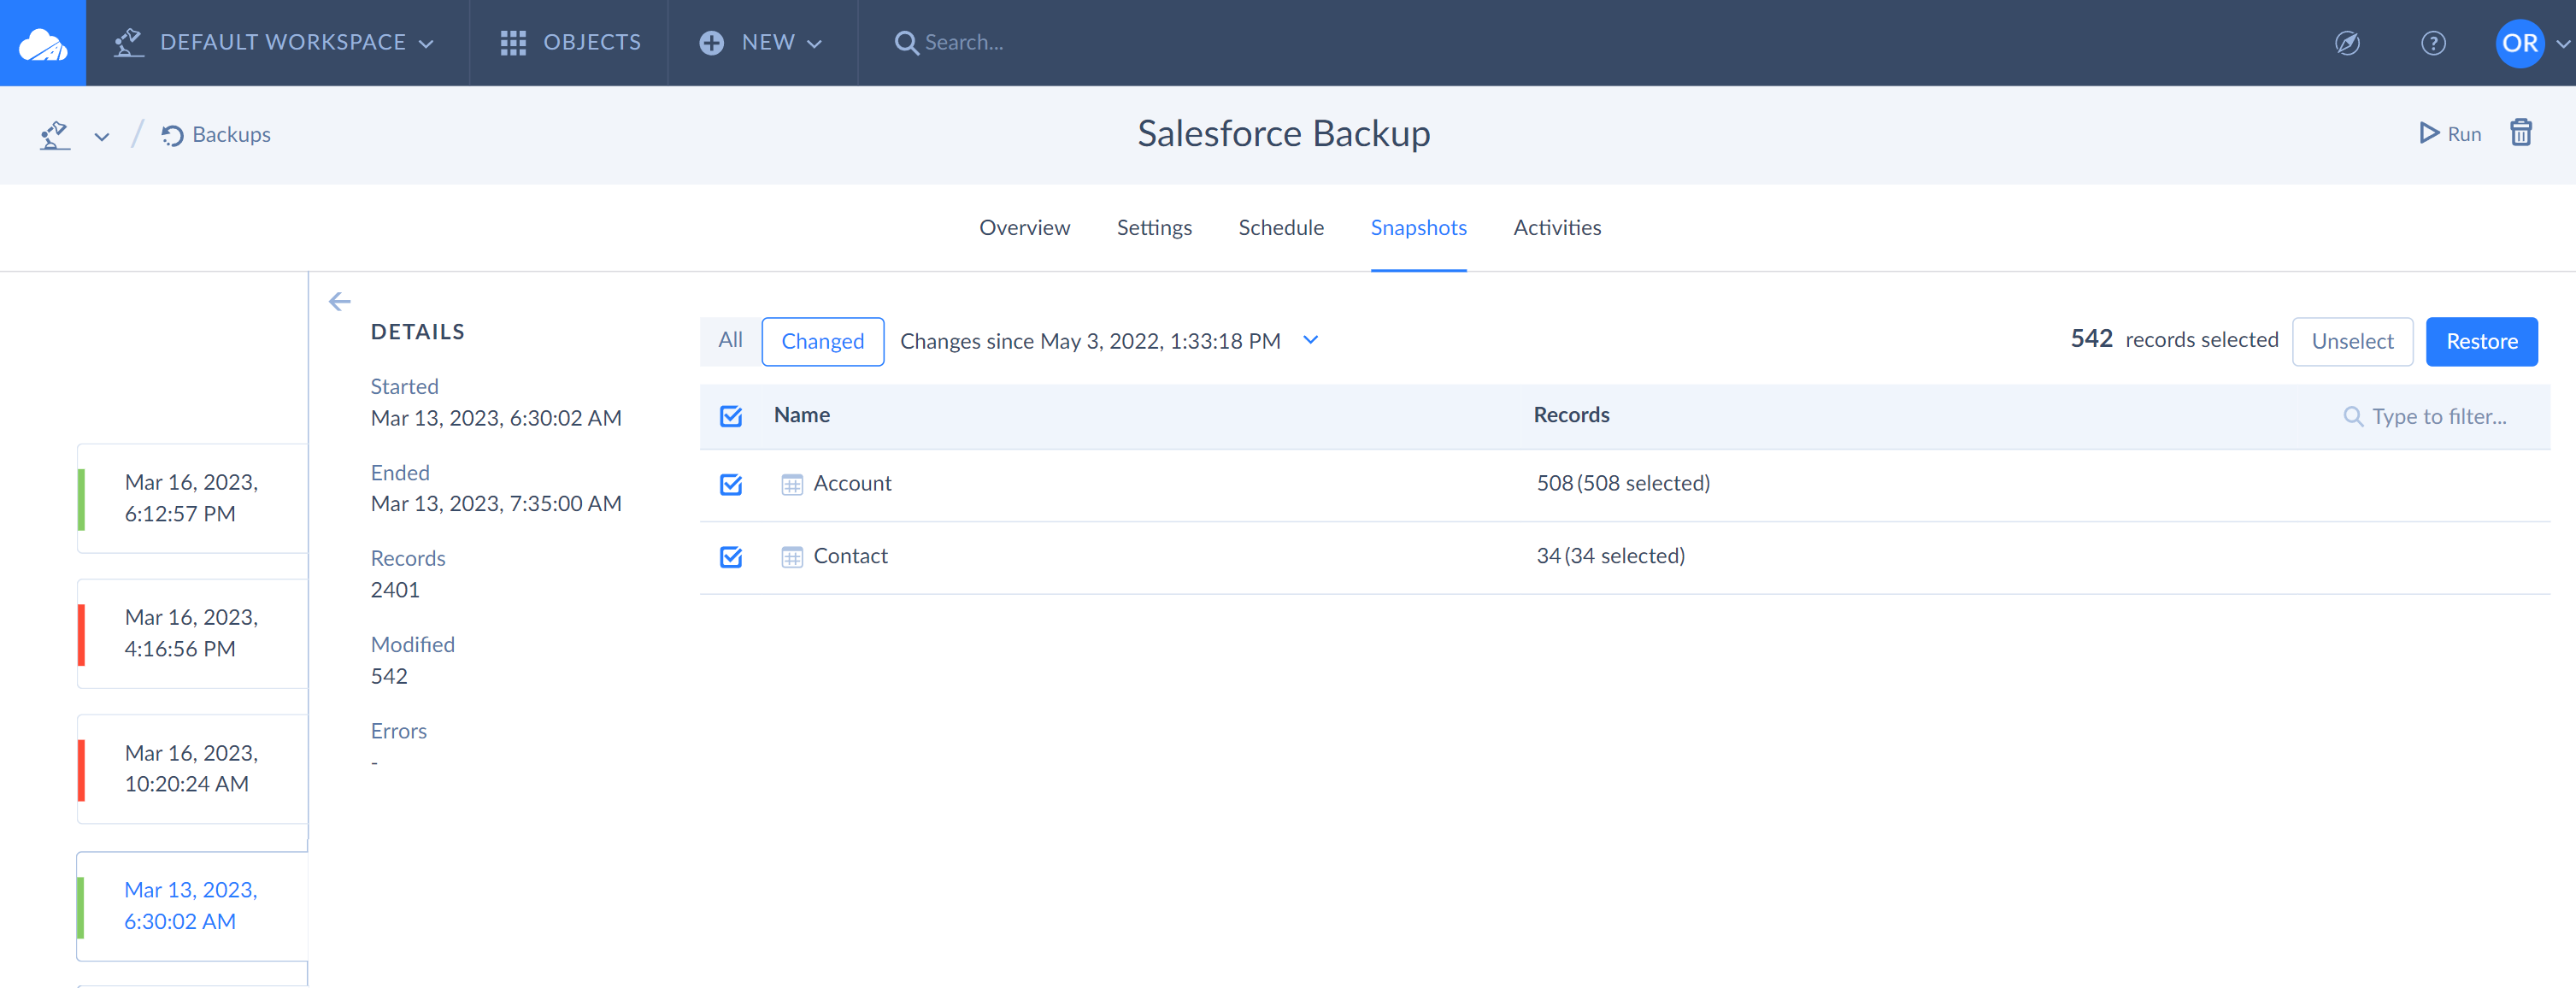
Bulk Restore
You can restore all the records in a specific object, or all backed up objects from your backup. When viewing snapshot details, you can select checkboxes for the backed up objects. Then, you can click Restore and select the operation to apply to the records. To select all the objects, select the checkbox in the header of the grid.
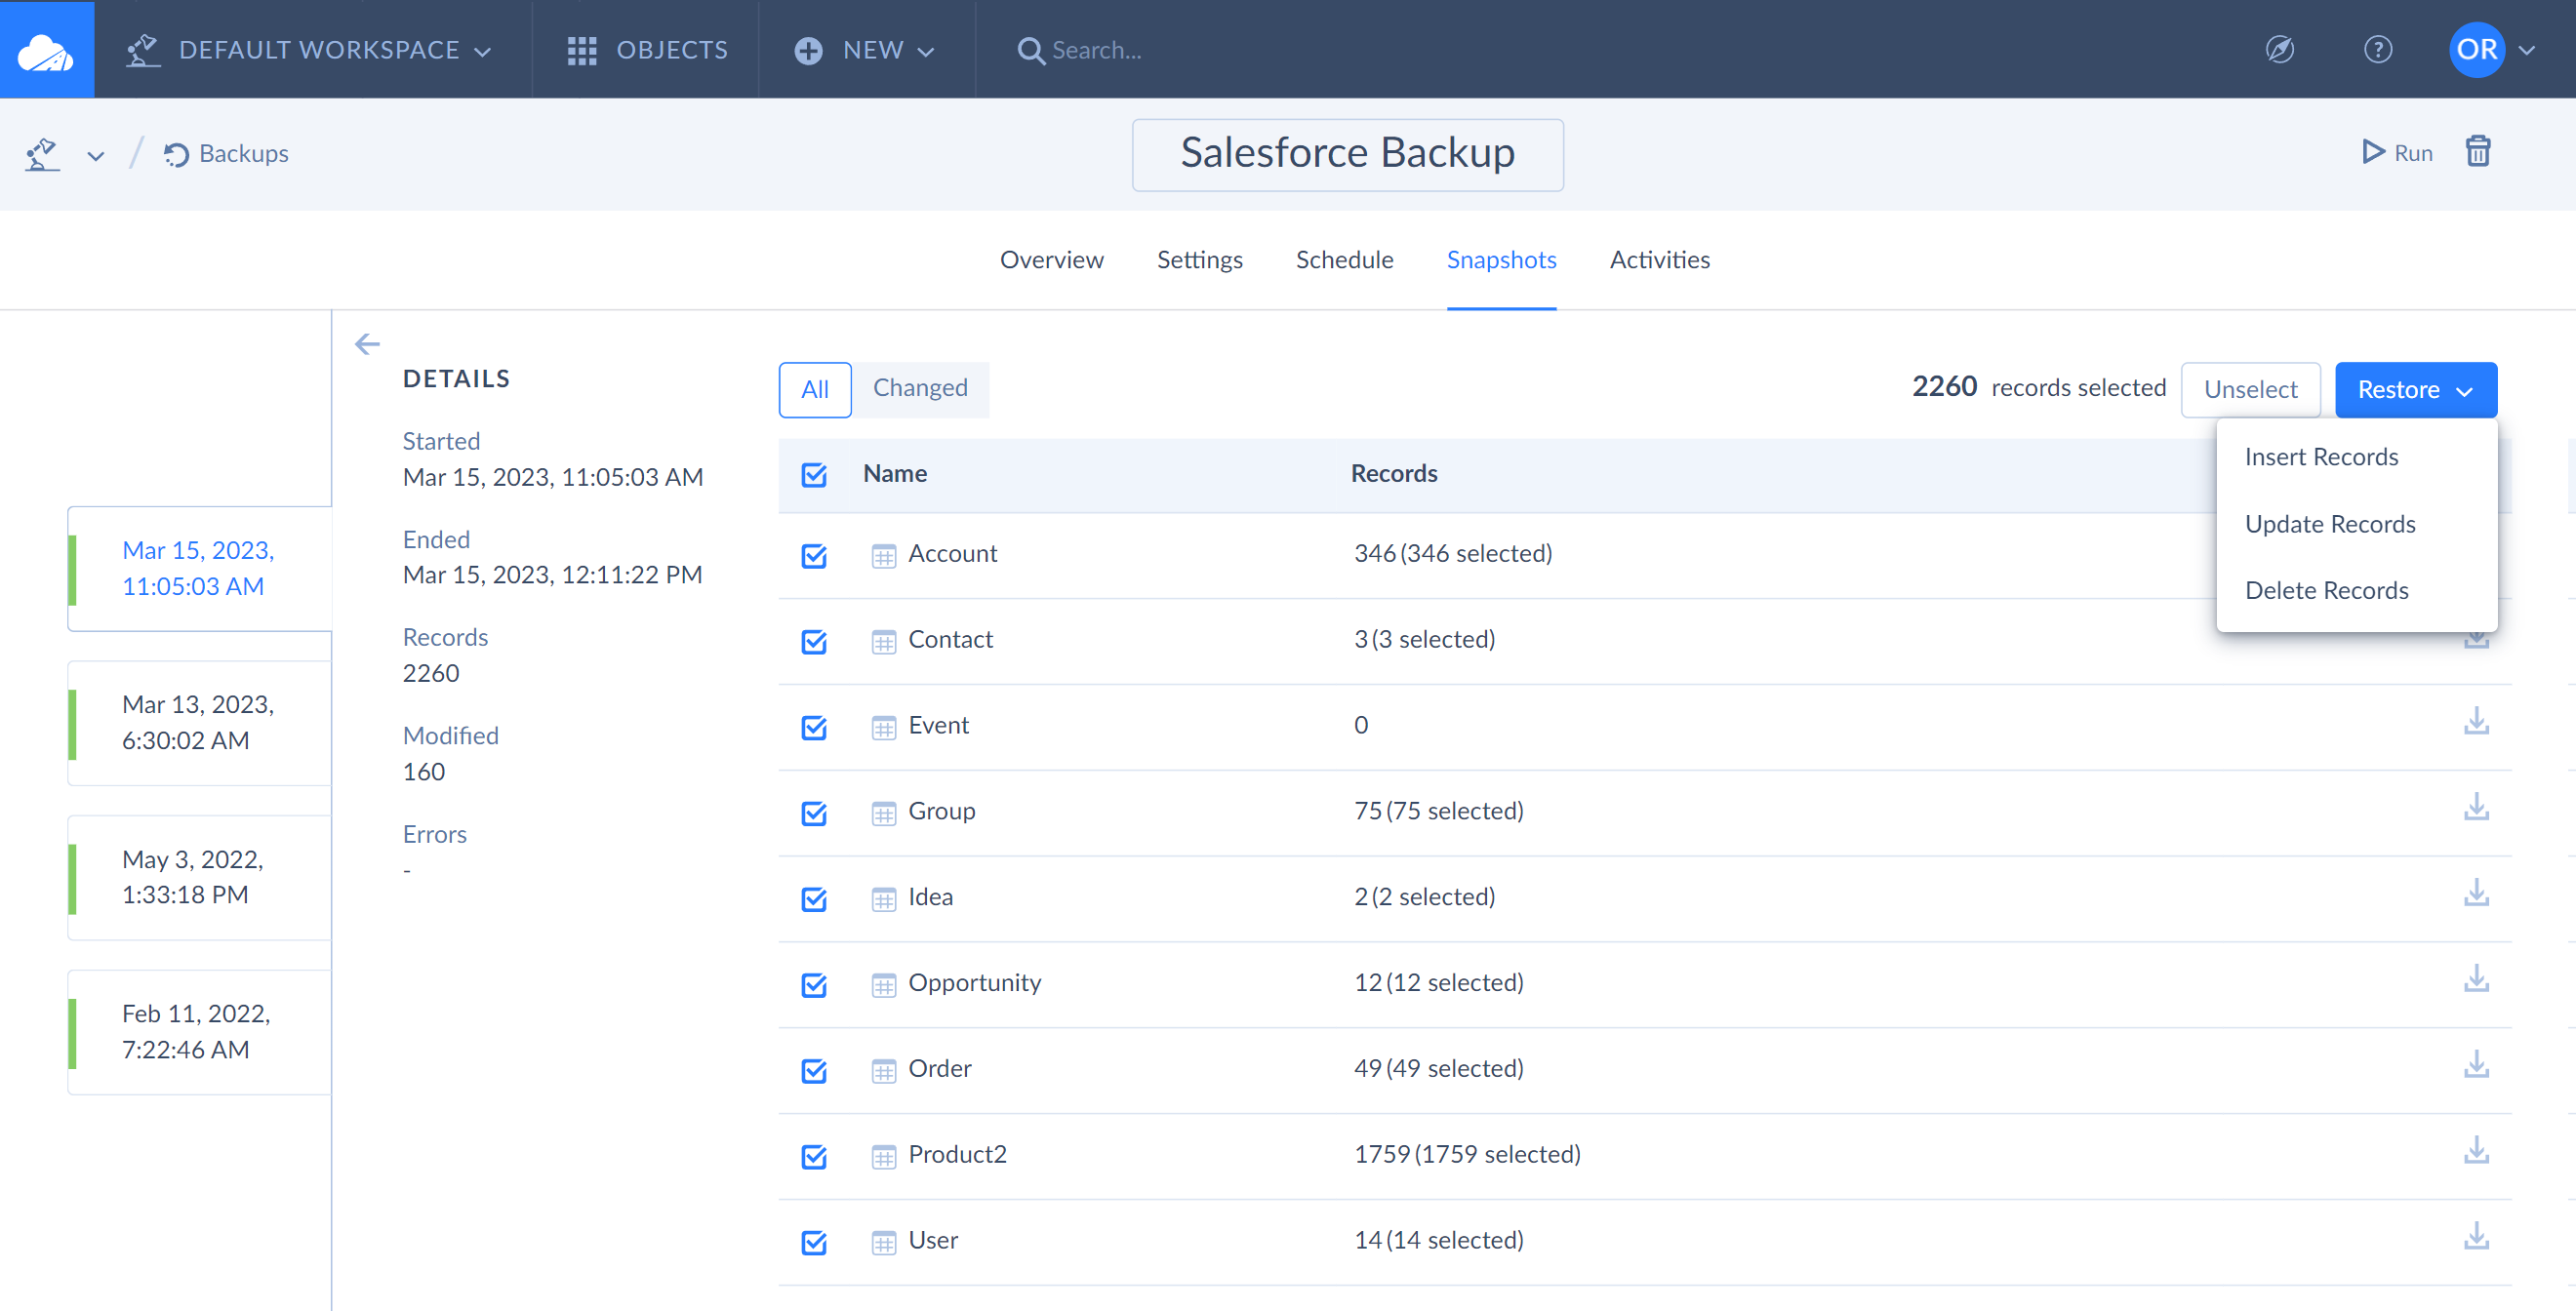
Skyvia only performs the selected actions for selected backed up data. It does not restore the data in the source to its original form completely. For example, it does nothing to the newly created records that haven’t been backed up yet.
If you want to restore all the data or a specific object to a point in time when one of your snapshots was made, you can do it in the following way.
- Create a new snapshot. Restore in Skyvia won’t affect the records that are not backed up yet. If you want to restore data to the previous point in time, you need to have all the data backed up.
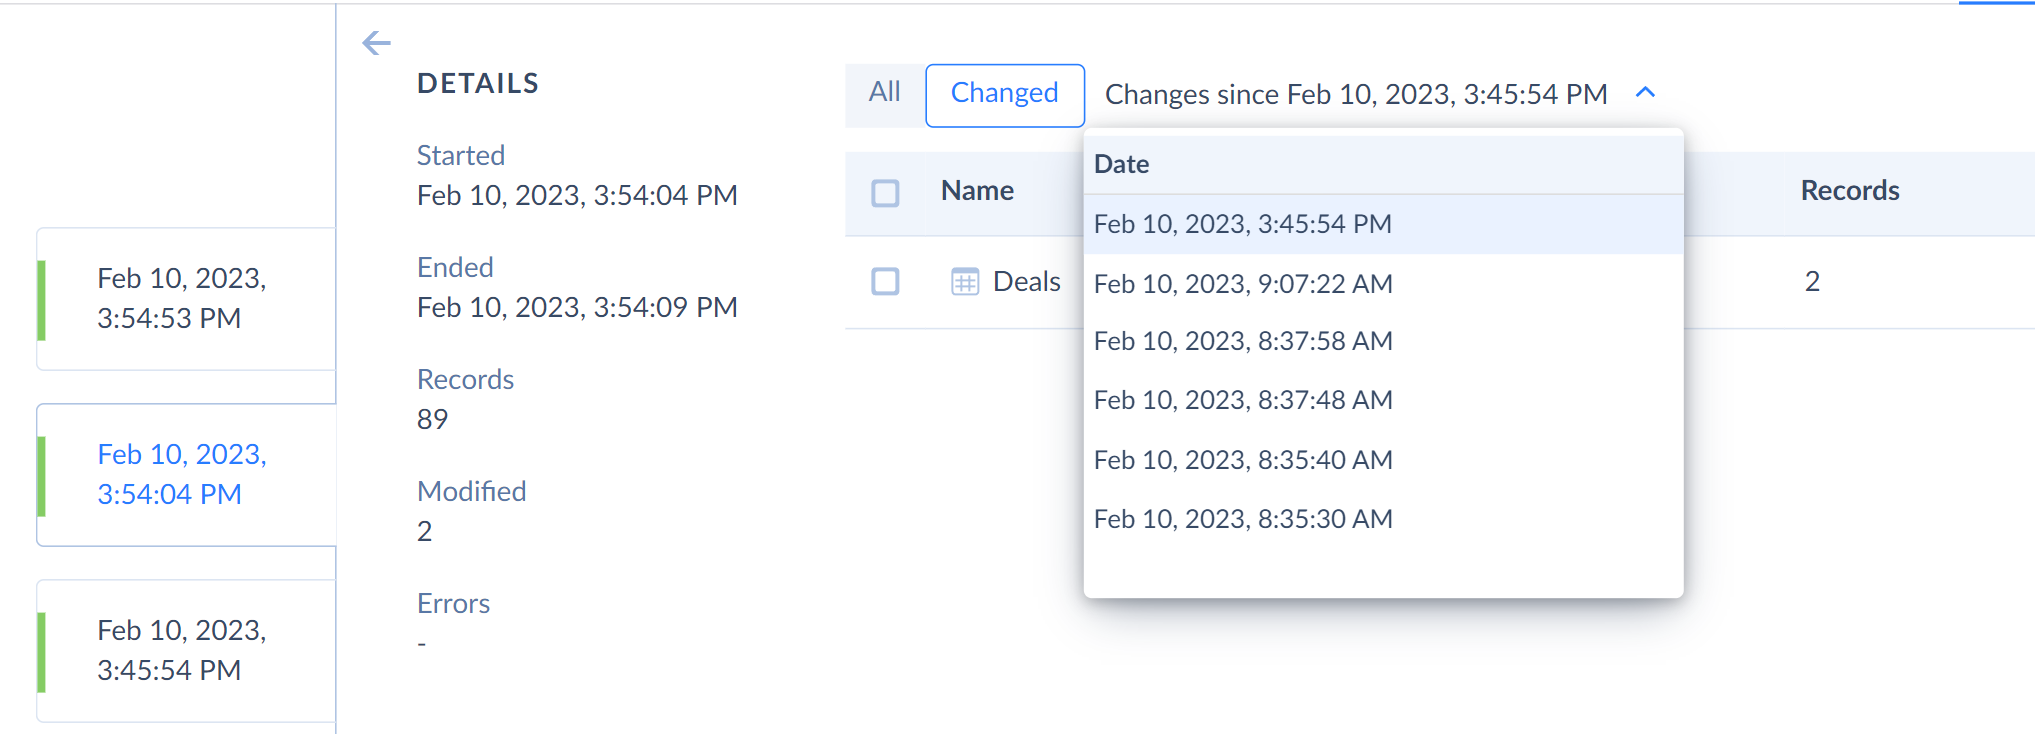
- Make sure that the snapshot for the date you want to restore data to is displayed in the list of the snapshots. If it is not displayed, make sure that the All time period is selected on the Snapshots tab, and scroll down till you see the required snapshot.
- After you see the required snapshot, scroll up to the most recent snapshot and click it.
- Click the Changed button.
-
From the drop-down list on the right, select the date/time of the snapshot you want to restore data to.
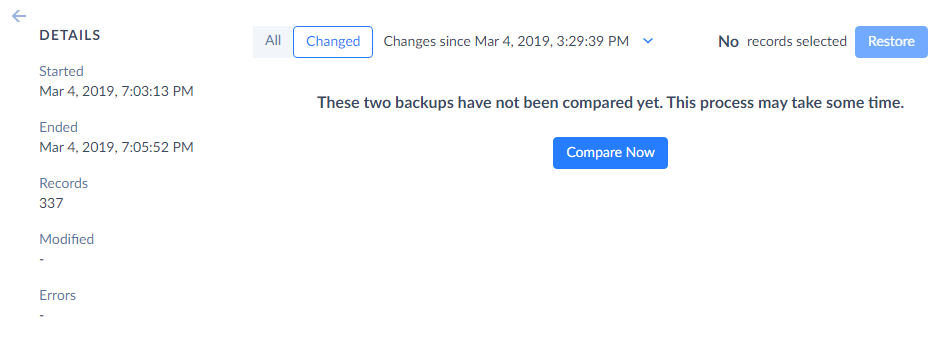
-
If this backup pair was never compared, the corresponding message is displayed. Click the Compare Now button to compare backups. Note that it can take some time if there is a lot of data backed up.
-
Select the checkbox for the corresponding object or all the objects and click Restore. Then click Apply.
Restoring Data to Other Connections
Skyvia allows you to restore data from a backup to another connection. It must be another connection of the same cloud application. For example, if you have backed up data from Salesforce, you can restore them to another Salesforce organization but not other cloud applications.
Select the necessary data to restore data to another connection and click Restore. Then click Insert Records and select a connection to restore data.
Selecting a connection is not available for Update and Delete operations or when viewing and undoing data changes (using the Changed view).
More Complex Scenarios
If you need to perform even more complex restore operations, for example, use Upsert or restore only records that meet some criteria, you can use Skyvia’s Data Integration functionality with your backed up data. You can create a connection to your backed up data and then configure an Import that loads data from your backup to your data source. Import provides advanced functionality such as source data filters, expressions, all DML operations support including UPSERT, and many others.