How to Perform UPDATE and DELETE
Skyvia supports not only INSERT operation for data import, but also UPSERT, UPDATE, and DELETE.
To create an import task that performs UPDATE or DELETE, configure source settings and click Next step as usually. Then, in target settings, selected the target object on the Target Definition page, and click Delete or Update. After this, in Mapping settings, map the target columns.
Skyvia will determine the records to update or delete by their ID/primary key values. This means that primary key columns must be mapped. They are marked as Required for the DELETE and UPDATE operations. In fact, for DELETE, you only need to map ID (primary key) columns. For UPDATE operation you also need to provide values for the columns you want to change the value of, and you can additionally map any target object columns.
Skyvia requires the target table/object to have either a primary key or a unique column for the UPDATE or DELETE operations.
What if ID/Primary Key Values Are Unknown?
When ID/Primary Key values are known and present in the source, you can simply specify them using column mapping. However, Skyvia allows performing UPDATE or DELETE operations even without knowing ID or primary key values in the target.
When you don’t have target IDs in the source, you can specify them via the Lookup Mapping and get the IDs or primary key values from the target object itself by some other field or a set of fields that uniquely identifies a record.
Alternatively, you can use Export or Query to retrieve the necessary ID values.
Google BigQuery Specifics
Google BigQuery does not have unique or primary keys, but Skyvia still supports UPDATE or DELETE operations for it. You can specify the fields, which will be considered key fields, manually.
If target of an import package is Google BigQuery, after you select the INSERT or UPDATE operation in the task editor, the Key Columns box is displayed. Click this box to display the list of the target table columns. Select a key column from this list.
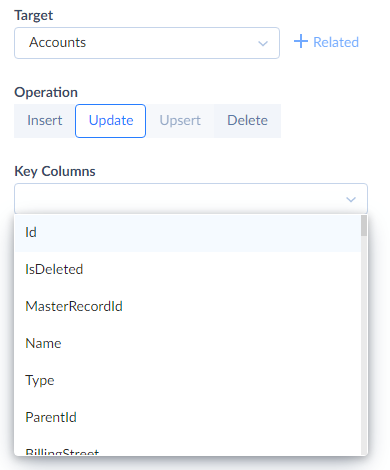
If you need to use a key of more than one column, repeat the operation. To remove a selected column from the list of key columns, click its Сross button.
Example: Updating Product Prices in Salesforce
Suppose we need to update product prices in Salesforce standard pricebook, and we only have a CSV file with product names and prices, without knowing the IDs of the corresponding PricebookEntries. Knowing the Pricebook2 ID value and product name, we can uniquely identify the PricebookEntry to update. We use the lookup mapping for the ID field, using these two fields as lookup key columns. The product names (which are stored in the PricebookEntry Name field) are specified as source column values. To retrieve the Pricebook2Id value of the standard pricebook, we will use a second-level lookup on Pricebook2 object to retrieve the ID value by the pricebook name.
Creating a Package
- Click +NEW in the top menu.
- In the Integration column, click Import. The import package details page will open.
- Rename your package by clicking and editing the package name. The default package name is Untitled. Please note, if you omit this step, the package name will remain Untitled in the list of created packages.
- Under Target, in the Connection list, click Select target and select Salesforce connection from the drop-down list. If you have not created the connection yet, see the Salesforce topic.
- Click the Add new link.
Configuring Source
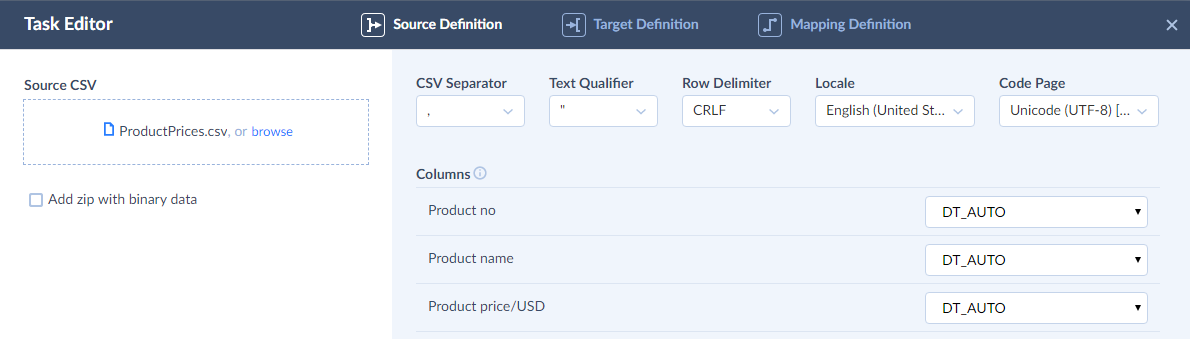
- Drag the source CSV file to the drop here your file, or browse area.
- Configure CSV Options if necessary.
-
Click Next step.
Configuring Destination
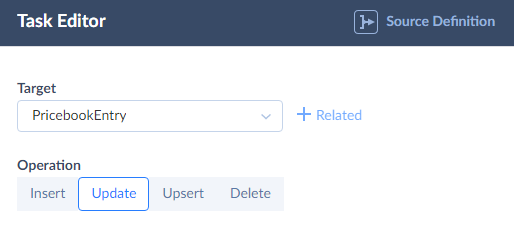
- In the Target list, select PricebookEntry.
- Click Update.
-
Click Next step.
Configuring Mapping
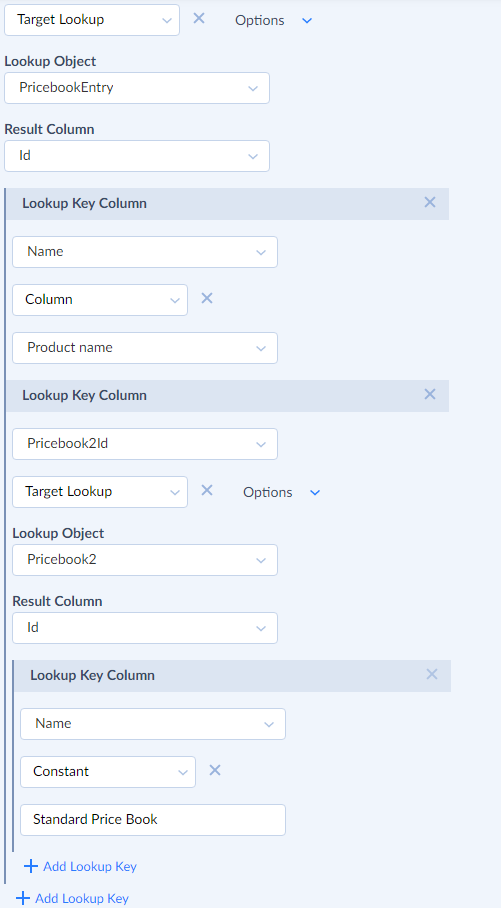
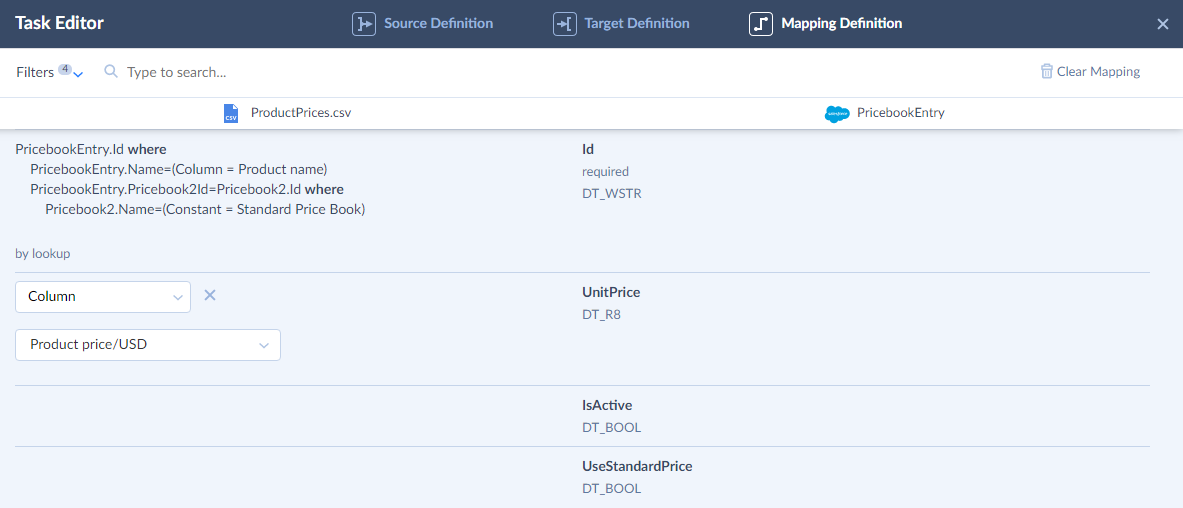
First we need to map the Id column of the PricebookEntry. We can uniquely identify the necessary pricebookentries by the product names, which are stored in the Name field of the PricebookEntry table, and by the PricebookId field. So, we will use lookup of these two columns to map the Id field. In case we do not know the Id of the standard pricebook, we can use a second-level lookup on Pricebook2 object by the name “Standard Price Book”.
- Click Id.
-
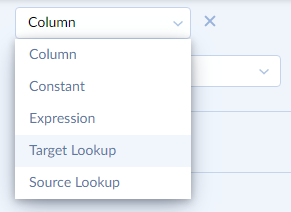
Click Column and then click Target Lookup.
- In the Lookup Object drop-down list, select a target object to get the value from (in our example, the same PricebookEntry table).
- In the Result Column drop-down list, select a column from the Lookup Object to get the result value for the mapped target column from (in our example, Id).
- In the Lookup Key Column drop-down list, select the target lookup key column (in our example, Name).
- In the bottommost drop-down list (under the Column drop-down list), select the column with product names (in our example, Product name).
- Click the +Add Lookup Key link at the bottom of the mapping area.
- In the Lookup Key Column drop-down list, select the second lookup key column (in our example, Pricebook2Id).
- In the Column drop-down list, select Target Lookup.
- In the new Lookup Object drop-down list, select a target object to get the value from (in our example, the Pricebook2 table).
- In the new Result Column drop-down list, select a column from the Lookup Object to get the result value for the mapped target column from (in our example, Id).
- In the new Lookup Key Column drop-down list, select the lookup key column (in our example, Name).
- In the new Column drop-down list, select Constant.
-
In the box under it, enter “Standard Price Book” (without quotes).
- Click UnitPrice below.
-
Select the Price column in the corresponding drop-down list.
After this, the import task is ready. Click the Save button to save the task. Now you can run it and update prices for the products.