OData Endpoints
Skyvia Connect is an OData-server-as-a-service product that allows you to quickly and easily expose your data from various sources via OData REST API and make it available in JSON or XML format over the web. It allows you to easily create OData endpoints in convenient GUI, configure them visually, and get a ready-to-use OData endpoint URL, which you can connect to in OData consumer applications and services immediately. You don’t need to care about OData server hosting, deployment, and administration at all.
OData Protocol
OData is a widely accepted open standard protocol for data access over the Internet. It provides queryable and interoperable RESTful APIs for working with data. It allows bi-directional data access with full CRUD support over the HTTP protocol and it provides a query language via specially constructed URLs and full metadata information.
OData standard is developed by OASIS. You can find more information about the OData standard and more useful OData tools and resources on www.odata.org.
Skyvia Connect allows creating OData endpoints, compatible with OData v1 - v3, or with OData v4. You can see the list of supported OData features along with examples of OData protocol request you can use against Skyvia Connect endpoints in the Supported OData Protocol Features topic.
OData Server
OData server is a software that provides access to data via OData protocol. It accepts OData requests and returns or modifies data accordingly to these requests.
If the data of this server must be accessible from the Internet, the server must be hosted somewhere, have a static IP, a domain registered, and a certificate for secure data access.
Being OData-server-as-a-service, Skyvia solves all these challenges without any need of user interaction. All you need is to select what data to publish via an OData endpoint, and Skyvia will take the rest. It provides you with a ready-to use OData endpoint link. The service is hosted on the endpoint.skyvia.com subdomain and uses this subdomain certificate. All the deployment and administration tasks are performed by Skyvia engineers, who has taken care about everything needed.
OData Endpoint Basics
In Skyvia Connect you create OData endpoints by selecting objects to expose from a data source connection, and selecting fields to expose data from. Data, exposed by OData endpoint can be described by entity data model. The main concepts of OData Entity Data Model are entities, entity types, and entity sets, relations, actions, and functions.
Entities are instances of entity types. Entity types are named structured types, having a key (a property or several properties that uniquely identify entities). Entity types have named properties and navigation properties, which represent relationships between entities. Entity sets are named collections of entities.
Actions and functions are currently not supported in Skyvia.
Creating OData Endpoints
OData endpoints can be created using either Simple mode or Advanced mode.
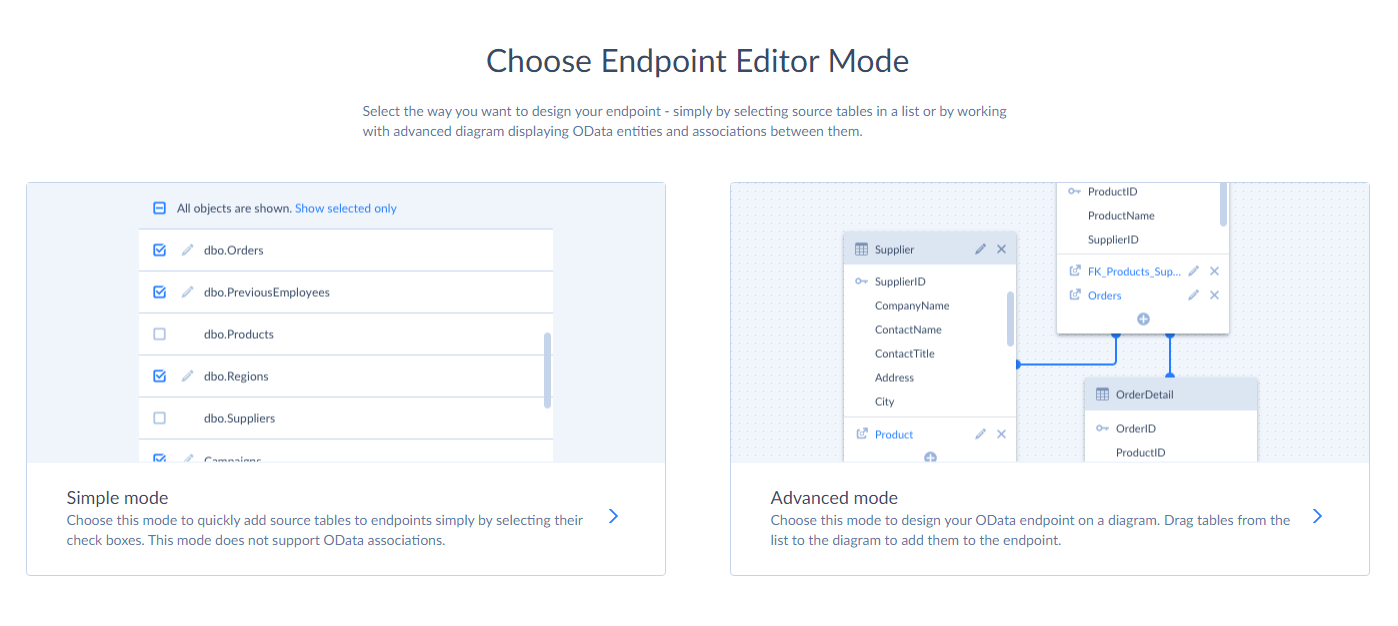
The Simple mode allows you to quickly and easily select data source objects to publish data from. If necessary, you can configure entities in more details. It does not create any relationships between OData entities. See the detailed procedure of creating an OData endpoints in the How to Configure OData Endpoint in Simple Mode topic.
In the Advanced mode you drag data source objects from the object list to the diagram. Skyvia generates the corresponding entity set and entity type, and adds the relations (associations) between added entity types based on the relations between data source objects. The Advanced mode allows not only adjusting entities, but also customizing associations between entity types. See the detailed procedure of creating an OData endpoints in the How to Configure OData Endpoint in Advanced Mode topic.
Note that the mode you select cannot be changed. For example, after you create an OData endpoint in the Simple mode, you won’t be able to edit it in the Advanced mode and add associations to it. When you edit an existing endpoint, its Model tab uses the same mode that was used when creating the endpoint.
Working with Created Endpoints
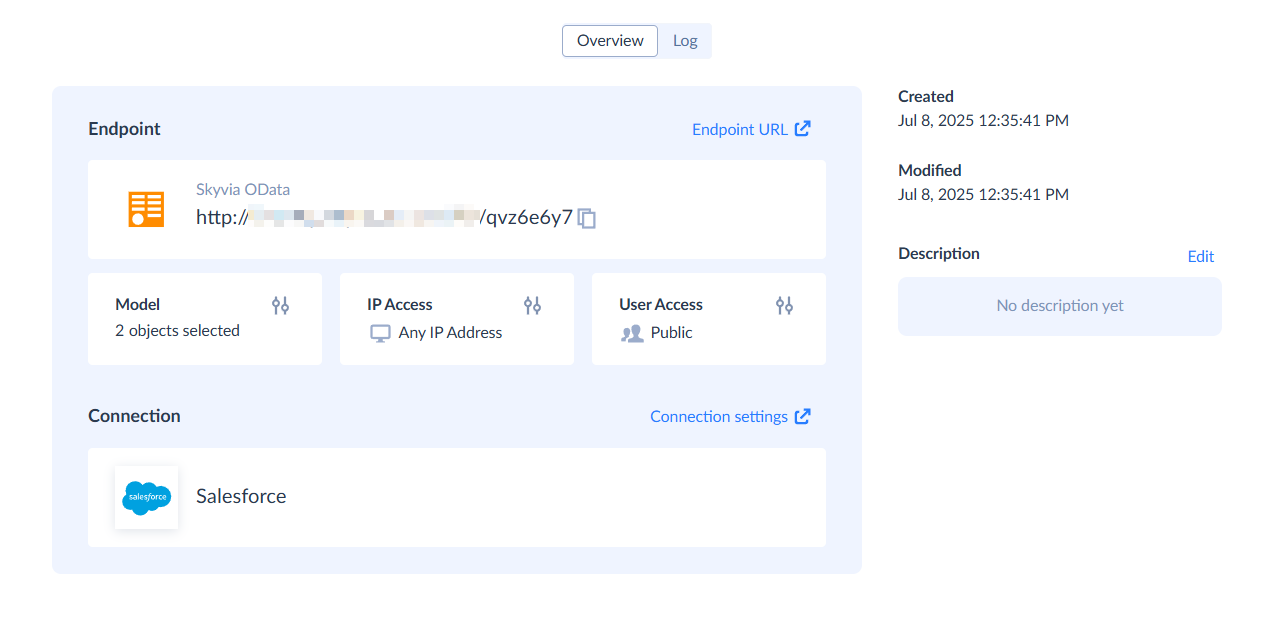
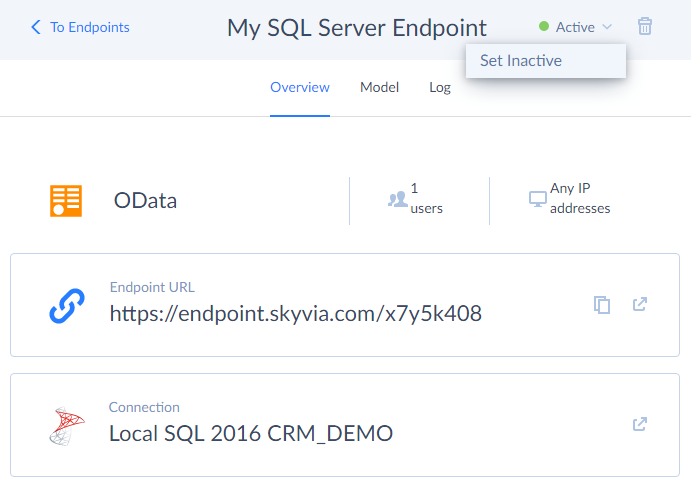
After you create an OData endpoint, its details open automatically. The detals consist of three tabs: Overview, Model, and Log. You can immediately copy the endpoint URL and use it in your OData consumer applications.
Using Created Endpoint
The Overview tab displays basic endpoint information (endpoint kind - OData or SQL, endpoint connection, numbers of endpoint users and IP address ranges) and the result endpoint URL.
Endpoint URL leads to the OData endpoint with the selected version of OData protocol. You can also access the endpoint via specific OData protocol version by adding odata3/ or odata4/ to the result endpoint URL. You can quickly copy the URL or open it in the new tab, using the corresponding buttons.
If your endpoint is valid, and it does not use features, not available in your Connect pricing plan, it is activated immediately, and you can copy and use the endpoint URL in your OData consumer applications. Whenever necessary, you may change the status of your endpoint to Inactive or back to Active in the endpoint title bar or via the corresponding quick action button in the object list.
However, you can save an endpoint even if it is invalid (for example, does not have any entity). Such endpoint is considered a draft endpoint. If your endpoint is invalid (is a draft) or uses features, not available in your pricing plan, it is created inactive, and it cannot be activated till you fix it (for a draft endpoint) or upgrade your connect subscription to a plan, which includes the necessary features.
Editing Created Endpoint
The Model tab allows you to edit the endpoint whenever necessary. You can add or remove entities, configure them, edit associations between them (if the endpoint was created in Advanced mode), change the default OData version and endpoint access mode from the toolbar. The changes are immediately applied when you click the Save button on the toolbar.
To modify the endpoint security settings, switch to the Overview tab and click the down arrow buttons near the information about users and IP addresses.
Monitoring Endpoint Activity
The Log tab allows you to monitor all the data access via the endpoint. Check the Monitoring Endpoint Activity topic for more details.