Configuring Replication
Replication is a specific kind of an integration, which helps you simply and easily replicate cloud data to relational databases or cloud data warehouses on an ongoing basis with the minimum necessary configuration. Replication offers dynamic, continuous, incremental delivery of high volumes of data with very low latency.
Creating a Replication Integration
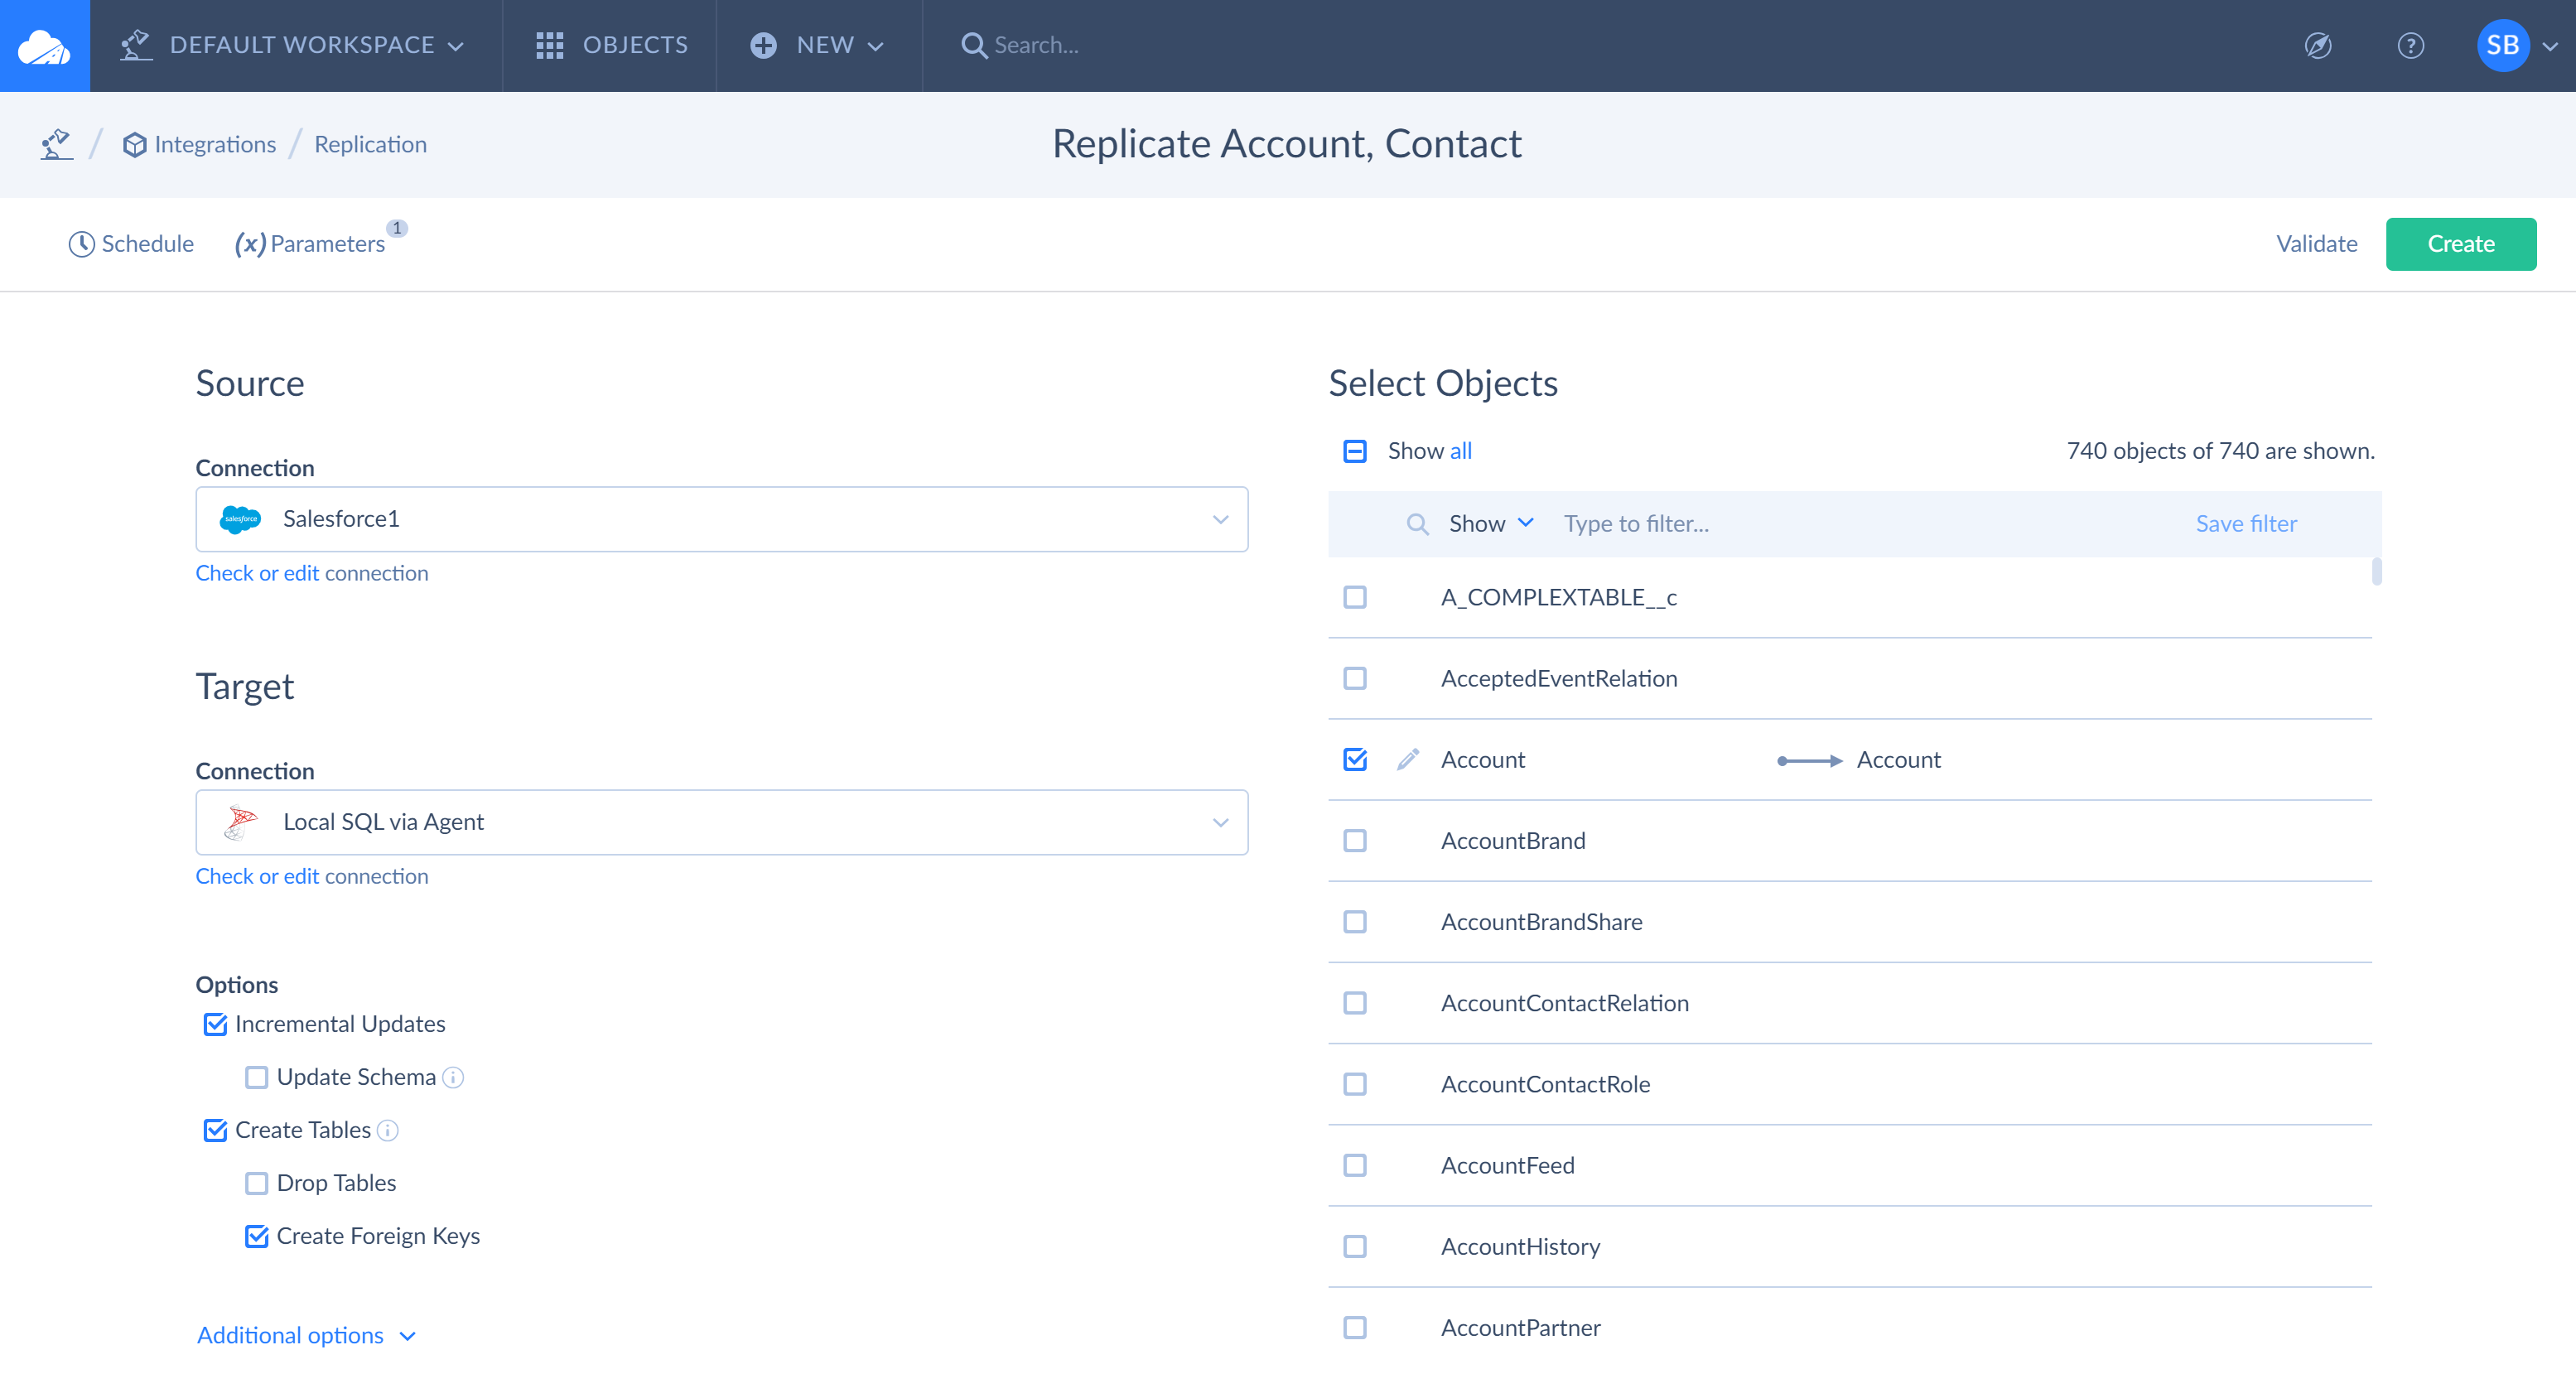
To create a replication integration, click + Create New in the top menu and select Replication in the Integration column. When the replication details page opens, perform the following steps:
- Specify a source connection you replicate data from and a target connection you replicate data to;
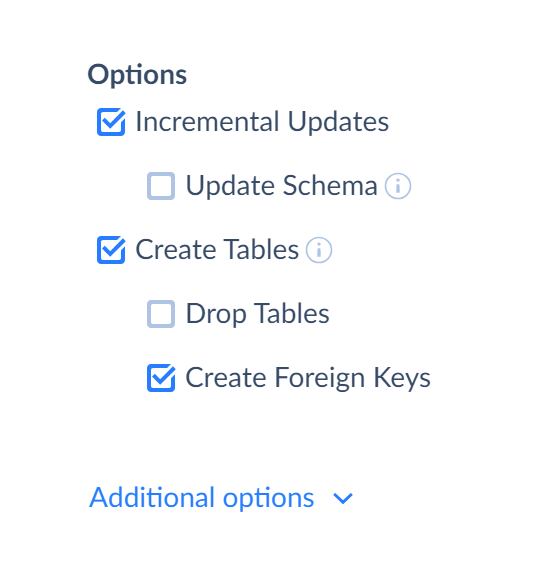
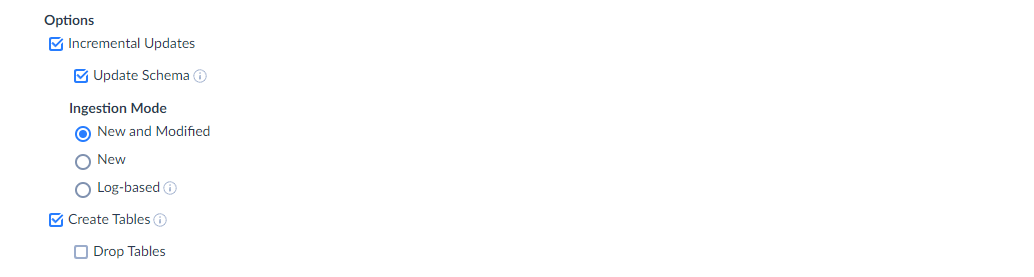
- Specify the necessary Options — Incremental Updates, Update Schema, Create Tables, Drop Tables, Create Foreign Keys;
- Select objects from the source list;
- Optionally schedule replication for automatic execution.
Creating Source and Target Connection
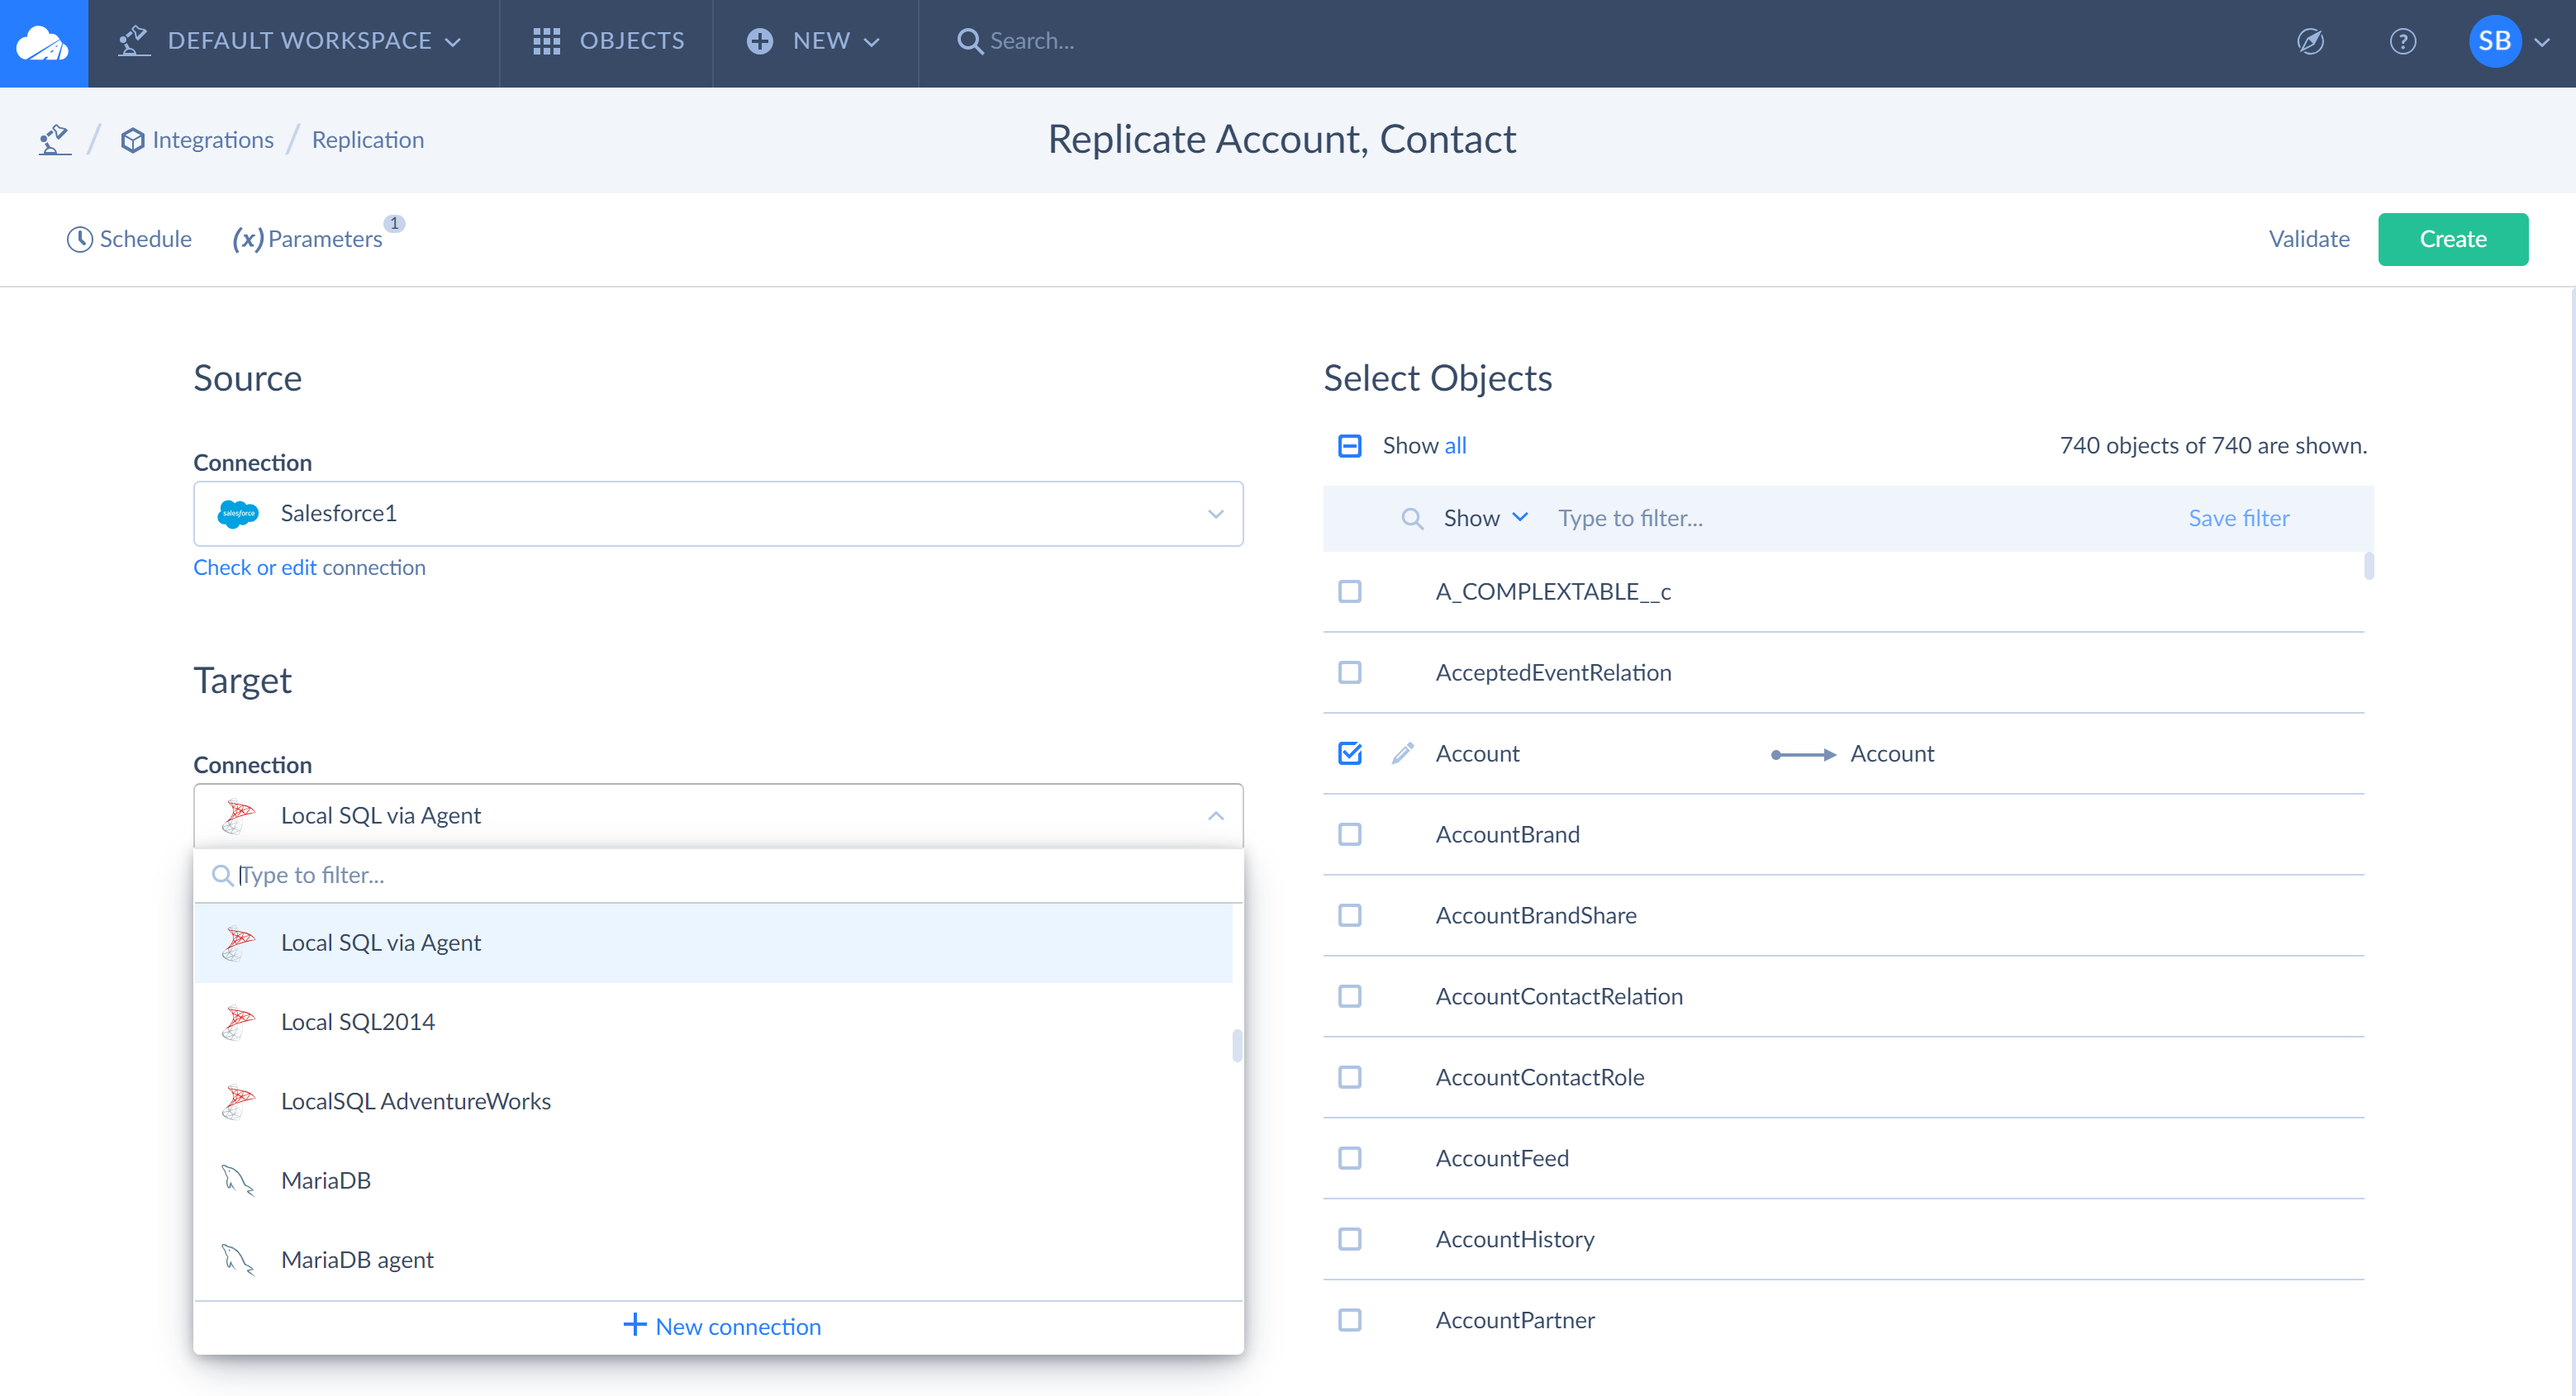
If you have already created source and target connections, simply select them from the drop-down list under Connection.
If you haven’t created the source or target connection yet, click +New connection at the bottom of the drop-down list, select the connector in the opened Connection window and specify the connection parameters. To create different connections, you need to enter different sets of parameters. See the Connectors section for more details.
Selecting Replication Options
-
Incremental Updates. If you select this checkbox, Skyvia does not perform a full replication (copying of all the data) each time replication is executed. Instead it performs a full replication only the first time the integration is run. During subsequent replications, Skyvia detects data that were changed in your cloud app since the last integration execution and then applies these changes to your database. It deletes records that were deleted in the cloud app since the last execution, updates records that were updated and inserts the newly inserted records. Such replication is known as incremental replication.
Incremental updates are not supported for some objects in certain cloud apps. To learn more, go to Incremental Replication and Schema Updates.
-
Update Schema. If you select this checkbox, Skyvia checks target schema and compares it with the schema it would build for the objects and fields, selected in the replication. If there are differences, Skyvia applies certain differences to the target database without re-creating all the tables. Note that not all differences are applied. See details in Incremental Replication and Schema Updates.
-
Create Tables. If you select this checkbox, system will try to create source tables in the target database. If the Incremental Updates checkbox is selected, Skyvia will try to create source tables in the target database only for the first replication execution (full replication). You can find more information below.
If the table with the same name already exists in a database, Skyvia will check the structure of that table. If it has the same structure, Skyvia will upsert data from replication object to the selected table. If the table has different structure, you will receive an error. However, if you select Drop Tables checkbox, that table will be deleted and new table with the same name and corresponding structure will be created.
-
Drop Tables. If you select this checkbox, Skyvia will try to drop source tables in the target database before creating them. If the Incremental Updates checkbox is selected, Skyvia will try to drop source tables in the target database only for the first execution (full replication). This checkbox is enabled only if the Create Tables checkbox is selected. You can find more information below.
-
Create Foreign Keys. If you select this checkbox, system will create the foreign keys in the target database according to relations between the replicated objects in the source CRM. This checkbox is enabled only if the Create Tables checkbox is selected. Note that Skyvia does not create foreign keys for many-to-many relations.
This option is only available if you clear the Use new replication runtime checkbox.
When you create a replication, Incremental Updates, Create Tables and Create Foreign Keys checkboxes are selected by default. Clear them if needed.
Incremental Updates in More Details
When the Incremental Updates checkbox is not selected, the Create Tables and Drop Tables options are applied every time replication is run (if the corresponding checkboxes are selected).
When the Incremental Updates checkbox is selected, the Create Tables and Drop Tables options are applied only when full replication is performed:
- for the first run after the integration creation;
- for the first run after resetting the LastSyncTime integration parameter.
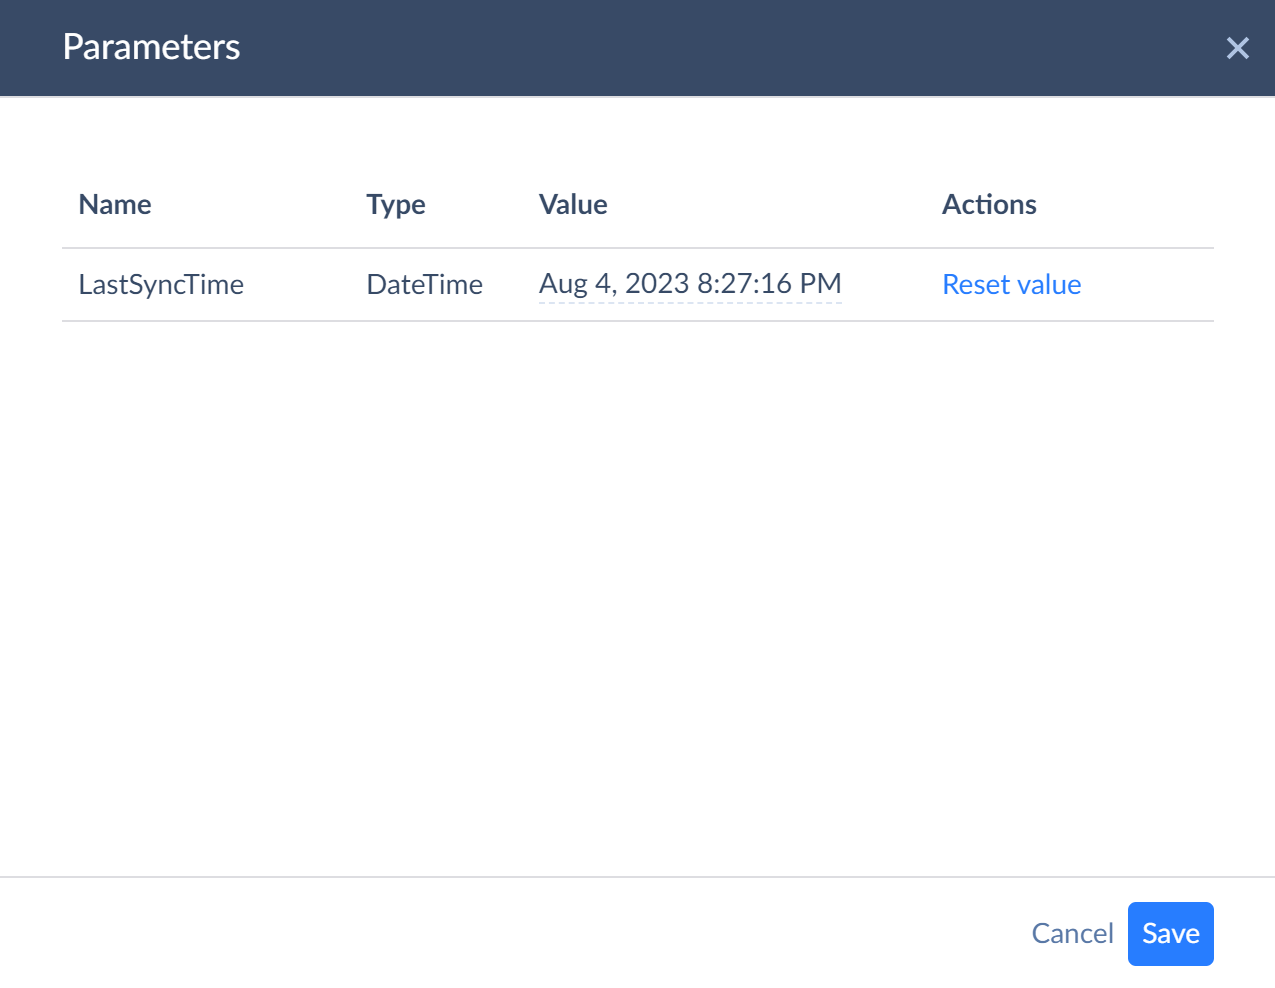
The LastSyncTime parameter is the parameter that shows sync time since the last replication. When replication is executed first time, Skyvia sets this parameter to the current time, and the next integration execution will load the changes made since the time specified in this parameter.
If you want to reset the parameter manually, click Parameters in the toolbar on the left. When the parameter editor window opens, click Reset value to reload all the data.
Replication Mode and Table Creation
Skyvia supports both full replication and incremental replication. By default, it performs full replication the first time, creating tables automatically. Subsequently, it performs incremental replication for all the selected objects.
You can change this behavior by configuring replication options for the whole integration or by changing the replication mode in replication tasks.
Incremental Updates
Clear this chekbox to disable incremental replication for the integration and perform full replication for all the replicated objects every time.
If this checkbox is selected, you can change replication mode for each object separately.
Update Schema
Determines whether to update target schema automatically when incremental replication is performed for an object if differences are detected between the source and target schema. Note that Skyvia applies only changes adding columns/tables to the target, but ignores column/table deletions.
Create Tables
Determines whether to create tables when the full replication is performed.
Tables are not re-created when incremental replication is performed.
Tables are dropped re-created whenever a replication runs for tasks with Resync and Resync on demand mode regardless of this checkbox.
Drop Tables
Determines whether to drop the corresponding tables before creating them when the full replication is performed.
Tables are dropped re-created whenever a replication runs for tasks with Resync and Resync on demand mode regardless of this checkbox.
Processing Deleted Records
Determines how Skyvia processes records, deleted in the source. Note that only some of the data sources support getting information about deleted records. It can take the following values:
- Hard delete. When Skyvia detects a record deletion in source, the corresponding record is deleted in the target database.
- Soft delete. Skyvia adds a boolean _is_deleted column to the target table with a default value of false. If a record is deleted in the source, Skyvia sets it to true for the corresponding record in the target.
- Ignore deleted. Skyvia ignores record deletions in the source. Records, deleted in the source, stay in the target table.
There are additional considerations when changing the Processing Deleted Records setting for an existing integration. Skyvia attempts to keep already replicated data consistent with the selected value.
For example, if the integration has Processing Deleted Records set to Soft delete and then you change it to another value, Skyvia will drop the added _is_deleted column. If you change it to Hard delete, Skyvia will also delete all records with _is_deleted set to true before dropping the column.
If the integration has Processing Deleted Records set to Ignore deleted, and then switch to Hard delete or Soft delete, Skyvia cannot consistently determine, which of the replicated records were deleted in the source, so Skyvia will offer you to perform a full resync. If you refuse, the replicated database may still contain records, deleted in the source.
Add _skyvia_sync Column to Target Tables
Determines whether to add the _skyvia_sync column to target tables. Skyvia uses this column to track the last time the record was added or modified in Target. If you disable this option in an existing integration, Skyvia will attempt to remove the _skyvia_sync column from the target table.
Replication Modes
When the Incremental Updates checkbox is selected, you can change the replication Mode for separate objects in the replication task editor.

Skvia supports the following modes:
- Standard - perform incremental replication for the object.
- History - store history of all the replicated changes instead of copy of the data. See History Mode for more details.
- Resync - perform full replication for the object each run.
- Resync on demand - perform full replication for the object only when the corresponding LastSyncTime parameter is reset. Otherwise, the object is ignored.
By default, Skyvia drops and re-creates target tables when performing full resync. You can change this behavior and truncate the existing data instead. For this, set Table clearing operation to Truncate in the corresponding replication task.
Nested Objects Replication
Some cloud sources have objects with fields, storing complex JSON objects and arrays. You can choose whether to store this data as usual string columns with JSON data in target or as separate tables.
You can set the default behavior for the whole integration with the Unwind Nested Objects setting. For each such field, you can change the default behavior for each field, including the object fields, in the replication task editor.
You can select one of the following behaviors for each nested object field:
- Default - the Unwind Nested Objects setting is applied.
- Table - data from this field is stored in a separate table.
- JSON - data from this field is stored as JSON values in the text column.
There you can also specify custom names for the child tables by clicking the Set custom name link for the corresponding field and entering the new name. The default table name is generated by concatenating the table name for the object and the field name separated by the underscore. If there are multiple nesting levels, the result name will also include names of all intermediate fields in the order of nesting, separated by underscores.
The primary key of the nested object tables always includes the primary key of the parent table (from the previous nesting level), however, foreign keys to parent tables are not generated.
Target Table Naming
Skyvia allows you to configure target table naming with the following options:
- Schema. This setting is available only if target is SQL Server. It allows specifying SQL Server schema to load data to. By default, the data are loaded to the default schema of the user, used in the target SQL Server connection. Usually, it is the dbo schema.
- Case. Determines how case is changed when converting a cloud object name to the target database table name. Note that some databases ma y not support uppercase characters in table names or can be configured to always use lowercase table names. It can take the following values:
- Unchanged — case is unchanged, database table names will have the same case as the original cloud object names.
- Lower — all letters of a cloud object name are converted to lower case.
- Upper — all letters of a cloud object name are converted to upper case.
- Capitalized — the first letter of a cloud object name and the first letter after each underscore or space are converted to upper case, other letters are converted to lowercase. For example, for the FAQ__ka object, a Faq__Ka table is created.
- FirstLetterUppercase — The result name of database table starts with the capital letter, other letters are converted to lower case. For example, for the FAQ__ka object, a Faq__ka table is created.
- Prefix. Adds the specified prefix to the result table name.
- Sanitize Table/Column Names. Enables name sanitization. It removes all non-alphanumeric characters including spaces from the source object name and replacing them with underscores.
- Remove Underscores This checkbox determines whether to remove underscores from the target table name.
-
Track Target Naming Changes. This checkbox determines whether to track the changes of target naming settings and apply them to an existing database next time the integration runs. If the Incremental Updates checkbox is selected, the naming changes are applied using ALTER statements. Otherwise, if Create Tables and Drop Tables checkboxes are selected and naming settings change, Skyvia attempts to drop tables with old names and create tables with new names.
If the Track Target Naming Changes checkbox is not selected, and you change naming settings for an existing replication integration with the database already created, you need to manually apply the naming changes to the database before the next replication run; otherwise, the next run will result in an error, because database tables with changed names would not be found. If this checkbox is selected, Skyvia tries to apply the changes automatically.
Note that if this checkbox is selected, Skyvia creates an additional table __skyvia_objects in the target database to store information on naming settings and changes in order to know which naming changes were already applied, and which it needs to apply during the next replication.

You can also specify a custom table name in the replication task editor. Just enter it to the Target name box. In this case, the Target Naming settings are not applied for this task. If you want to return to the generated names, click the ![]() button in the Target name box.
button in the Target name box.
You must use only alphanumeric characters, digits, and underscore.
Selecting Data to Replicate
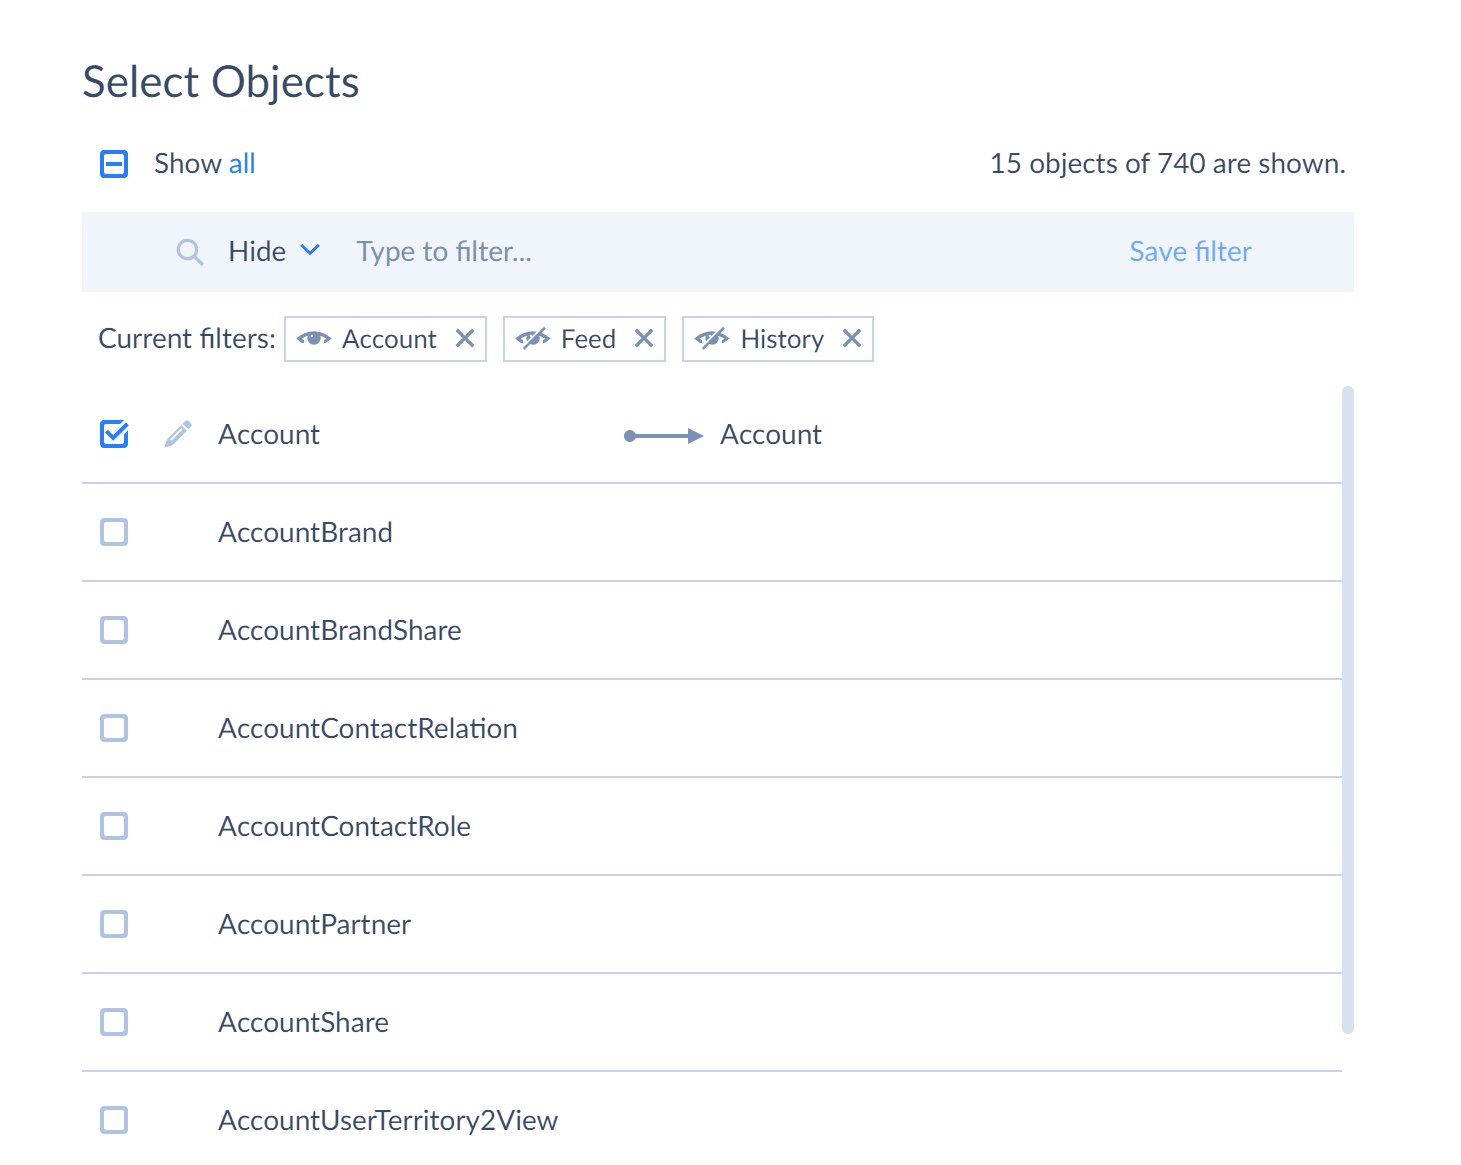
After you have chosen both connections on the left, you can select source objects arranged in an alphabetic order in the table on the right. You can select either some or all of the objects to replicate them to target. The checkbox in the header under the Select Objects title allows selecting all the displayed objects.
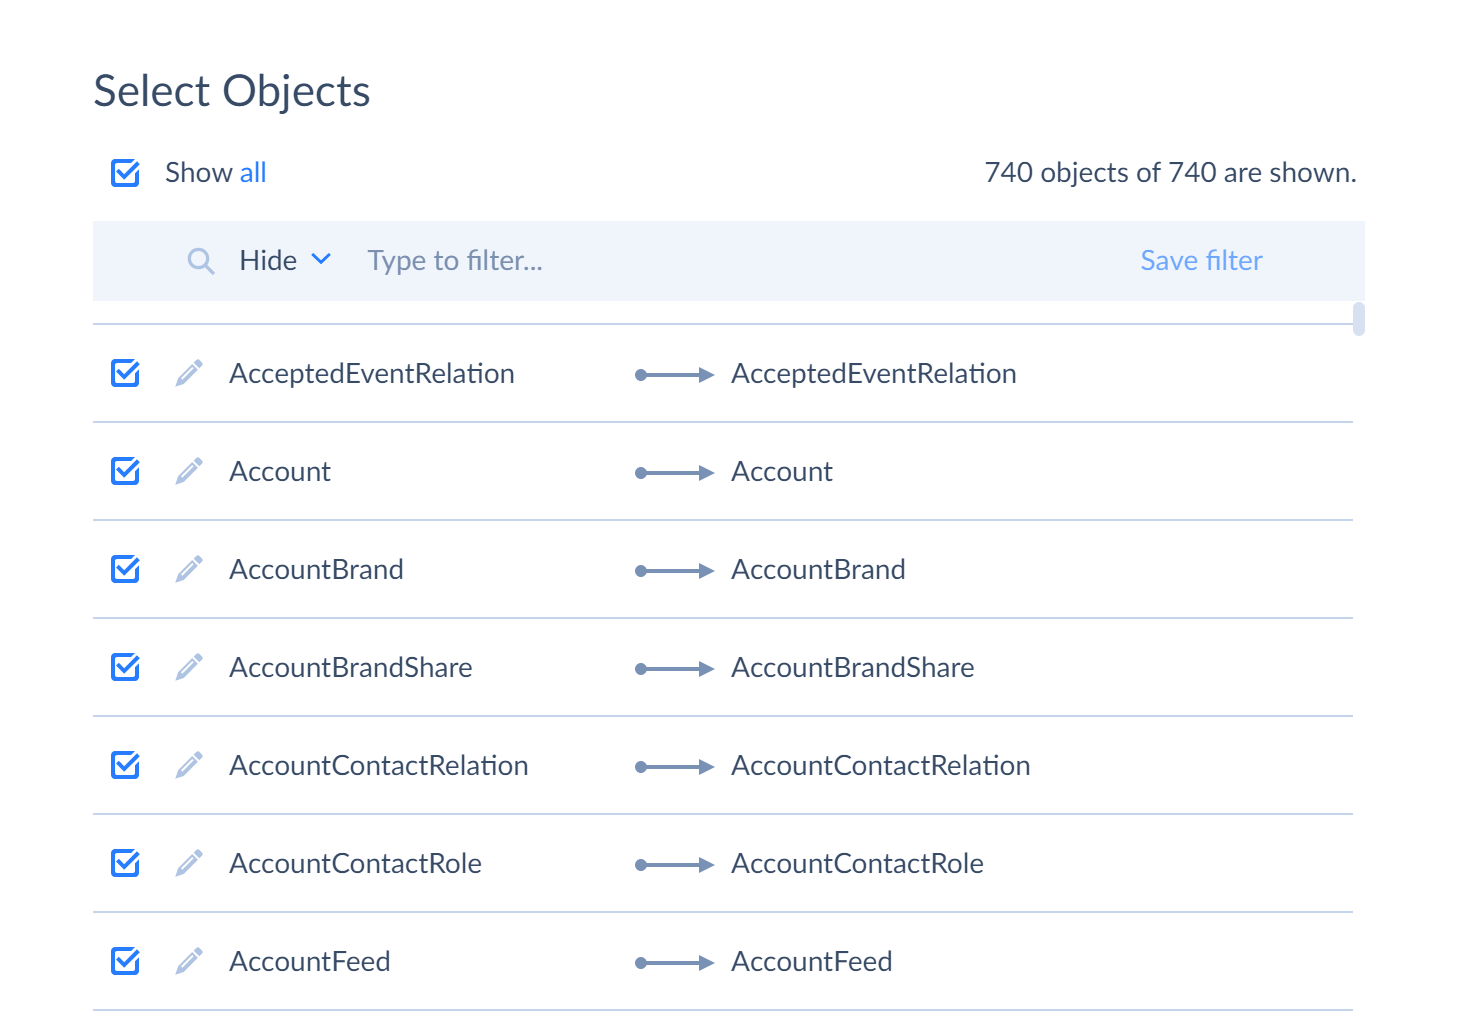
Filtering and Selecting Objects
For better visual perception and easier search, Skyvia offers additional filtering settings for objects:
-
Filtering using Show selected only link. When you apply this filter, system displays only the objects you have selected. To display all objects again, click Show all link.
-
Filtering by object name. When you enter part of the object name (for example “account”) in the field above the table, system automatically displays all objects containing “account” name. If you want to hide objects with this name, select Hide from the drop-down list. Depending on your needs, you may apply multiple filters at the same time and save the applied filters. To do it, enter a part of object name in the objects if name contains field, switch from Show to Hide if necessary, and click Save filter. The filter is displayed. After this you may add more filters in the same way.
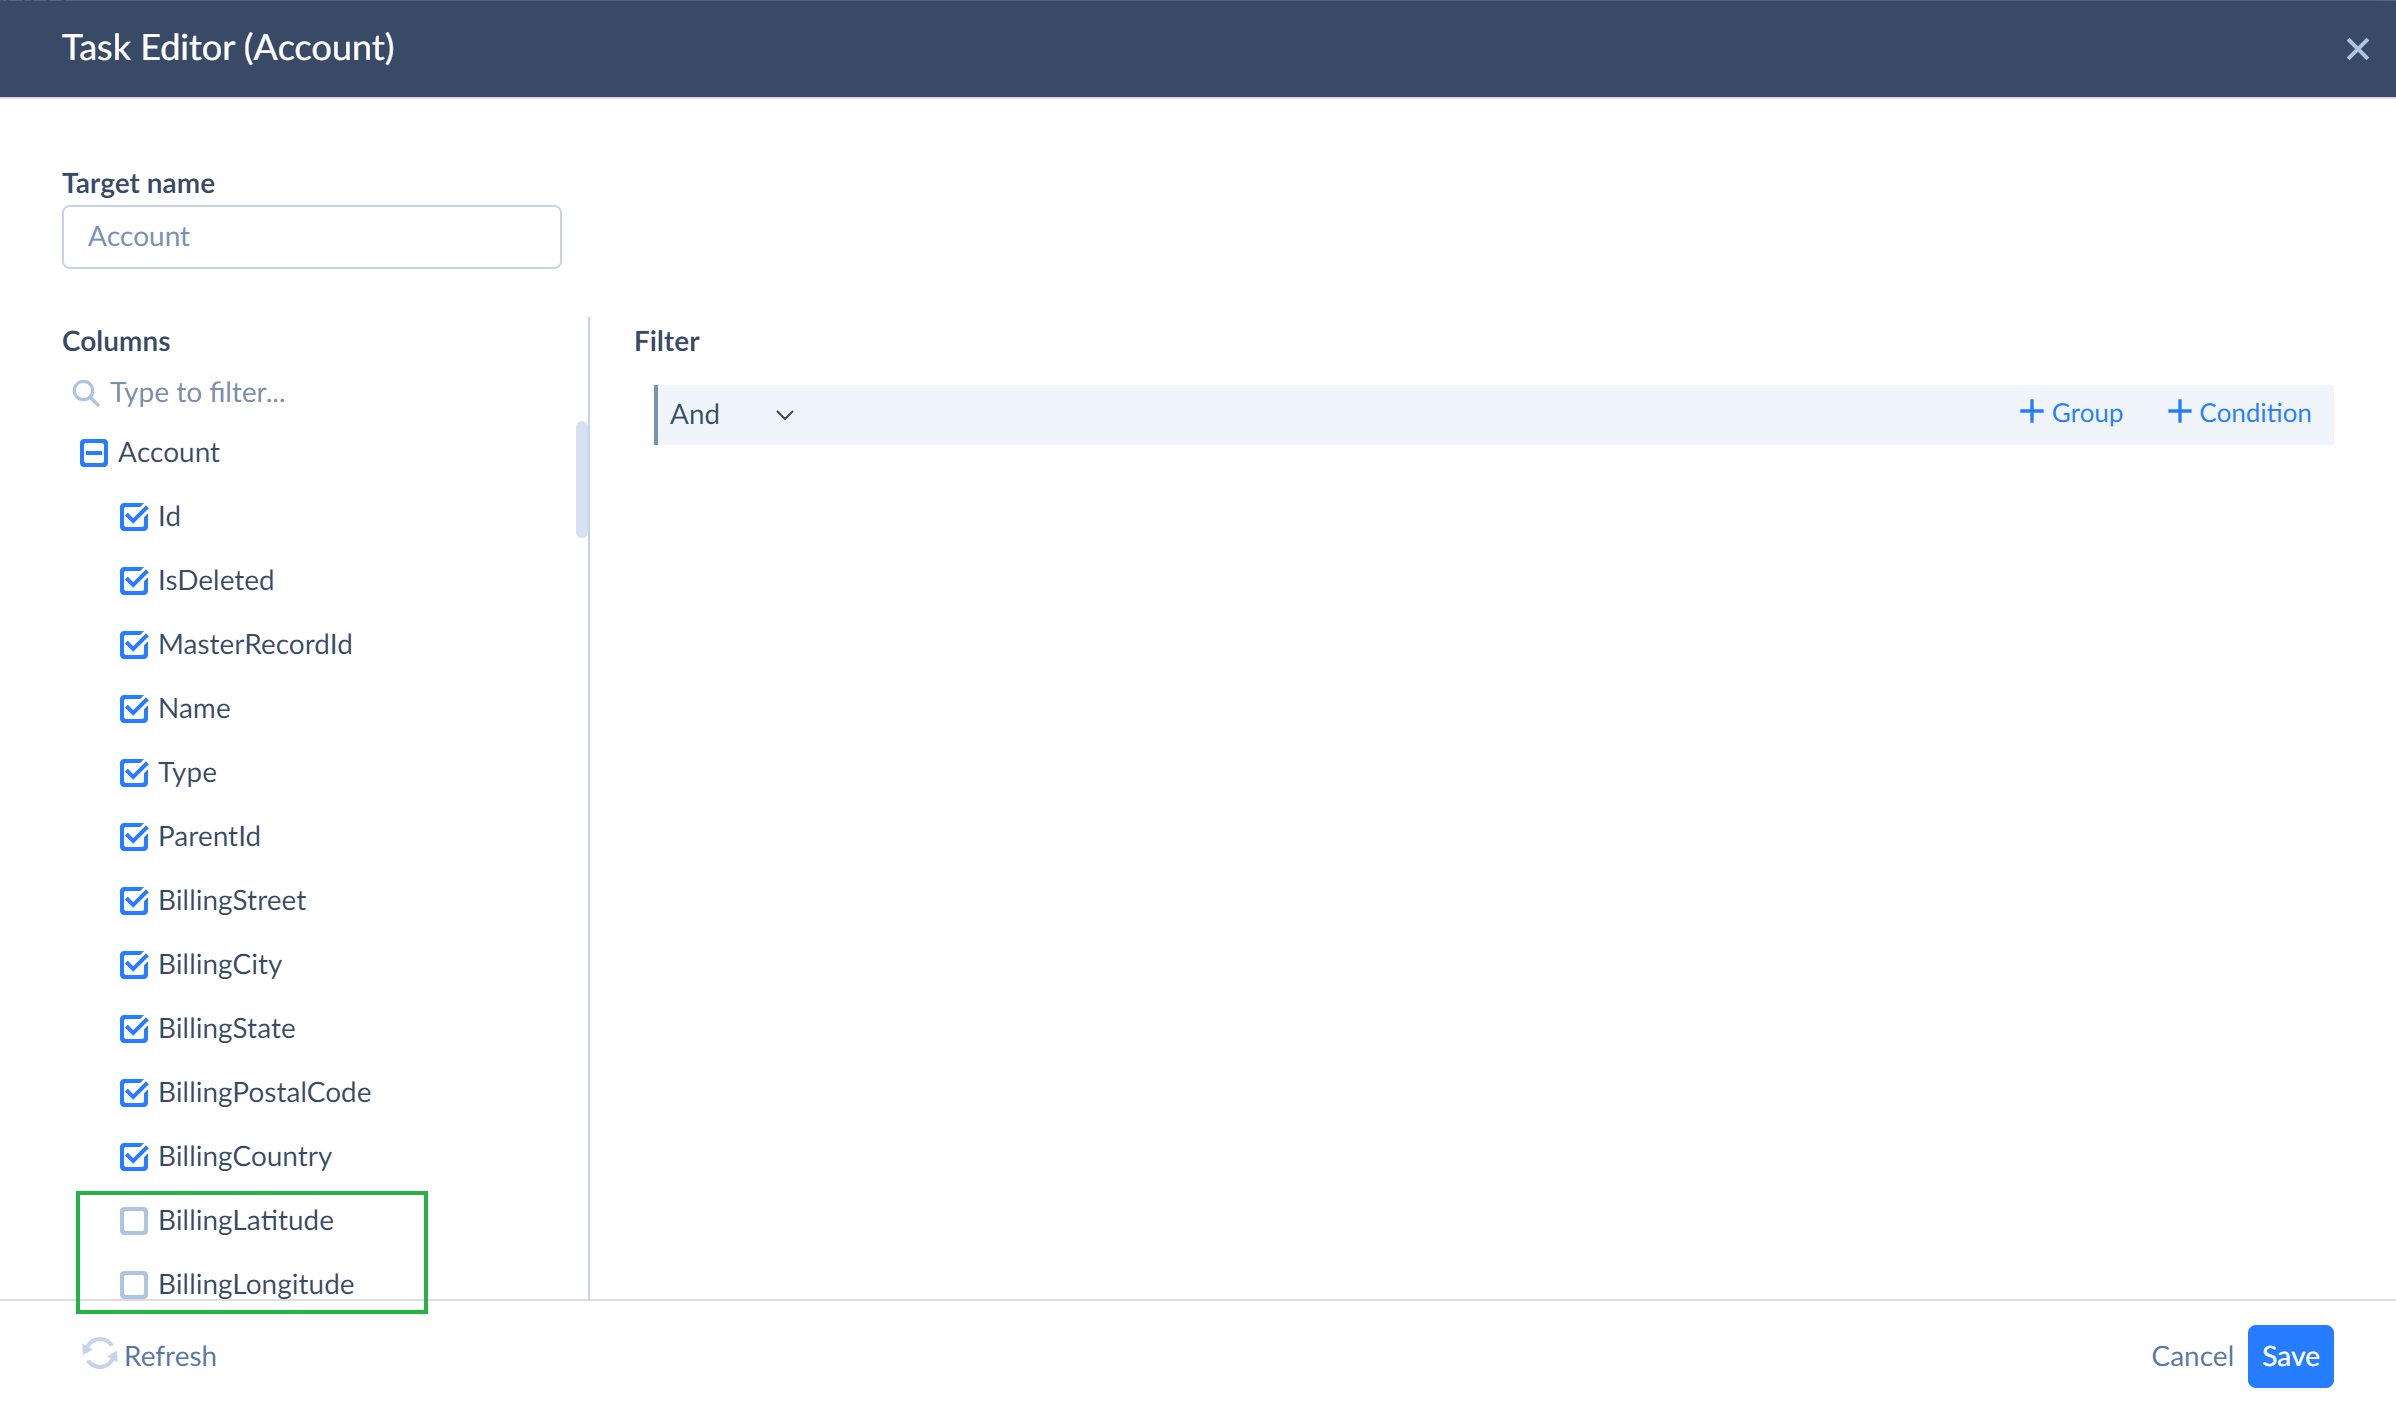
Selecting Fields
After you have selected objects, you can optionally exclude some of their fields, which you do not want to replicate. For this, click the corresponding Edit icon next to the object. When the task editor window opens, clear only those fields of the object, which you do not want to replicate and leave selected only those ones intended for replication. Note that if you want to use Incremental Updates, the object key fields and such additional fields as CreatedDate, UpdatedDate, DateCreated, DateModified, LastModifiedDate, Modified Time, Created Time, etc. must be included. Here is the list of such fields for different cloud sources.
In our screen, we show fields of the Account object — both selected and cleared.
When replicating data Amazon Redshift, replication task editor provides more settings, allowing you to configure the target Redshift table and column parameters. See more details in the Editing Replication Task for Amazon Redshift topic.
Filtering Object Data
Additionally you can filter source data for replication by applying certain conditions to object fields in the task editor window. Click +Condition and set conditions you want to be met during replication. In our example, we want to replicate only accounts of the Customer-Direct type, and we specify it in the filtering area highlighted in blue. To learn more about filters, go to Filter Settings topic.

Setting Custom Table Names
You can also specify a custom table name in the task editor window. Just enter it to the Target name box. In this case, the Target Naming settings are not applied for this task. If you want to return to the generated names, click the ![]() button in the Target name box.
button in the Target name box.
You must use only alphanumeric characters, digits, and underscore.
Replicating Data from a Database
You can choose your database as Source in Replication. This adds one extra step to the replication configuration - configuring the Ingestion mode. Ingestion mode defines how to track changes in Source during the incremental replicaiton. There are three available Ingestion modes: New, New and modified, and Log-Based.
Currently Skyvia supports replication from SQL Server, Oracle, PostgreSQL and MySQL. We work on supporting more databases and they will be available in the near future.
Ingestion Modes
You select the Ingestion mode for the whole replication on the main page of your replication.
You can change the Ingestion mode separately for each replication task in the task settings.
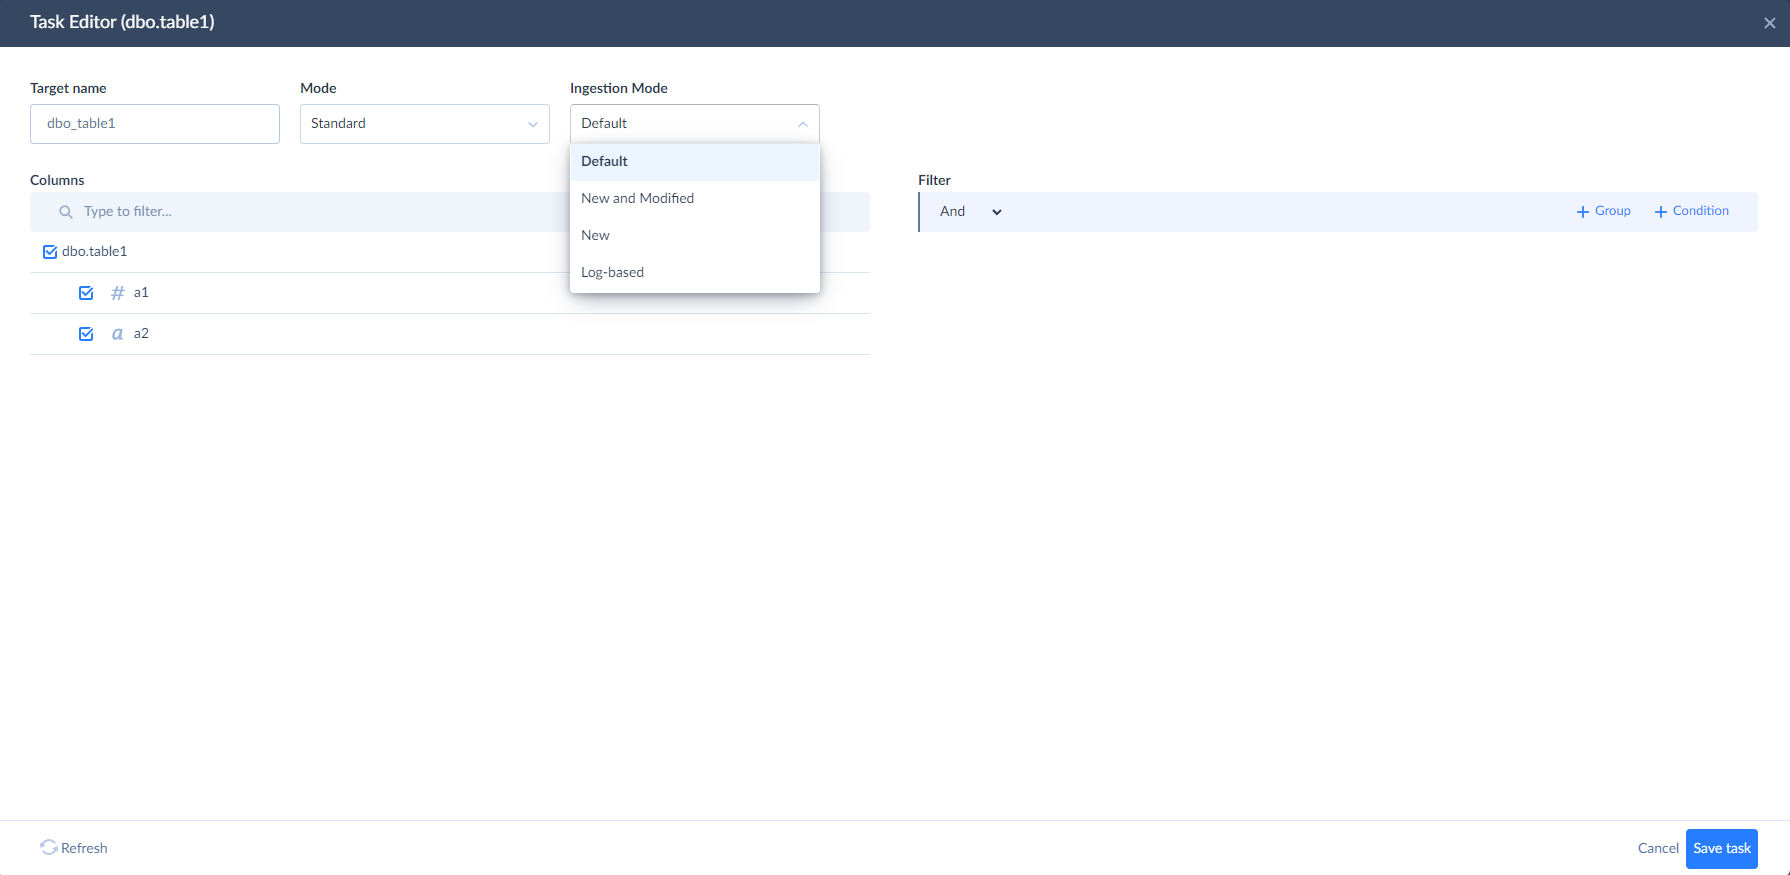
Ingestion Mode: Default
The tasks with the Default Ingestion mode selected use the ingestion mode, selected for the whole replication.
Ingestion Mode: New
The New mode allows you to track only new records in Source and incrementally replicate them to Target. To configure a New mode select a DATETIME column that can be used to track a creation date, or an auto-increment number column such as Id. Skyvia will automatically provide you with the selection of columns with the suitable column types.
Note that the New mode does not track deleted records.
Ingestion Mode: New and Modified
The New and modified mode allows you to track new and modified records in Source and incrementally replicate them to Target. To configure a New and modified mode select a DATETIME or autoincremental number column that can be used to track record modifications from the Modified column dropdown. You can use the same column in the Created column dropdown to track new records unless this column is NULLABLE and is not updated at the time of row creation. In this case, select a separate NOT NULLABLE DATETIME or autoincremental number column from the Created column dropdown. Skyvia automatically provides you with the list of columns that can be used as Created and Modified columns.
Note that the New and Modified mode does not track deleted records.
Ingestion Mode: Log-Based
This mode uses database change-tracking and logging tools to detect new, modified, and deleted records between replication runs. The technics of tracking changes can differ from database to database. To learn how to enable change tracking for your database visit the connectors topic.
Log-Based mode is currently available for SQL Server only.