QuickBooks Desktop
QuickBooks Desktop is an accounting software for managing and controlling finance-related processes for inventory-based businesses that need to scale as they grow. Skyvia supports QuickBooks Desktop 2006 and higher.
QuickBooks Desktop connections can work only via Agents. QuickBooks Desktop must be installed on the same computer, on which the Agent application is installed.
Data integration: Skyvia supports importing data to and from QuickBooks Desktop, exporting QuickBooks Desktop data to CSV files, replicating QuickBooks Desktop data to relational databases, and synchronizing QuickBooks Desktop data with other cloud apps and relational databases.
Backup: Skyvia Backup does not support QuickBooks Desktop backup.
Query: Skyvia Query supports QuickBooks Desktop.
For QuickBooks Online connector, see QuickBooks Online.
Establishing Connection
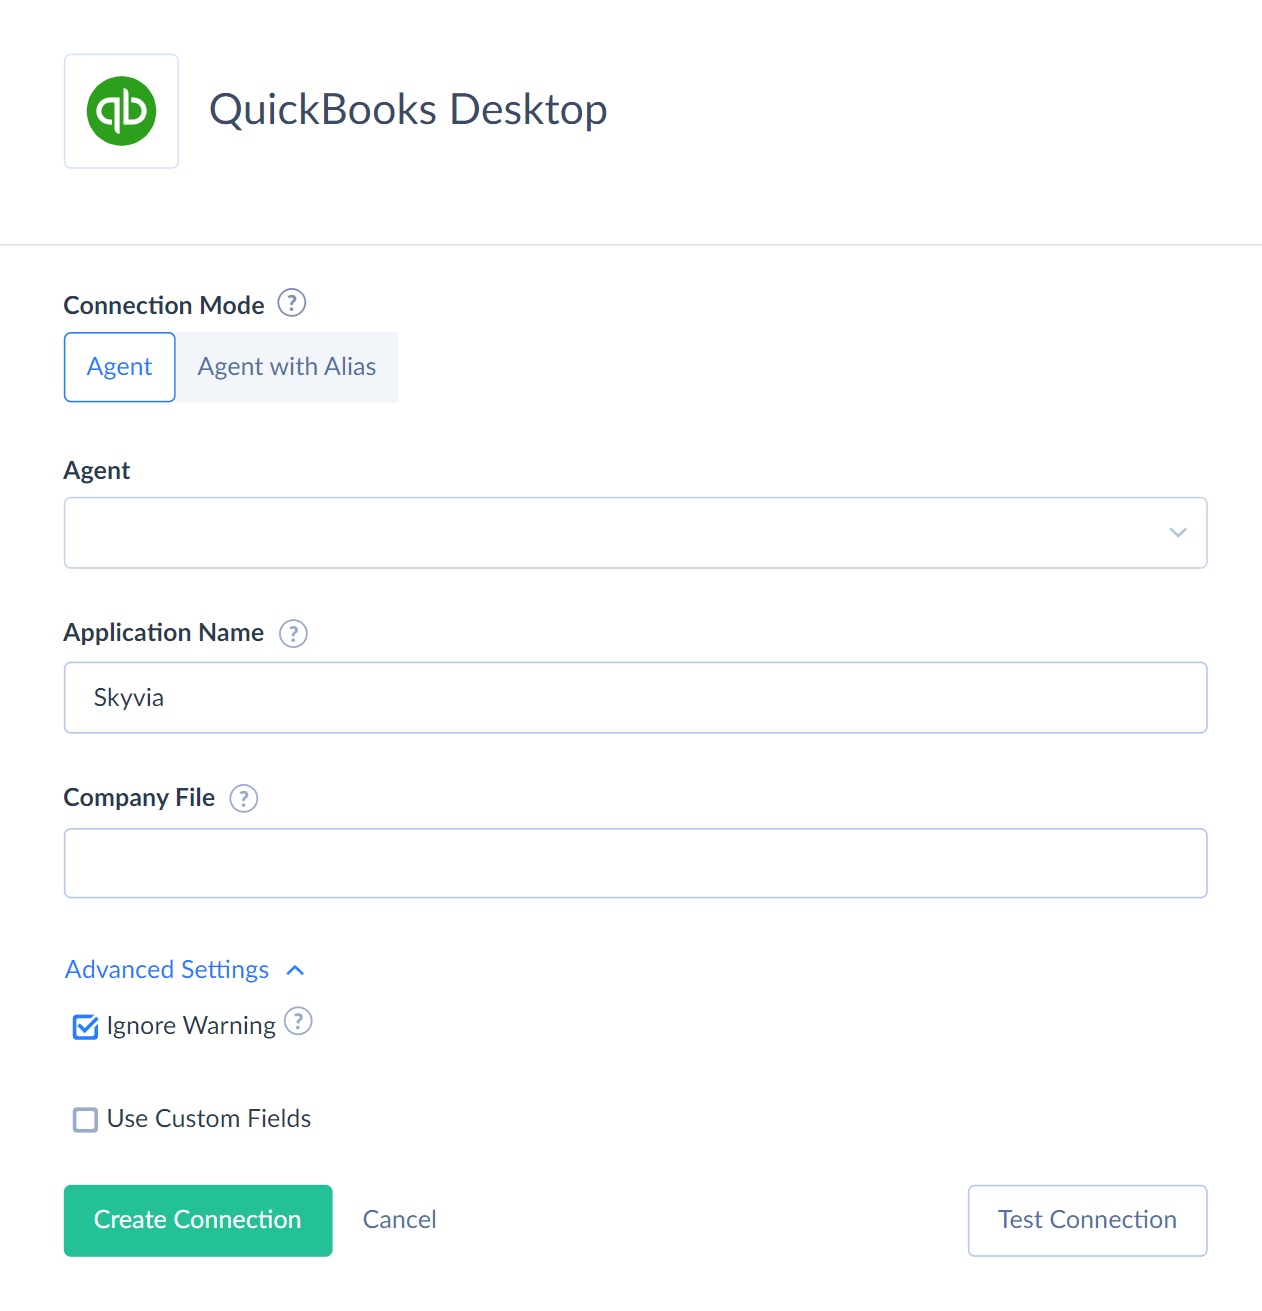
When creating a QuickBooks Desktop connection, you need to select an Agent, installed on the same computer with QuickBooks Desktop instance, and specify the Application Name and Company File.
Requirements
Skyvia Agent bitness must correspond the bitness of the QuickBooks Desktop instance. Note that Skyvia Agent installs both 64 bit and 32 bit versions on 64 bit systems, so you can run the corresponding Agent app version.
Skyvia Agent must be run as an application, NOT as a service. It must be run by the same Windows user with the same privileges as QuickBooks Desktop.
Creating Connection
To connect to QuickBooks, perform the following steps:
-
Select an Agent, installed on the same computer with QuickBooks Desktop instance.
-
Specify the Application Name, for example, Skyvia. This name will be displayed in the QuickBooks Desktop prompt to grant or refuse access to the data. Leave the Company File empty for now.
-
Open QuickBooks Desktop and open the corresponding company file in it.
-
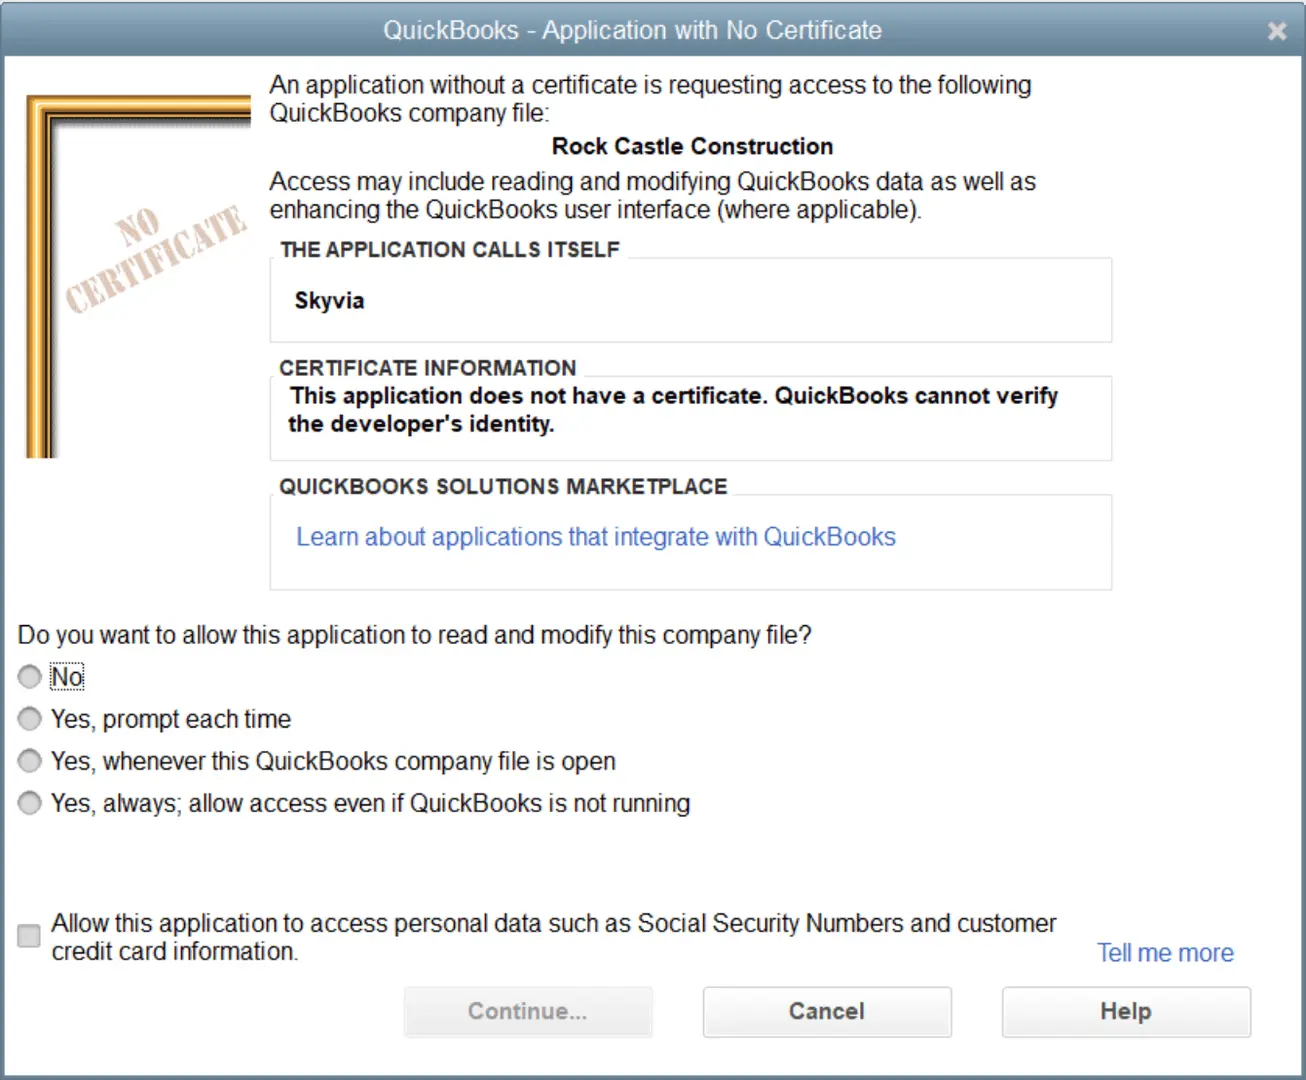
Click Test Connection. Skyvia connects to QuickBooks Desktop, and the corresponding prompt displays in it:
-
Select how Skyvia is allowed to access QuickBooks Data. We recommend selecting Yes, whenever this QuickBooks company file is open or Yes, always; allow access even if QuickBooks is not running.
The Yes, whenever this QuickBooks company file is open mode does not require the company file specified, but it requires QuickBooks running.
In the Yes, always; allow access even if QuickBooks is not running mode, QuickBooks will run automatically as a background process when you access the QuickBooks data.
In the latter mode, you may not be able to open the file in QuickBooks Desktop after Skyvia works loads data from or to it. In such case, after Skyvia finishes loading data, restart the Agent application to correctly close session.
-
If you are using QuickBooks Desktop in a multi-user mode and you have selected Yes, always; allow access even if QuickBooks is not running, you need to select the user account to use and sign in with this user.
-
Optionally select the Allow this application to access personal data such as Social Security Numbers and customer credit card information checkbox. This allows Skyvia to work with certain fields like the CreditCardInfo* fields in the Customer object.
-
Click Continue, then click Yes, and then click Done.
-
If you plan to connect to the company file even when QuickBooks is not running, and you have selected Yes, always; allow access even if QuickBooks is not running, specify the path to Company File in the QuickBooks Desktop connection on Skyvia. By default, QuickBooks Desktop stores company files in the C:\Users\Public\Public Documents\Intuit\QuickBooks\Company Files folder. Note that you need to specify the same path that you use when opening the file in QuickBooks Desktop.
After this, the connection is ready. You can switch back to Skyvia, save it and use it.
If you use the Yes, always; allow access even if QuickBooks is not running mode and QuickBooks Desktop is used in multi-user mode, you won't be able to use this QuickBooks Desktop user account from a different computer when Skyvia connects to it untill the session is closed. If you don't want to buy additional QuickBooks Desktop license for Skyvia, you need to use the Yes, whenever this QuickBooks company file is open mode, and one of the QuickBooks Desktop user must open the company file and work with it on a computer with the agent installed.
Additional Connection Parameters
Ignore Warning
Sometimes, when performing INSERT or UPDATE operation against QuickBooks Desktop, it may not assign values to some of the mapped fields. In such cases, QuickBooks Desktop sends a warning. By default, Skyvia ignores QuickBooks warnings, and doesn't display them in logs.
You can clear the Ignore Warning checkbox in the Advanced Settings in the connection editor to change this behavior. If this checkbox is not selected, QuickBooks warnings are treated as errors. This means that Skyvia treats records, for which QuickBooks Desktop returned a warning, as failed and adds them to error logs, even though the records were added/partially updated in QuickBooks Desktop.
Use Custom Fields
Select this checkbox to make custom fields available in Skyvia.
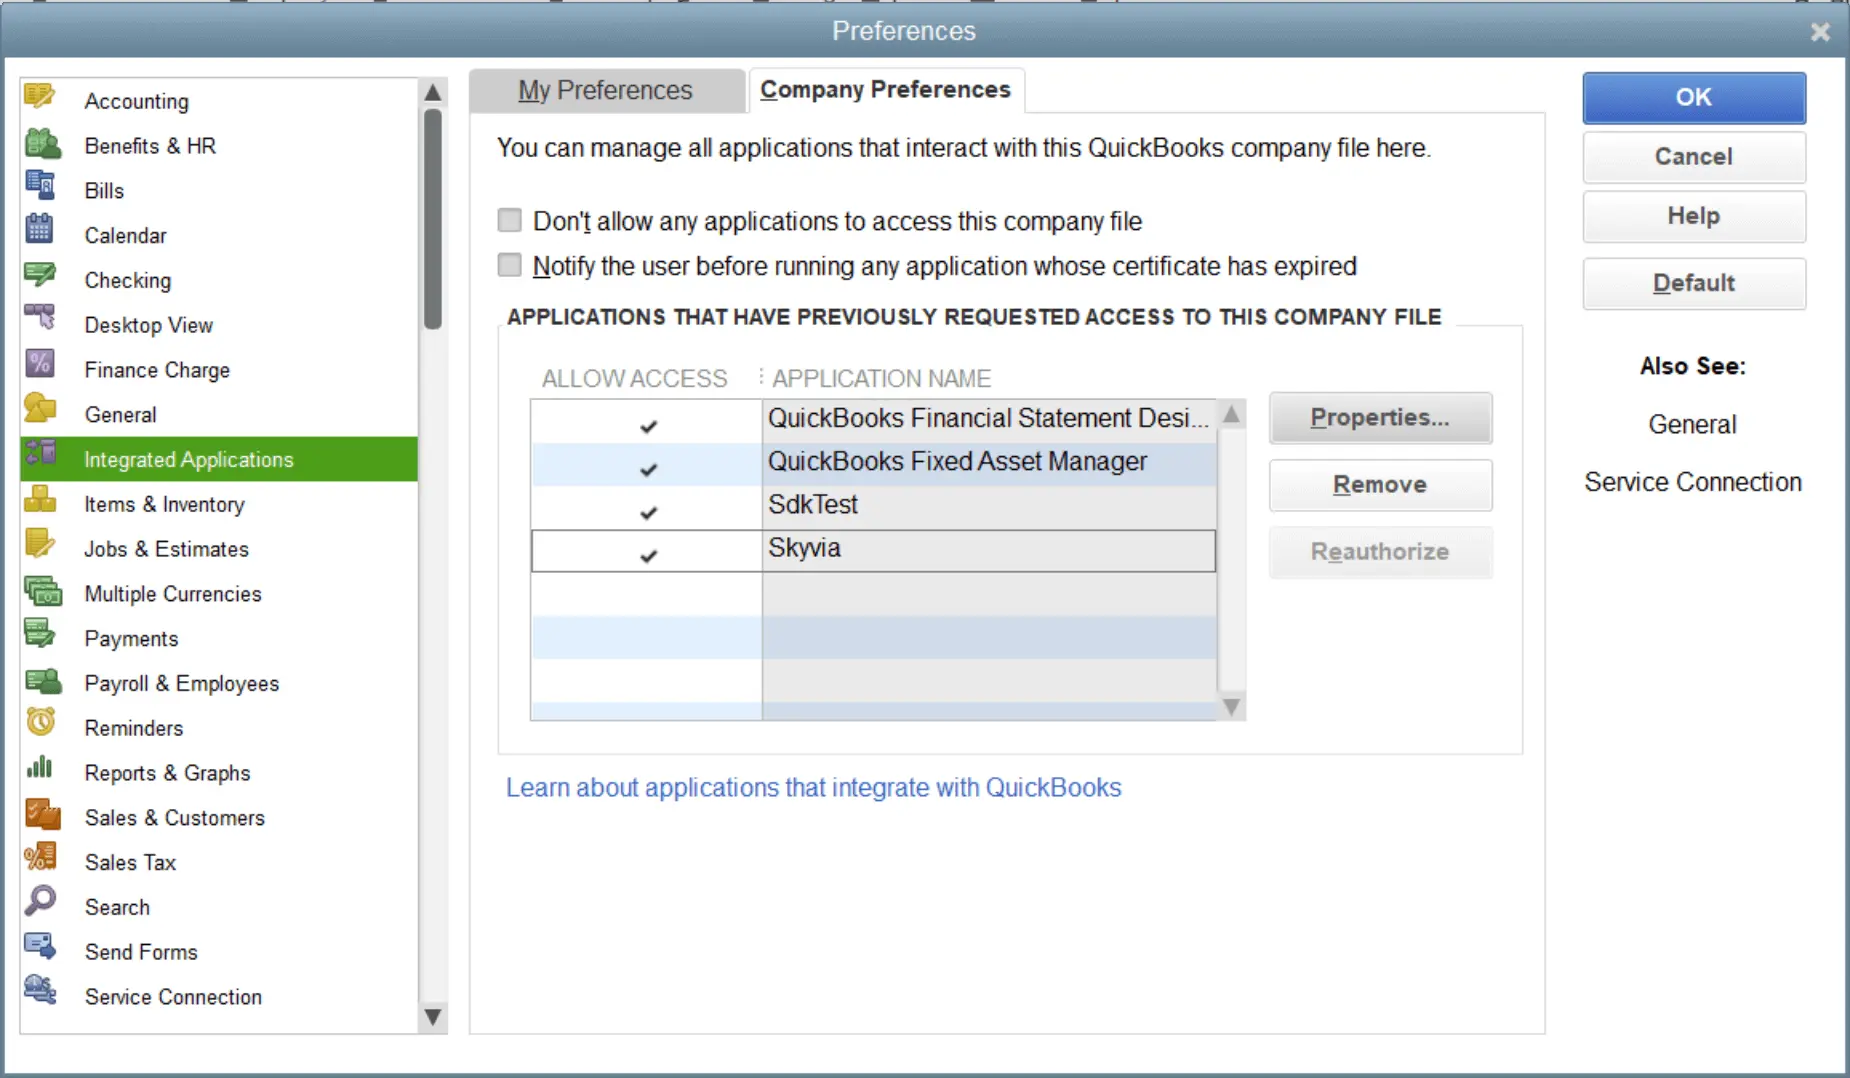
Revoking Access
If you want to revoke granted access and disconnect Skyvia from QuickBooks, you can revoke access in QuickBooks Desktop Preferences. From the Edit menu, select Preferences. In the opened Preferences dialog box, switch to Integrated Applications.
There, on the Company Preferences tab, you can see and manage the list of application, for which access is allowed to this company file. You can revoke access by removing the application from the list or see its properties and manage access rights.
Connector Specifics
Complex Structured Data
Some of the QuickBooks tables store complex structured data. These are the following tables: Charge, Check, CreditCardCharge, CreditCardCredit,InventoryAdjustment, Invoice, Estimate, Bill, CreditMemo, JournalEntry, Payment, PurchaseOrder, SalesOrder, SalesReceipt.
For example, an invoice or bill can have several lines. Skyvia represents this information in such tables as a JSON field LineItems. Here is an example of the LineItems field value from the Invoice table:
[
  {
    "Id": "3B1F-1071532020",
    "IsItemGroup": false,
    "ItemId": "30000-933272655",
    "ItemName": "Removal",
    "Desc": "Removal labor - strip damaged roof on garage",
    "Quantity": 46.0,
    "Rate": 35.00,
    "ClassId": "40000-933272658",
    "ClassName": "Remodel",
    "Amount": 1610.00,
    "SalesTaxCodeId": "20000-999022286",
    "SalesTaxCodeName": "Non"
  },
  {
    "Id": "3B20-1071532020",
    "IsItemGroup": false,
    "ItemId": "10000-933272655",
    "ItemName": "Framing",
    "Desc": "Framing labor - reconstruct low pitch roof",
    "Quantity": 20.0,
    "Rate": 35.00,
    "ClassId": "40000-933272658",
    "ClassName": "Remodel",
    "Amount": 700.00,
    "SalesTaxCodeId": "20000-999022286",
    "SalesTaxCodeName": "Non"
  },
  {
    "Id": "3B25-1071532020",
    "IsItemGroup": false,
    "ItemId": "D0000-933272656",
    "ItemName": "Subs:Roofing",
    "Desc": "Roofing - weather proofing and shingle materials applied",
    "Rate": 855.00,
    "ClassId": "40000-933272658",
    "ClassName": "Remodel",
    "Amount": 855.00,
    "ServiceDate": "2007-03-28T00:00:00Z",
    "SalesTaxCodeId": "20000-999022286",
    "SalesTaxCodeName": "Non"
  }
]
For user convenience, lines of these objects are also available as separate records via read-only tables with names containing LineItem suffixes, like InvoiceLineItem, BillLineItem, etc. They allow you to view these lines in a tabular form with Query, export them to CSV with Export, import them from QuickBooks to a cloud application or database, where these lines should be stored in a separate table, etc.
Since these tables (that have the LineItem suffix in their name) are read-only, they are not available in Import as a target or in Synchronization. To modify lines of a bill, journal entry, etc., you need to provide values in JSON format for the Lines field of the corresponding main table - Bill, JournalEntry, etc. For example, to import bills from a CSV file to QuickBooks, you need to specify bill lines in the JSON format in one of the CSV file columns and import this file to the Bill table. You need to map the Lines field of the Bill table to this column of the CSV file.
You can use our Nested Objects mapping feature in Import integrations. For this, you need to select the Nested Objects checkbox in the integration. Then, in the mapping settings, you can map the fields of the corresponding line items. See see QuickBooks Online tutorials to know how to use this feature. Additionally, you can use Nested types feature of Data Flow.
Object Peculiarities
Charge
The INSERT operation requires mapping either the CustomerName or the CustomerId field and either the ItemName or the ItemId field.
Checks
The INSERT operation requires mapping either the AccountName or the AccountId field and either the LineItems or the ExpenseLines fields. Consider the account type when importing records to this object. If the account doesn't support checks, you receive an error.
CreditCardCharge
The INSERT operation requires mapping either the AccountName or the AccountId field, either PayeeEntityId or PayeeEntityName and either the LineItems or the ExpenseLines, fields. This object supports the inserting of records for the credit card account type only.
CreditCardCredit
The INSERT operation requires mapping either the AccountName or the AccountId field, either PayeeEntityId or PayeeEntityName and either the LineItems or the ExpenseLines, fields.
InventoryAdjustment
This object has a complex structure and contains nested objects. Consider the inventory adjustment type, when importing data to this object. The inventory adjustment of particular type requires mapping the specific fields:
| Adjustment type | Required Fields for Mapping |
|---|---|
| Quantity Adjustment | NewQuantity or QuantityDifference; SerialNumber or LotNumber; ExpirationDateForSerialLotNumber; InventorySiteLocationId or InventorySiteLocationName |
| Value Adjustment | NewQuantity or QuantityDifference, NewValue or ValueDifference |
| Serial Number Adjustment | SerialNumber, SerialNumberAddedOrRemoved, ExpirationDateForSerialLotNumber; InventorySiteLocationId or InventorySiteLocationName |
| Lot Number Adjustment | LotNumber; CountAdjustment; ExpirationDateForSerialLotNumber; InventorySiteLocationId or InventorySiteLocationName |
When you update the InventoryAdjustment lines, map the following fields: ItemId or ItemName, SerialNumber or LotNumber, CountAdjustment, ExpirationDateForSerialLotNumber, InventorySiteLocationId or InventorySiteLocationName, QuantityDifference, ValueDifference.
The following fields are needed for data import, they return null values when querying: NewQuantity, NewValue,SerialNumberAddedOrRemoved, CountAdjustment
ReceivePayment
If an invoice waits for partial payment, map the TotalAmount field together with the required fields. The TotalAmount value must not exceed the sum of all invoice items. The TotalAmount is not necessary, to create a discount for the invoice.
ItemAssembliesCanBuild
This object doesn't have a primary key. To select data from this object, use filters by the ItemInventoryAssemblyId or ItemInventoryAssemblyName, and also use filter by TxnDate. The latter filter can be omitted, and QuickBooks Desktop will use the last period in this case.
Custom Fields
Using custom fields may affect performance for INSERT, UPDATE, and DELETE operations, because Skyvia performes additional API calls.
The following QuickBooks objects support custom fields: Customer, Employee, Vendor, Item.
Customer
The following transaction objects inherit the custom fields from the Customer object: CreditMemo, Estimate, Invoice, SalesOrder, SalesReceipt.
For example, there is a custom field CustomField1 in the Customer object. When you create an invoice for a specific customer, this invoice will inherit the CustomField1 values from the Customer object by default. To set another value for a custom field in the invoice instead of the inherited one, use the INSERT or UPDATE operations and set the needed value directly. It won't affect the original custom field value in the Customer object and other Invoice records.
Vendor
The object PurchaseOrder inherits the custom fields from the Vendor object.
For example, you add a custom field CustomField1 in the Vendor object. When you create a purchase order for a specific vendor, this order will inherit the CustomField1 values from the Vendor object by default. To set another value for a custom field in the purchase order instead of the inherited one, use the INSERT or UPDATE operations and set the needed value directly. It won't affect the original custom field value in the Vendor object and other PurchaseOrder records.
Item
You can add custom fields to the following Item related objects: ItemDiscount, ItemFixedAsset, ItemGroup, ItemInventory, ItemInventoryAssembly, ItemNonInventory, ItemOtherCharge, ItemPayment, ItemService.
When you create a custom field, it is common for all Item* objects at once. For example, you can't add the CustomField1 to the ItemDiscount object or the CustomField2 to the ItemFixedAsset.
The following Item related objects don't support custom fields: ItemSalesTaxItemSalesTaxGroup, ItemSites, ItemSubtotal, PayrollItemWage, PayrollItemNonWage.
The following LineItem* objects inherit Item custom fields: CreditMemoLineItem, EstimateLineItem, InvoiceLineItem, PurchaseOrderLineItem, SalesOrderLineItem, SalesReceiptLineItem.
Filtering Specifics
QuickBooks Desktop API supports the following native filters:
| Objects | Fields and Operators |
|---|---|
| Template | Id (=) |
| VehicleMileage | Id (=, In) |
| BillPaymentCreditCardLine | Id (=), BillCreditCardId (=) |
| BillExpenseLine | Id (=), BillId (=) |
| BillingRateLine | Id (=), BillingRateId (=) |
| BillPaymentCheckLine | Id (=), BillPaymentCheckId (=) |
| BuildAssemblyLineItem | Id (=), BuildAssemblyId (=) |
| CheckExpenseLine, CheckLineItem | Id (=), CheckId (=) |
| CreditCardChargeExpenseLine, CreditCardChargeLineItem | Id (=), CreditCardChargeId (=) |
| CreditCardCreditExpenseLine, CreditCardCreditLineItem | Id (=), CreditCardCreditId (=) |
| DepositLineItem | Id (=), DepositId (=) |
| EstimateLineItem | Id (=), EstimateId (=) |
| InventoryAdjustmentLine | Id (=), InventoryAdjustmentId (=) |
| InvoiceLineItem | Id (=), InvoiceId (=) |
| ItemReceiptExpenseLine, ItemReceiptLineItem | Id (=), ItemReceiptId (=) |
| JournalEntryLineItem | Id (=), JournalEntryId (=) |
| PriceLevelPerItemLine | Id (=), PriceLevelId (=) |
| PurchaseOrderLineItem | Id (=), PurchaseOrderId (=) |
| ReceivePaymentLine | Id (=), ReceivePaymentId (=) |
| SalesOrderLineItem | Id (=), SalesOrderId (=) |
| SalesReceiptLineItem | Id (=), SalesReceiptId (=) |
| SalesTaxPaymentCheckLineItem | Id (=), SalesTaxPaymentCheckId (=) |
| TransferInventoryLineItem | Id (=), TransferInventoryId (=) |
| Deposit, Estimate | Id (=, In), TimeModified (=, <, <=, >, >=) |
| ToDo | Id (=, In), TimeModified (=, <, <=, >, >=), IsActive (=, In) |
| JobType | Id (=, In), TimeModified (=, <, <=, >, >=), FullName (=, In, Like), IsActive (=, In) |
| SalesRep | Id (=, In), TimeModified (=, <, <=, >, >=), Initial (=, In, Like), IsActive (=, In) |
| Class, Currency, CustomerMsg, DateDrivenTerms, Employee, InventorySite, ItemDiscount, ItemFixedAsset, ItemGroup, ItemInventory, ItemInventoryAssembly, ItemNonInventory, ItemOtherCharge, ItemPayment, ItemSalesTax, ItemSalesTaxGroup, OtherName, PayrollItemNonWage, PayrollItemWage, PriceLevel, SalesTaxCode, ShipMethod, StandardTerms, Terms, Vehicle, WorkersCompCode | Id (=, In), TimeModified (=, <, <=, >, >=), Name (=, In, Like), IsActive (=, In) |
| Vendor | Id (=, In), TimeModified (=, <, <=, >, >=), Name (=, In, Like), IsActive (=, In), Balance (=, <, <=, >, >=, In) |
| PaymentMethod | Id (=, In), TimeModified (=, <, <=, >, >=), Name (=, In, Like), IsActive (=, In), PaymentMethodType (=, In) |
| Customer | Id (=, In), TimeModified (=, <, <=, >, >=), Name (=, In, Like), IsActive (=, In), TotalBalance (=, <, <=, >, >=, In) |
| ARRefundCreditCard, Bill, BuildAssembly, Charge, Check, CreditCardCharge, CreditCardCredit, InventoryAdjustment, Invoice, ItemReceipt, JournalEntry, PurchaseOrder, ReceivePayment, SalesOrder, SalesReceipt, SalesTaxPaymentCheck, TransferInventory | Id (=, In), TimeModified (=, <, <=, >, >=), RefNumber (=, In) |
| Transfer, TimeTracking | Id (=, In), TimeModified (=, <, <=, >, >=), TxnDate (=, <, <=, >, >=) |
| BillPaymentCheck, BillPaymentCreditCard | Id (=, In), TimeModified (=, <, <=, >, >=), TxnDate (=, <, <=, >, >=), RefNumber (=, In) |
| Transaction | Id (=, In), TimeModified (=, <, <=, >, >=), TxnType (=, In), TxnDate (=, <, <=, >, >=), RefNumber (=, In) |
| ItemAssembliesCanBuild | ItemInventoryAssemblyId (=), ItemInventoryAssemblyName (=), TxnDate (=) |
Use these filters to improve performance and save API calls. You can use filters with other fields or operators, but it may increase API call usage.
Incremental Replication and Synchronization
Synchronization and Replication with Incremental Updates enabled are not supported for objects without TimeCreated or TimeModified fields.
DML Operations Support
Skyvia supports the following DML operations for QuickBooks Desktop objects:
| Operation | Object |
|---|---|
| INSERT, UPDATE, DELETE | Account, Bill, BillPaymentCheck, BuildAssembly, Charge, Check, Class, CreditCardCharge, CreditCardCredit, Currency, Customer, Deposit, Employee, Estimate, InventoryAdjustment, InventorySite, Invoice, ItemDiscount, ItemFixedAsset, ItemInventory, ItemInventoryAssembly, ItemNonInventory, ItemOtherCharge, ItemPayment, ItemReceipt, ItemSalesTax, ItemSalesTaxGroup, JournalEntry, OtherName, PriceLevel, PurchaseOrder, ReceivePayment, SalesOrder, SalesReceipt, SalesRep, SalesTaxCode, SalesTaxPaymentCheck, TimeTracking, ToDo, Transfer, TransferInventory, Vehicle, WorkersCompCode |
| INSERT, DELETE | ARRefundCreditCard, BillingRate, BillPaymentCreditCard, CustomerMsg, CustomerType, DateDrivenTerms, JobType, PaymentMethod, PayrollItemWage, ReceivePayment, ShipMethod, StandardTerms, VehicleMileage |
| UPDATE | PhoneNumbers |
Supported Actions
Skyvia supports all the common actions for QuickBooks Desktop.
Troubleshooting
Retrieving the COM class factory for component with CLSID {45F5708E-3B43-4FA8-BE7E-A5F1849214CB} failed due to the following error: 80040154 Class not registered (Exception from HRESULT: 0x80040154 (REGDB_E_CLASSNOTREG)).
This error means that QuickBooks Desktop is either not installed on the computer with Skyvia Agent running or is incorrectly installed on this computer.
- Make sure that you have selected the correct agent in the connection.
- Make sure that the agent app is installed and running on the computer with QuickBooks Desktop, and that it uses the correct key — the key of the agent, selected in the connection.
- Make sure you are using the agent app of the same bitness (32bit or 64bit) as your QuickBooks Desktop instance.
- If everything is correct, this probably means that QuickBooks Desktop is installed incorrectly. Please reinstall QuickBooks Desktop and try again.
Could not start QuickBooks
This error can be caused by the similar reasons as the previous one, so please check the above solution. Additionally, it can be caused by QuickBooks running on a different user level than the agent app. They both need to be running as a normal user or both running as administrator, but not mixed. You can also see the QuickBooks documentation on this issue.