How to Import Binary Data
Methods of Binary Data Import
Skyvia supports importing binary data to all supported databases and cloud data warehouses and to some of the cloud applications, for example, Salesforce, Marketing Cloud, Magento, Shopify, Marketo. When importing CSV files, you can use two ways to import data to binary columns: using encoded values in the CSV files itself, or using a zip archive with the binary files.
Importing Encoded Values
The first way is to add encoded binary values to the CSV file. For databases you need to encode it to the hexadecimal format, and for cloud data warehouses and cloud apps you need to use base64 encoding.
However, it may be inconvenient to place the data for such columns to a CSV file. For example, if you want to import a number of pictures to Salesforce attachments, it definitely won't be convenient to convert them to the hexadecimal format and place the result into a CSV file.
Importing Zip Archive with Binary Files
The second way is to import a set of binary files to a binary field, uploading them compressed to a zip archive. You just need to upload a zip archive with these files together with the CSV file with other data. The CSV file must specify which attachment file to import for each data row.
The easiest way to specify this information is to add a column with the attachment file names to use to the CSV file. However, you may use more complex ways since Skyvia allows specifying the corresponding file names using Expressions.
Supported Field/Column Types
Here are examples of field/column types that are supported for binary data import/export. Note that the list of cloud sources, supporting binary mport is not complete.
Databases
- SQL Server: image, binary, varbinary
- MySQL: binary, varbinary, blob
- PostgreSQL: bytea
- Oracle: raw, blob, long raw, bfile
Cloud Data Warehouses
- SQL Azure Data Warehouse: binary, varbinary
- Google BigQuery: bytes
- Redshift: bytea
Cloud Applications
- Salesforce: base64
- Salesforce Marketing Cloud: ByteA
- Marketo: Binary
- Shopify: Binary
- Magento 2.x: only the ImageContent field of the ProductMedias object.
- Zoho CRM: Photo field of the Contacts, Leads, Accounts, Products, and Vendors objects and the Content field of the attachments objects: LeadAttachments, AccountAttachments, CampaignAttachments, CaseAttachments, ContactAttachments, DealAttachments, MeetingAttachments, InvoiceAttachments, PriceBookAttachments, ProductAttachments, PurchaseOrderAttachments, QuoteAttachments, SalesOrderAttachments, SolutionAttachments, TaskAttachments, VendorAttachments.
How to Import Binary Data
To import binary files, upload the zip archive together with the CSV file on the Source Definition page of the Task Editor.
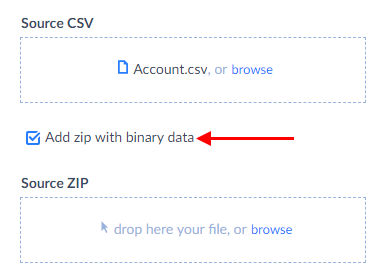
If you are importing local file(s) from your computer, drag your file to the drop here your file, or browse area or click the browse link and upload the CSV file to import.
![]()
When the CSV file is uploaded, select the Add zip with binary data checkbox under Source CSV and drag your ZIP file to the drop here your file, or browse area or click the browse link.
The maximum size of a ZIP file that can be uploaded is 400 Mb.
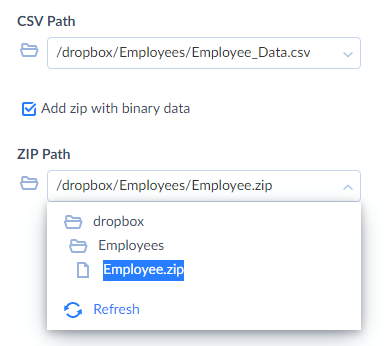
If you are importing files from FTP or a file storage service, select the file in the CSV Path drop-down list. Then, select the Add zip with binary data checkbox and find the ZIP file you want to upload in the ZIP Path drop-down list. This drop-down list displays folders and files from the specified source connections. You can open and close folders by clicking them.
Then, when mapping a binary field use a special Zip File mapping and specify an expression, returning the name of the attachment file to import for the current data row.

To find a more detailed information about binary data import with a zip archive, see the Importing Accounts with Binary Attachments tutorial.