Configuring Queries with Query Builder
General Introduction to Query Builder
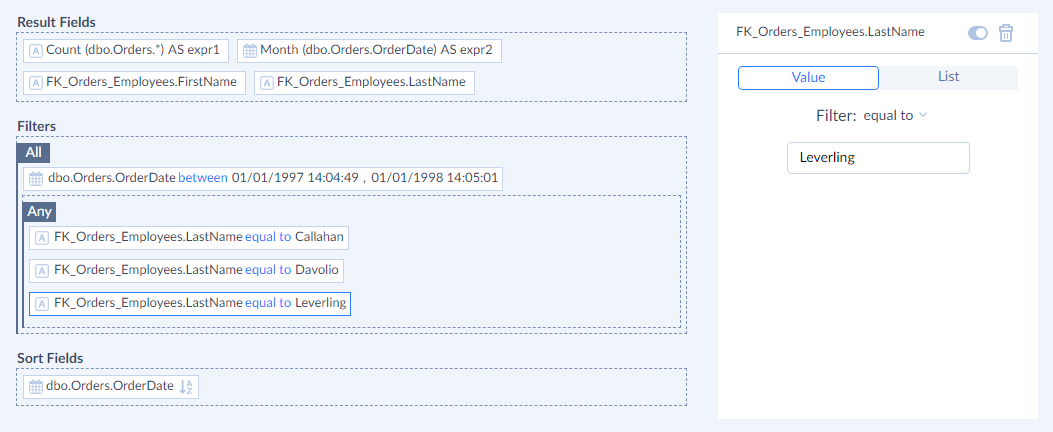
Query Builder is a visual query editor that allows composing SELECT queries visually without typing a code. It is available on the Builder tab of query. It consists of the four panes: Result Fields, Filters, Sort Fields and Details.
Result Fields pane displays fields (columns) the query returns. You can drag tables and columns from the Connection Object List to this pane to query their data (add them to the SELECT and FROM clauses of the SELECT statement). You can read more about it in the How to Add or Remove Columns from Query subsection.
Filters pane displays query filters and filter groups. You can drag columns to this pane to filter data by these columns (add them to the WHERE clause of the query). Find more in the How to Configure Filters subsection.
Sort Fields pane displays columns, the returned data are ordered by, and the sorting order. You can drag columns from the Connection Object List or from the Result Fields pane to this pane in order to sort the queried data by these columns (add them to the ORDER BY clause of the query). Read more in the How to Sort Data subsection.
Details pane is located to the right of other three panes. It allows configuring query in more details and displays settings for the currently selected item in one of other panes. When you click an item in the Result Fields pane, the Details pane allows you to apply functions to the result fields. For an item in the Filters pane, the Details pane allows you to apply a filter or filter group; for an item in the Sort Fields pane it allows changing the sorting order.
How to Create Query
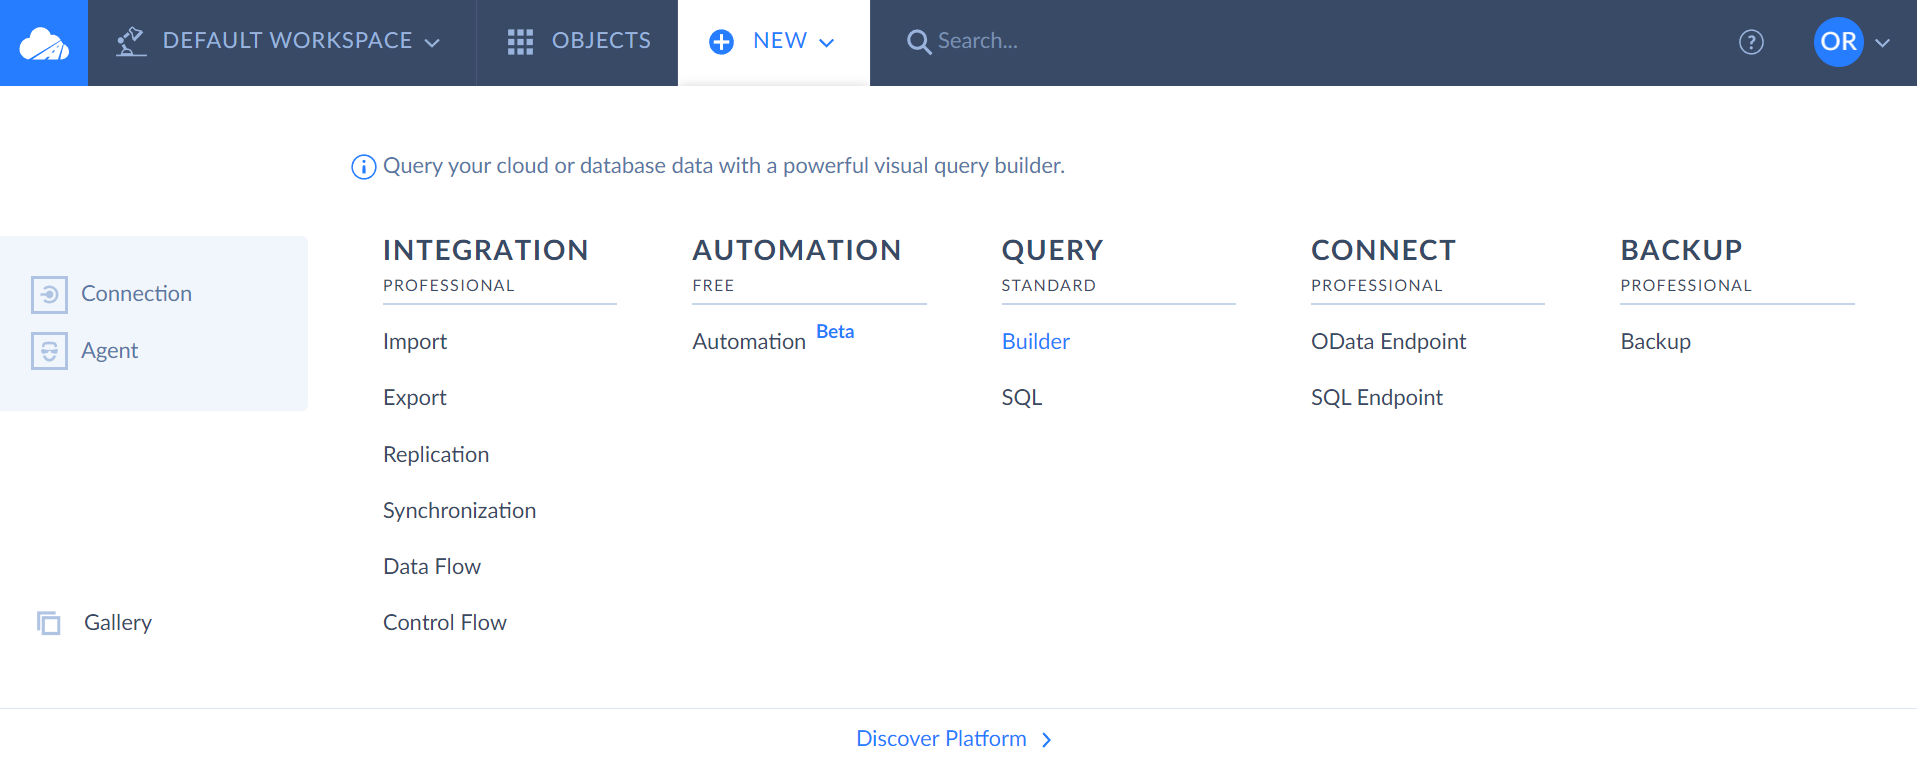
When no query is opened, you can create a new query by clicking +NEW in the top menu and selecting Builder or SQL under Query. In our example, we select Builder.
A new query will be created with the respective view opened. To create a new query when one or more queries are already open, click the  button on the query page tab bar. A new query will be created with the same view opened as the previously active query. You can switch to the necessary view by clicking the corresponding button on the right side of the query toolbar.

Additionally, you can clone an open query by clicking Clone on the Query toolbar. The query is cloned with all its settings, connections and returned data. Created queries are saved to the OBJECTS page for future use.
How to Rename Query
If you want to rename a newly opened query or an already existing one, you need to hover over the corresponding query tab and click the edit icon as shown in the screenshot below.

How to Add or Remove Columns from Query
Adding Columns to Query
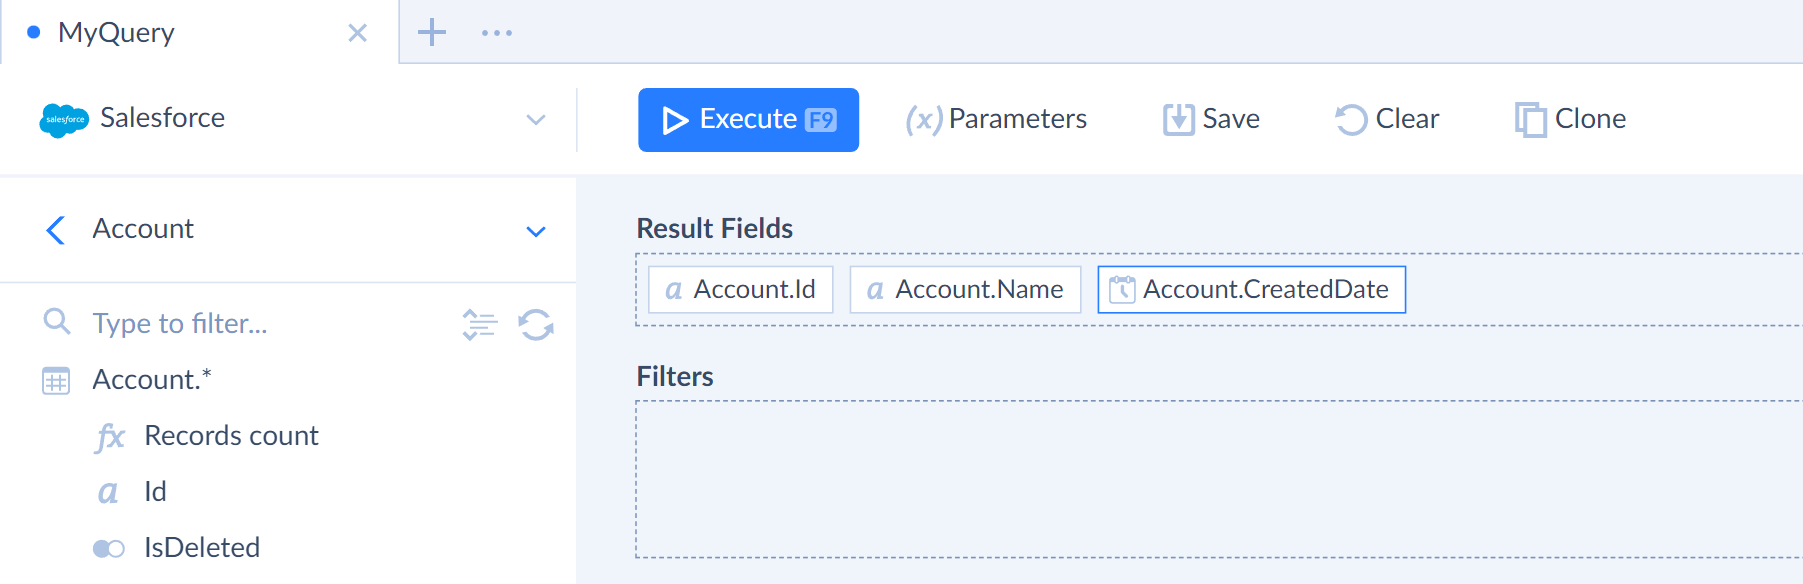
To query data from a table, simply drag this table from the Connection Object list to the Result Fields pane. To add only some of the table fields to the query, click a table in the Connection Object list, and it will display the list of table fields.
You can also drag several table fields at the same time. For this, select them in the Connection Object List using Ctrl or Shift key and drag them.
Removing or Disabling Columns from Query
To remove a column or table from the query, click it on the Result Fields pane and press the Delete key or click the ![]() button in the Details pane header on the right side of the query. You can also temporary disable a column in a query without removing it. For this, click the
button in the Details pane header on the right side of the query. You can also temporary disable a column in a query without removing it. For this, click the ![]() icon in the Details pane header. This will remove the column from the generated SQL statement, but keep it in the Query Builder so that you will be able to re-enable it. To enable it back, select it on the Result Fields pane and click the same button in the Details pane header again.
icon in the Details pane header. This will remove the column from the generated SQL statement, but keep it in the Query Builder so that you will be able to re-enable it. To enable it back, select it on the Result Fields pane and click the same button in the Details pane header again.
Setting Column Alias
You can also set an alias for the column. For this, click the column on the Result Fields pane and then click the ![]() Rename field button under the Details pane header. Enter the alias and click the
Rename field button under the Details pane header. Enter the alias and click the ![]() Apply rename button or click the
Apply rename button or click the ![]() Cancel rename button to cancel the action.
Cancel rename button to cancel the action.
How to Add Aggregations and Functions
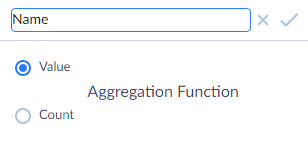
After you have added the necessary fields or objects to the query, you can apply aggregation or other functions to them. To do it, simply click the field in the Result Fields pane and then select the necessary function in the Details pane on the right side of the query. Note that the Details pane displays only the functions applicable to the type of the selected column.
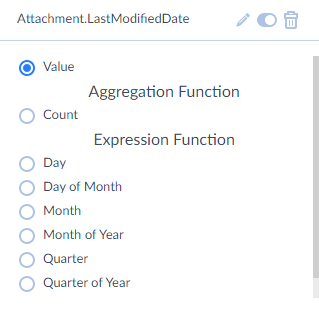
When you apply aggregation functions to selected columns, columns without an aggregation function selected are automatically added to the GROUP BY clause. You don't need to configure this clause manually.
To remove a function from a column, simply select the column in the Result Fields pane and then, in the Details pane, click Value.
How to Configure Filters
Adding, Removing, and Disabling Filters
To filter data by certain column, drag this column from the Connection Object List to the Filters pane. Then click it in the Filters pane and configure the filter in the Details pane on the right side of the query as described below.
Skyvia Query filters are type-specific, the available filters depend on the data type of the column.
To remove a filter, click it in the Filters pane and then press the Delete key or click the ![]() icon in the Details pane.
icon in the Details pane.
You can also temporary disable a filter in a query without removing it. For this click the ![]() icon in the Details pane header. This will remove the filter from the generated SQL statement, but keep it in the Query Builder so that you will be able to re-enable it. To enable it back, select it on the Result Fields pane and click the same button in the Details pane header again. Read more in the How to Configure Filters in Queries tutorial
icon in the Details pane header. This will remove the filter from the generated SQL statement, but keep it in the Query Builder so that you will be able to re-enable it. To enable it back, select it on the Result Fields pane and click the same button in the Details pane header again. Read more in the How to Configure Filters in Queries tutorial
When you add several filters to a query, they can be united into groups and subgroups. Each group consists of several filters and/or subgroups united with a logical operator (AND or OR). For more information on how to create and configure filter groups check Filter Groups subsection.
Configuring Filters
Skyvia supports four kinds of filters: value filters, list filters, relative filters and Parameters. Value filters are supported for all field types. List filters are supported for fields with string data only. Relative filters are supported for the fields with datetime data only. Parameter is a placeholder for varying values you can instead of constant values. You can change parameter values without modifying the query itself.
Value Filters
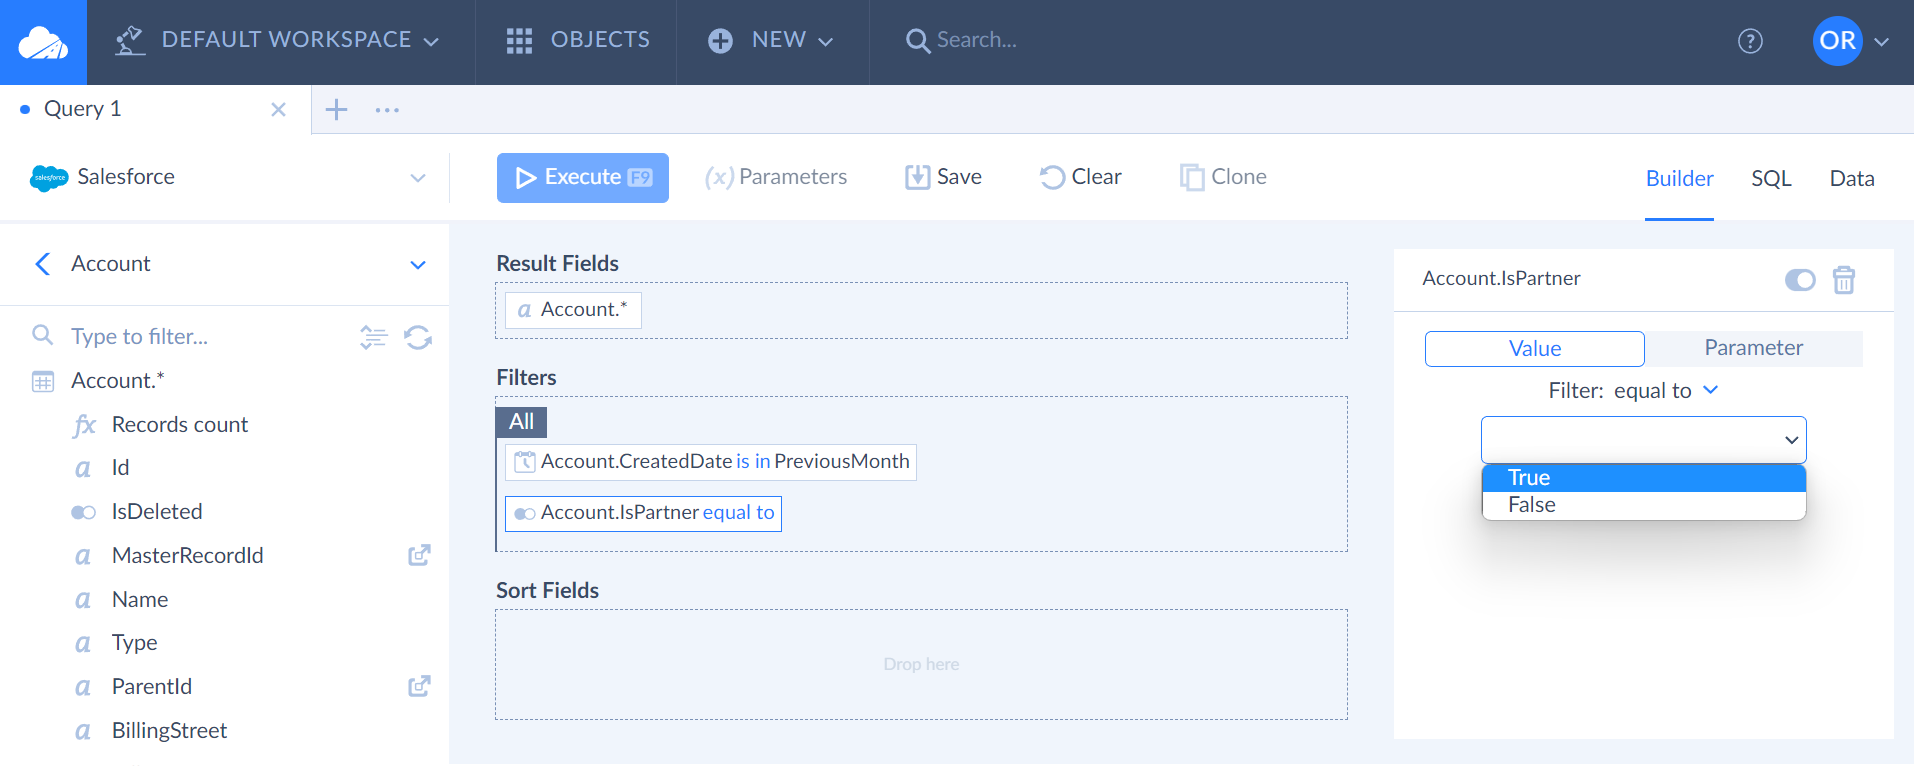
Value filters simply compare the field value with the specified one using different comparison operators or check whether the field value is NULL.
For value filters, the configuration is pretty straightforward: on the Details pane, in the Filters list select the necessary filter. Then, if the selected filter requires a value to compare the field with (like equal to or between), specify this value or values. More information can be found here.

List Filters
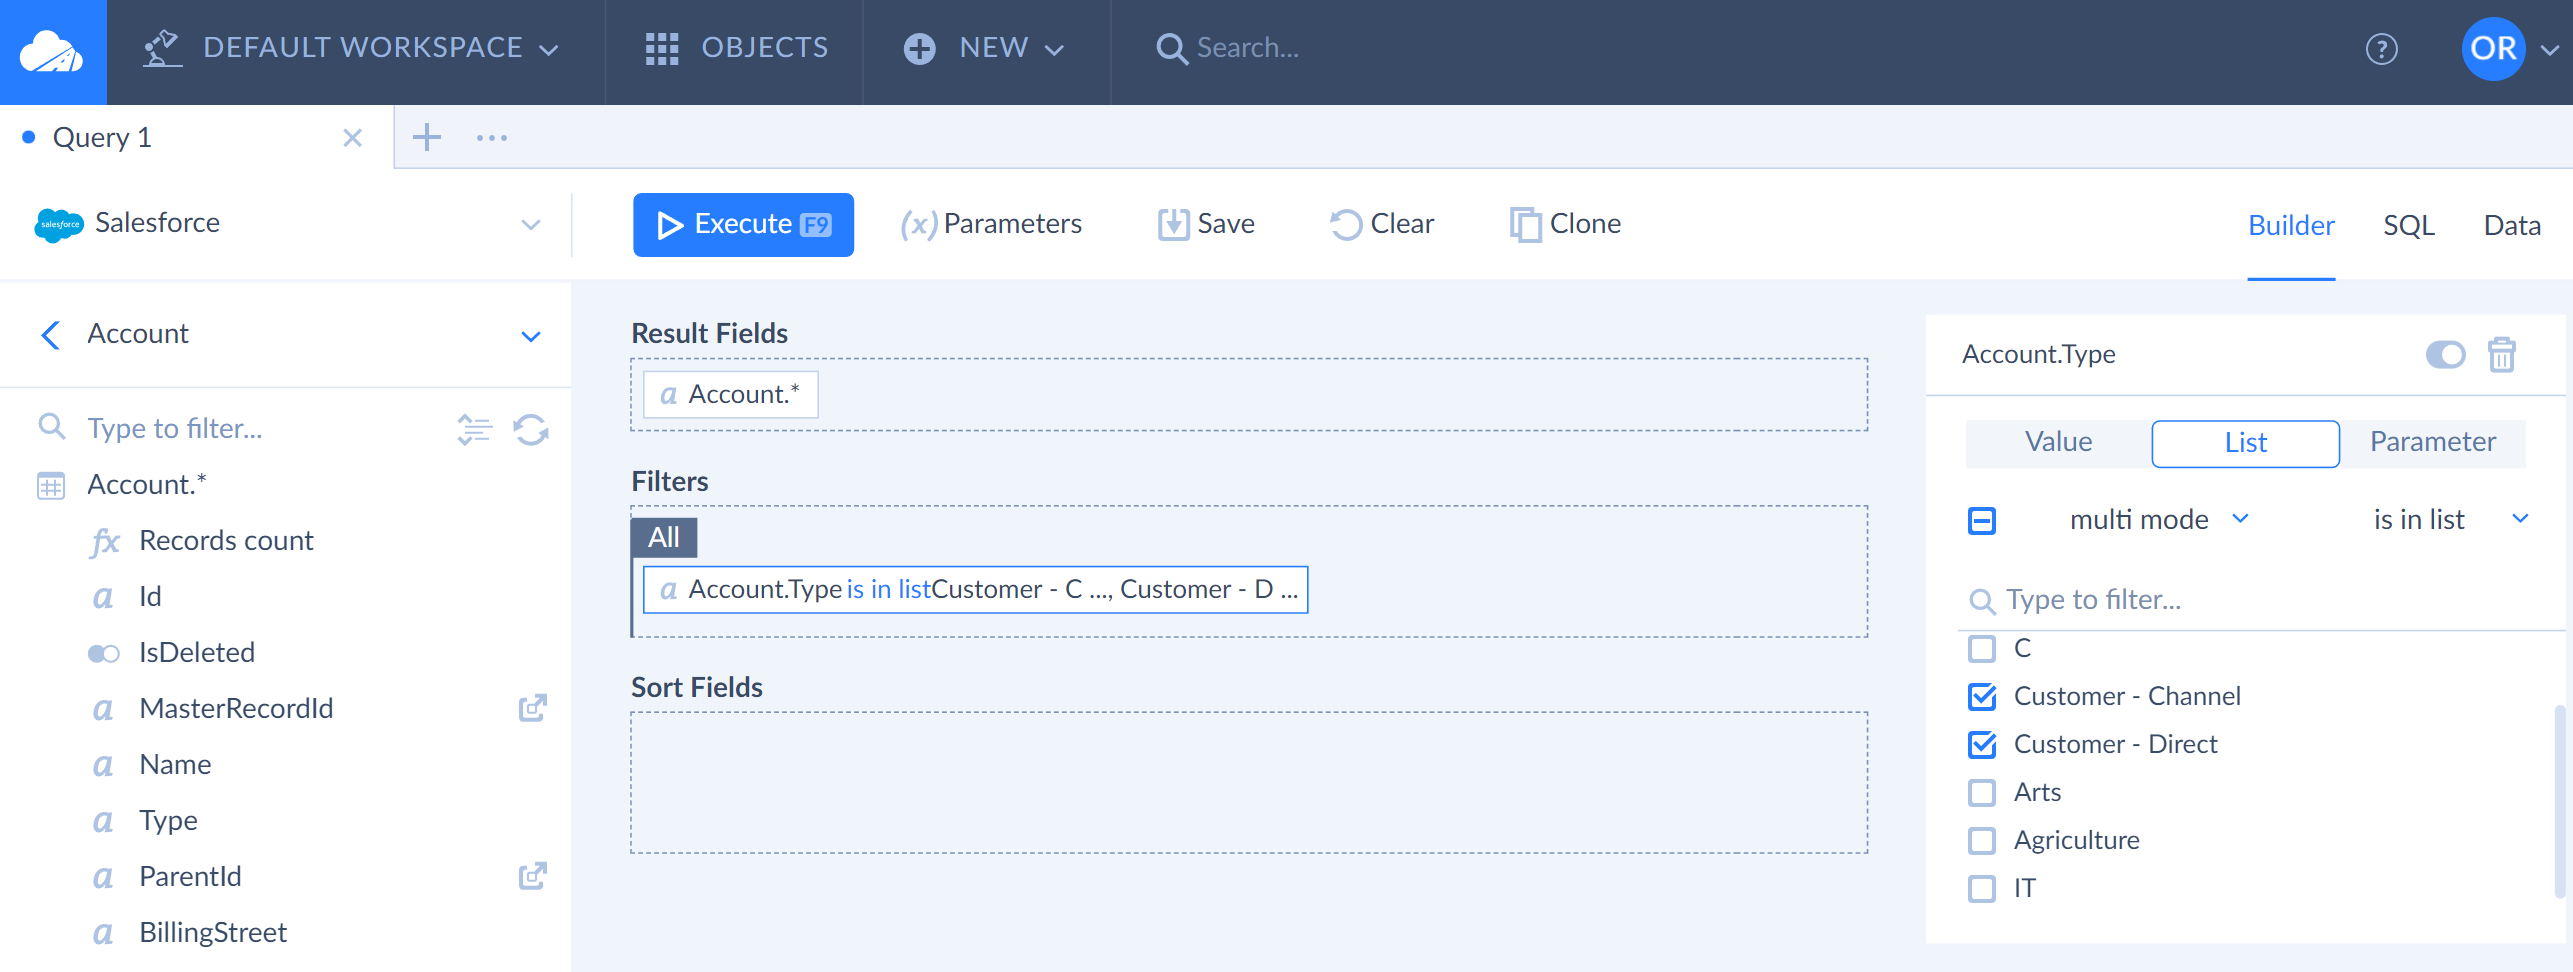
List filters allow you to quickly select one or more values from a list of the distinct values, available in the data source for this field, and get or exclude records with selected values from the list. They are especially useful when a field in the data source can have one of a fixed set of values. To configure a list filter, perform the following steps:
-
In the Details pane, click List.
-
Select checkboxes for the required values in the list. If you don't see all the required values, click the load more link at the end of the list until all the required values are loaded.
If there are too many values in the list, you can use the Type to filter box to quickly find the necessary values. Start typing the value, and only values, containing the entered string, will be displayed.
-
If you want to filter out records with selected values, click is in list and select is not in list. If you want to retrieve the records with such values, omit this step.
Relative Filters
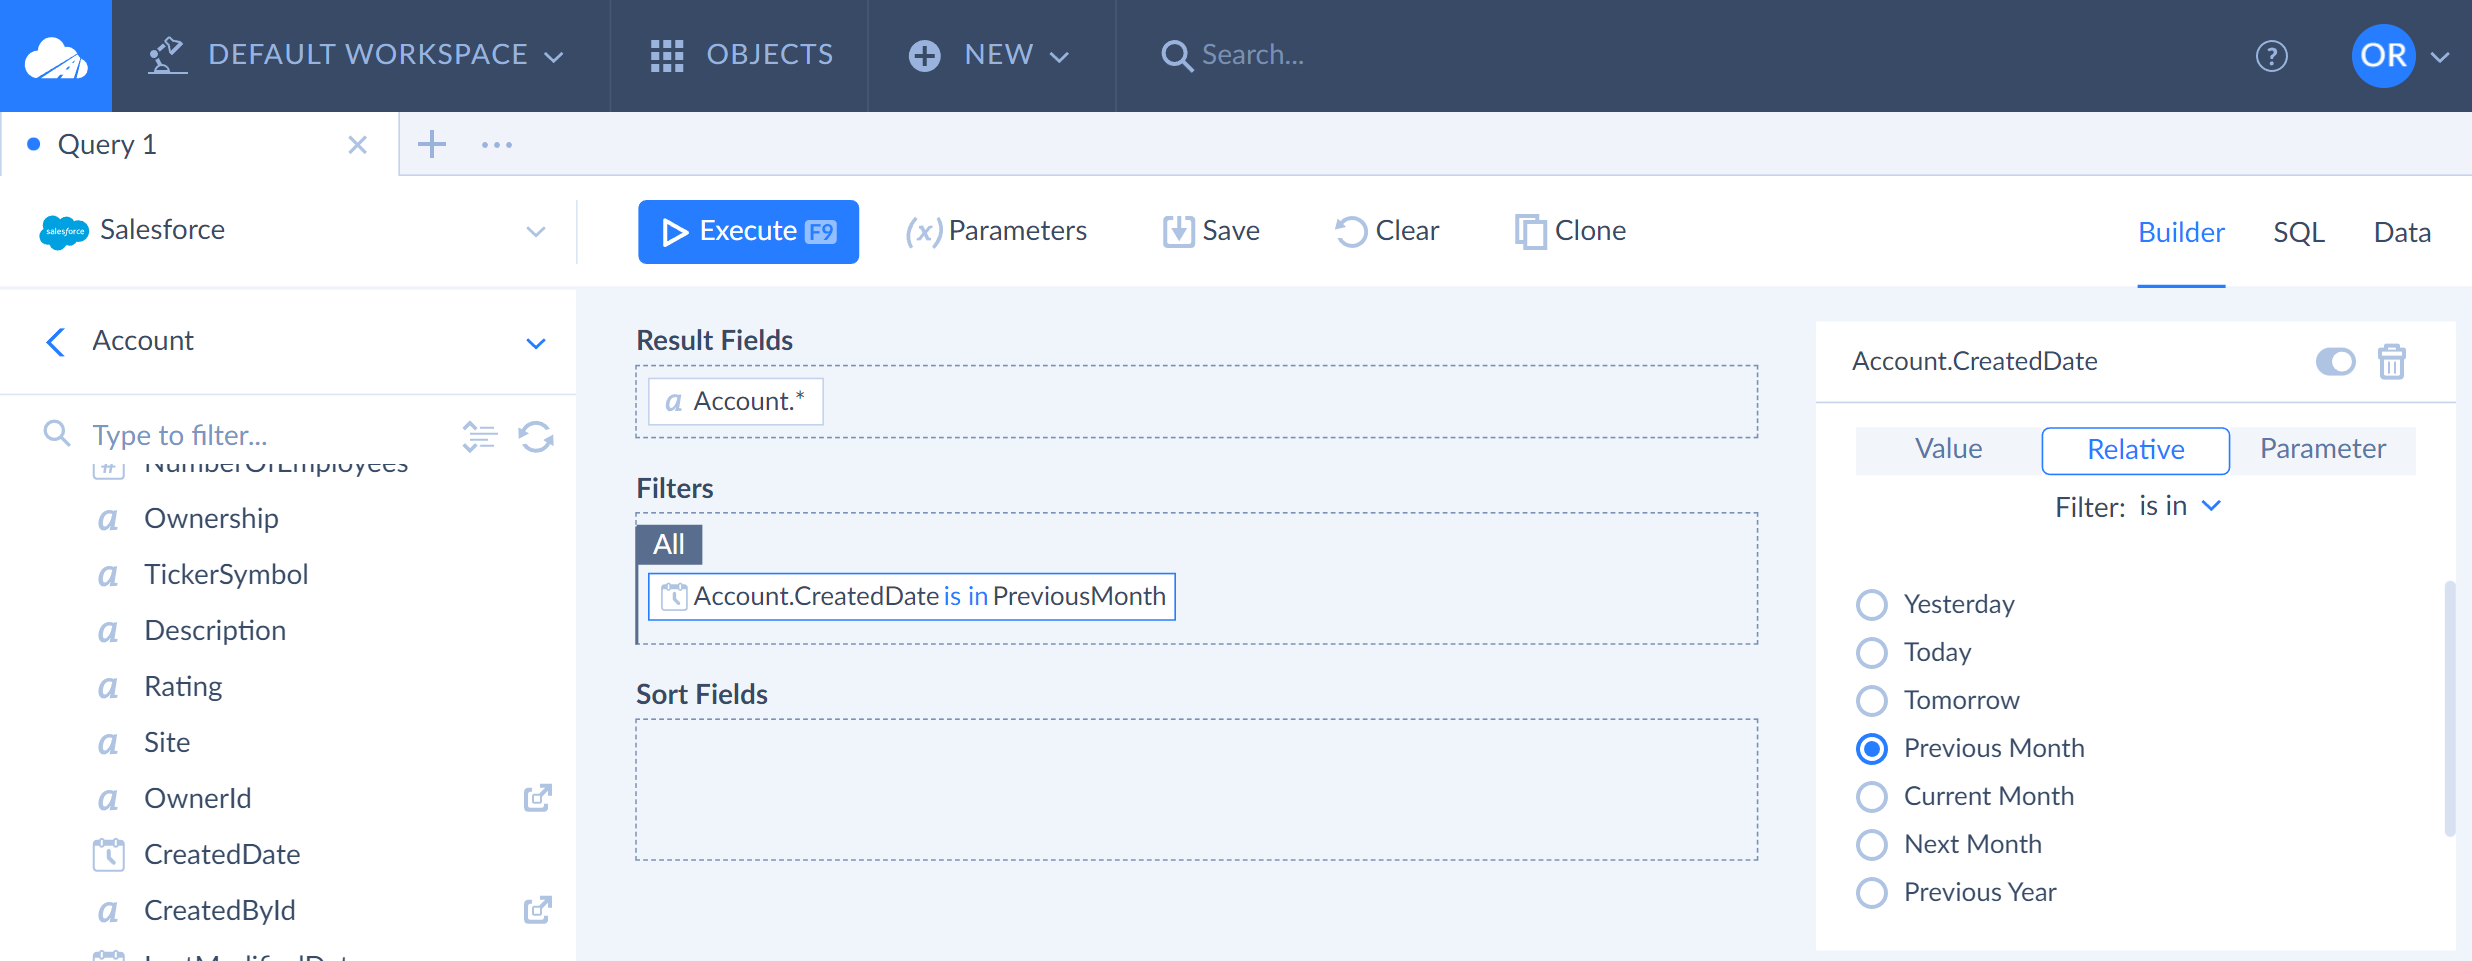
Relative filters allow quickly filtering records with datetime values within a specified period. To configure a relative filter, perform the following steps:
- In the Details pane, click Relative.
- If you want to filter out values within the period, click is in and select is not in from the list. If you want to retrieve the records with values within this period, omit this step.
- Select the necessary period in the bottom part of the Details pane.
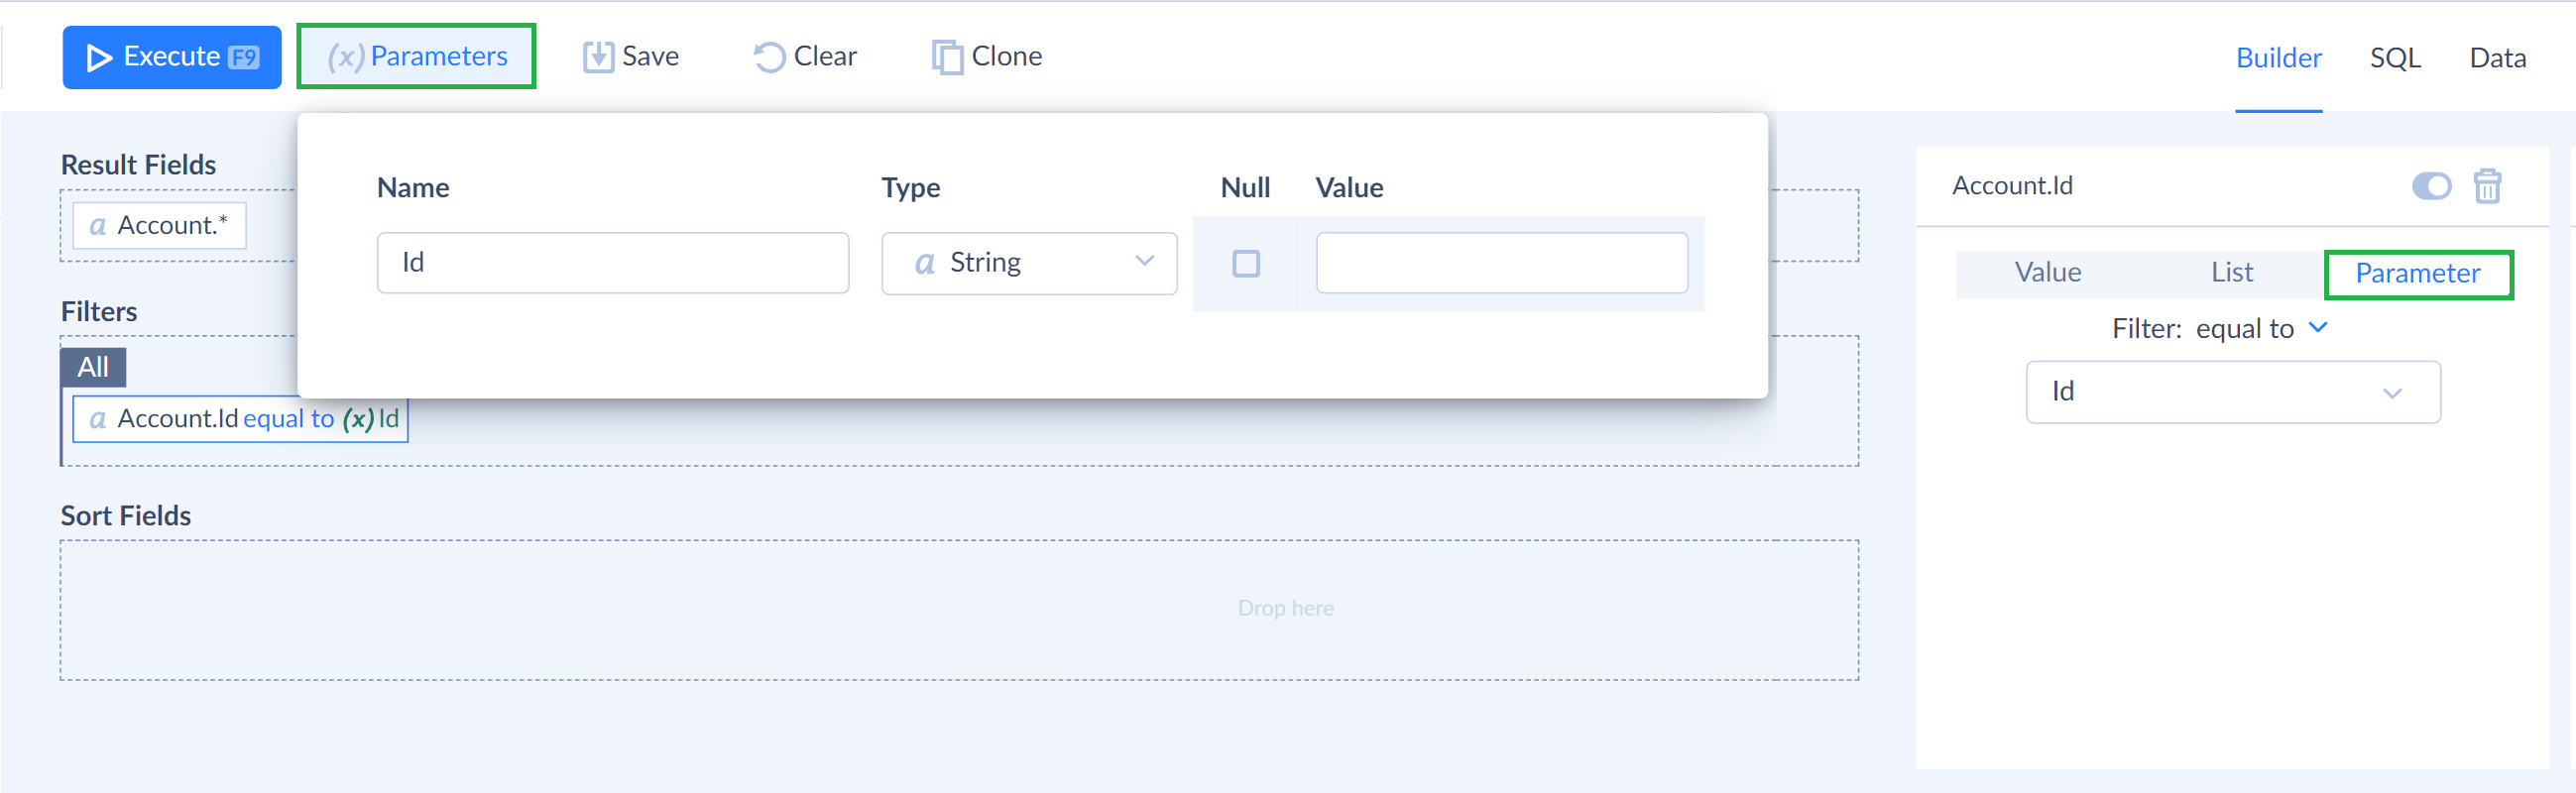
Parameters
You can use query parameters when you need to run the same query often, using different values. For example, building the same report for different periods.
To add a parameter to a query, do the following:
- In the Details pane, click Parameter. Skyvia automatically creates the parameter with the name corresponding to the field name.
- To assign a value to the parameter, click Parameters above and enter the value.
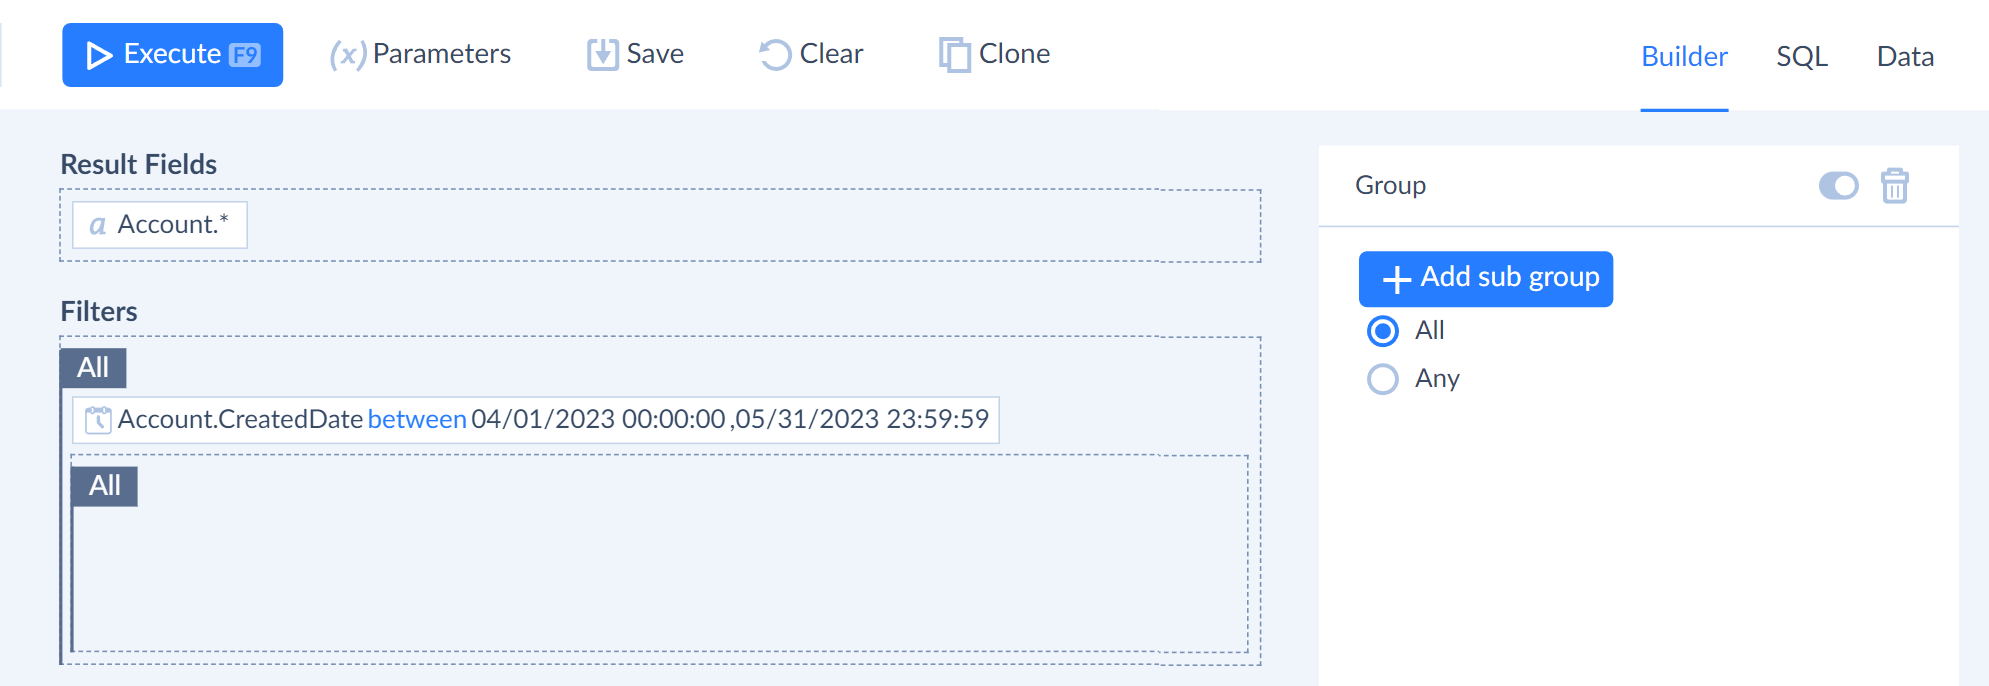
Filter Groups
If you add multiple filters, they can be united in groups. Each group consists of several filters and/or subgroups united with a logical operator (AND or OR). The group header in the Filters pane indicates which logical operator is used in the group. All means that rows must satisfy all group filter conditions and subgroups (AND operator is used). Any means that rows must satisfy at least one filter condition or subgroup (OR operator is used).
Initially, one root filter group is created, and rows should satisfy all its filters and subgroups.
To add a subroup to a group, click the group header and then click +Add subgroup in the Details pane.
To change the group operator, click the group header and then click All or Any depending on the operator you want to apply.
To remove a group, click its header in the Filters pane and then press the Delete key or click the ![]() icon in the Details pane header on the right side of the page.
icon in the Details pane header on the right side of the page.
You can also temporary disable a filter group in a query without removing it. For this, click the ![]() icon in the Details pane header. This will remove the filter group from the generated SQL statement, but keep it in the Query Builder so that you will be able to re-enable it. To enable it back, select it on the Result Fields pane and click the same button in the Details pane header again.
icon in the Details pane header. This will remove the filter group from the generated SQL statement, but keep it in the Query Builder so that you will be able to re-enable it. To enable it back, select it on the Result Fields pane and click the same button in the Details pane header again.
Note that you can copy a filter from one group to another by dragging it to the target group. Read the How to Configure Filters in Queris tutorial to find out more.
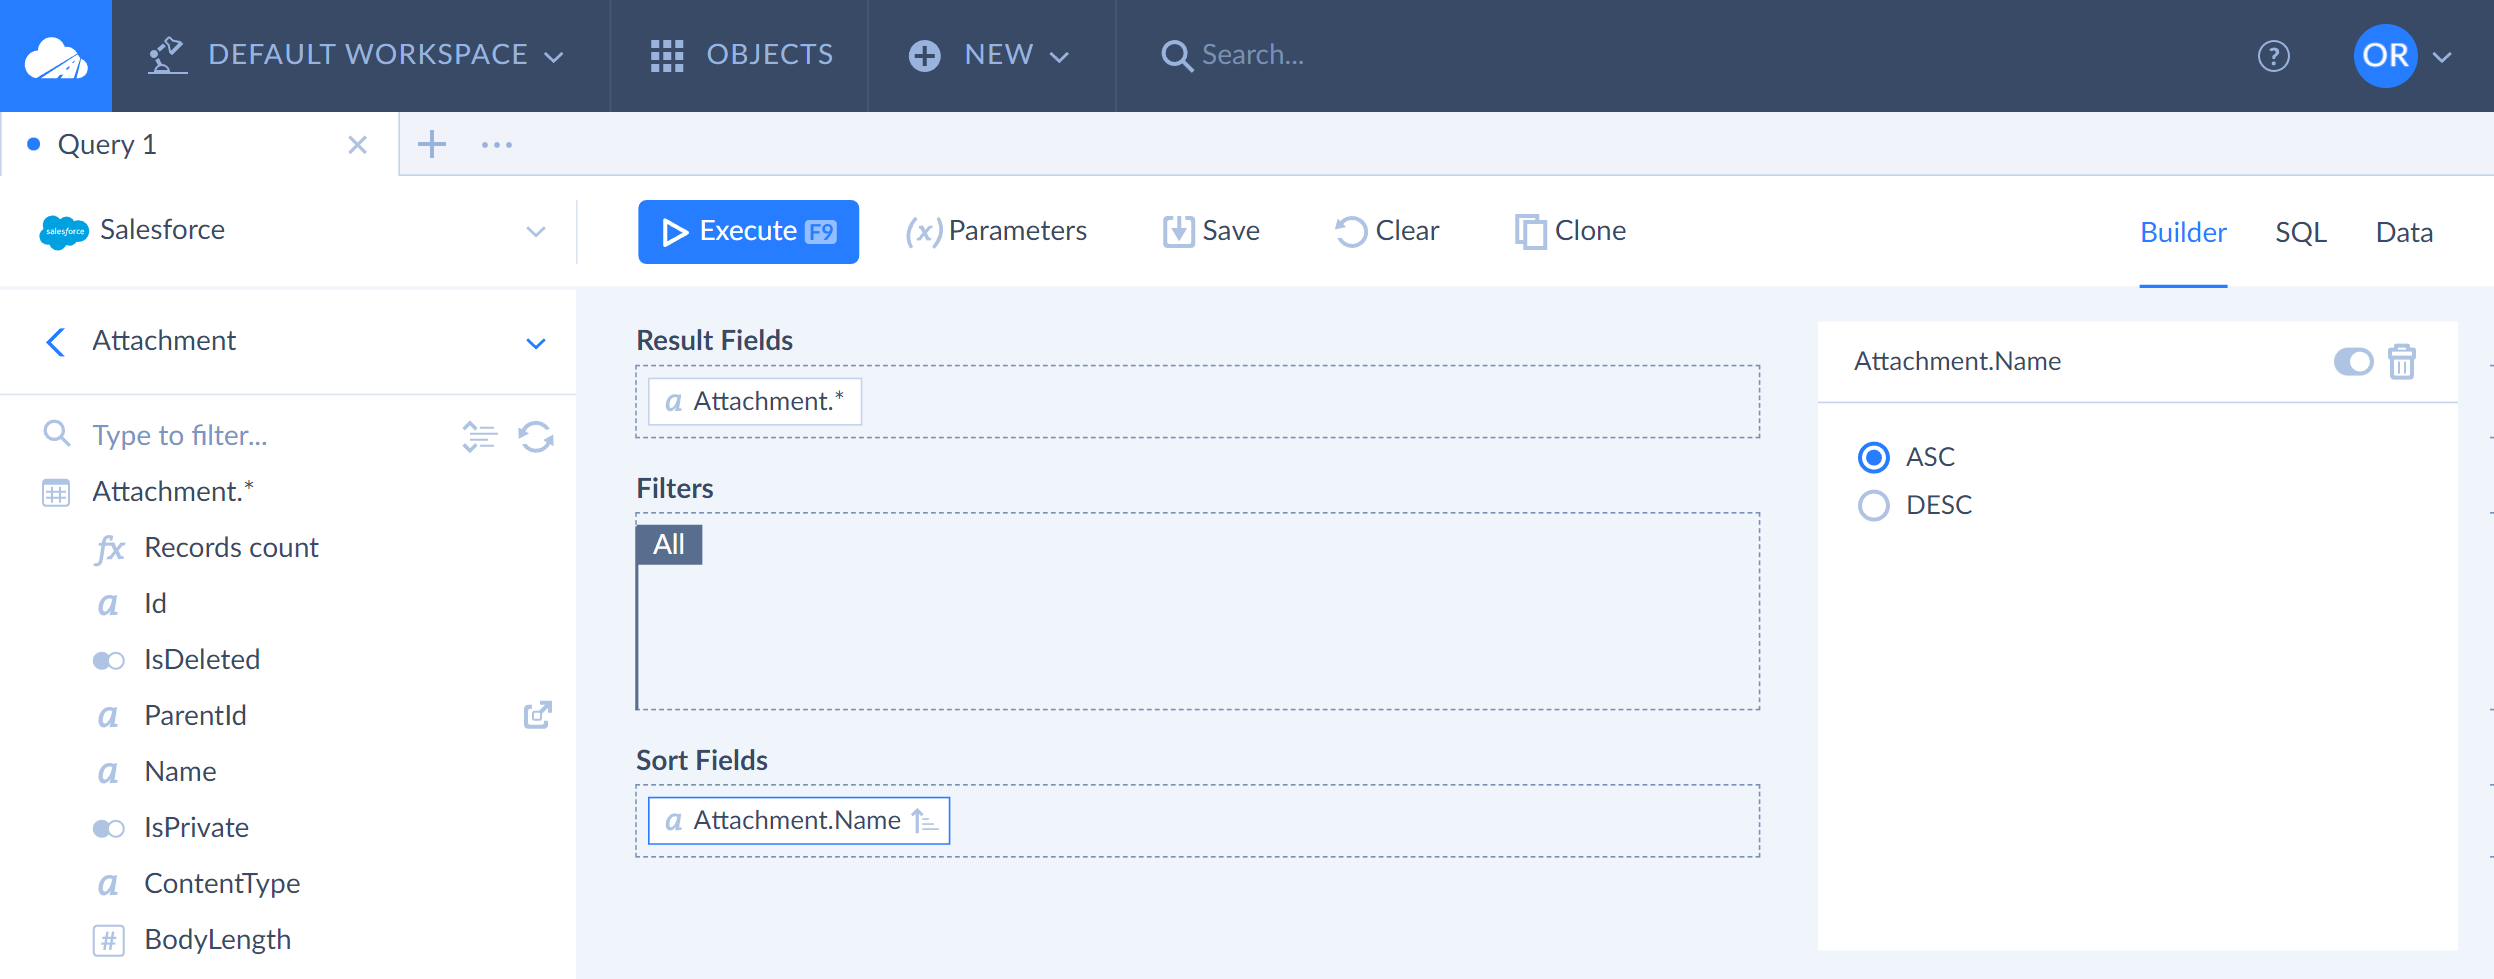
How to Sort Data
To sort data by a column, drag this column to the Sort Fields pane. You can drag it either from the Connection Object List or from the Result Fields pane. By default, the data are sorted in the ascending order. To change the sort order, click the column in the Sort Fields pane and then, in the Details pane, click Asc or Desc. You can add as many columns to sorting as you need. To change the priority of the columns in sorting, use drag-n-drop in the Sort Fields pane to order columns by the necessary priority.
To remove sorting by a column, click the column in the Sort Fields pane and then press the Delete key or click the ![]() Delete icon in the Details pane.
Delete icon in the Details pane.
How to Create Joins
In order to create joins, you need to use navigation by relations in the Connection Object List. When you open a table in the Connection Object List, you can navigate to its parent table by clicking the ![]() icon to the right of the corresponding foreign key field.
icon to the right of the corresponding foreign key field.
If you drag a field or several fields from the parent table in the Connection Object List to query builder after navigating to it via a relation, query builder will generate JOIN by this relation in the FROM clause of the SELECT statement. If you have navigated to a table via several relationships in a table hierarchy, JOINs for all of the relationships used are added to the query.
To navigate back to the child table, click the ![]() button in the Connection Object List header. Alternatively, you can click the
button in the Connection Object List header. Alternatively, you can click the ![]() button in the Connection Object List header to open a list with all the tables, by relationships of which you have navigated to the current table, and the corresponding foreign key fields used for navigation. Then click the necessary table in the list.
button in the Connection Object List header to open a list with all the tables, by relationships of which you have navigated to the current table, and the corresponding foreign key fields used for navigation. Then click the necessary table in the list.
To add join by a relationship to your query, perform the following steps:
- When you want to add data from several tables, having foreign key relationships, start with the "most child table" you want to include to a query — a table not referenced by foreign keys you want to use for joins. Click this table in the Connection Object List in order to access its fields and drag the necessary fields from it to the Result Fields pane.
- Then navigate to the necessary parent table in the following way: find the foreign key field of the child table, belonging to the foreign key you want to use for join, in the Connection Object List and click the
 icon to the right of the foreign key field.
 - Drag the necessary parent fields to the Result Fields pane. Query Builder will automatically create JOIN on the foreign key you have used for navigating to the parent table.
- If you need to add fields from the higher level parent table, find a foreign key field of the corresponding foreign key in the current table, click the icon to the right of the foreign key field to navigate to the higher level parent table. Then drag the necessary fields to the Result Fields pane. Repeat this until you get to the "most parent" table you want to add the fields from to the query.
When you add a join, the joined parent table is assigned with an alias based on the relationship names you have used for navigation.
To get better understanding of adding joins, you can read the How to Create Joins in Queris tutorial.
How Query Builder Generates SQL
While Query Builder user interface does not have exact 1 to 1 correspondence to the structure of the SELECT statement, it's easy to understand how actions performed in the query builder influence SQL generation.
Note that different data sources use different SQL syntax, and thus, SQL generated for different data sources from a similar design may differ. (For cloud apps, SQLite syntax is used).
SELECT and FROM Clauses
Dragging columns from the connection object list to the Result Fields pane adds these columns to the SELECT clause and adds the corresponding tables to the FROM clause, if they are not still present there. Note that if you drag columns from multiple tables while navigating by table relations, as described above, JOINs are generated automatically in the FROM clause. However, if you switch between tables in the connection object list not by relations but just by switching to the list of tables back from the list of table columns, no joins are built. In this case tables will simply listed in the FROM clause, separated by commas, without any limiting conditions, and you will get a combination of every record from the first table with every record of the second table and so on.
When you apply an expression function to a field, you will get an expression in SQL. Note that different databases may have different sets of functions, so the function added to the SQL may be called differently than in the Query Builder or may use a different syntax.
Grouping
When you apply an aggregation function, Query Builder adds the corresponding aggregation function to the column in the SELECT clause and creates a GROUP BY clause with all the other unaggregated columns if they are present. If you add aggregation functions to more columns, they are removed from the GROUP BY clause, and the corresponding functions are applied in the SELECT clause.
WHERE Clause
Every filter in the Filters pane is added to the WHERE clause. They are united by AND and OR logical operators and taken into parentheses according to the filter groups configured. Value filters are converted to the corresponding SQL operators. List filters are converted to the IN operators. Parameters are converted to SQL parameters, indicated by a colon character prior to the parameter name.
For relative date filters, however, there are no direct SQL analogues. For these filters, Query Builder generates sometimes complex expressions, corresponding to the filter condition, and using data source-specific datetime functions.
ORDER BY Clause
ORDER BY clause is generated based on the columns added to the Sort Fields pane. Note that if you drag a column from the connection object list, Query builder uses the corresponding column name in the ORDER BY clause, but if you drag them from the Result Fields pane to the Sort Fields pane, result column alias is used if present. If you have modified the default order from ASC to DESC, DESC is added to the generated SQL.