Snowflake
Snowflake is a scalable cloud-based data platform, which enables data storage, processing and analytic solutions that are faster, more flexible and easier to use. The Snowflake data platform is not built on any existing database technology or “big data” one, instead it combines a completely new SQL query engine with an innovative architecture natively designed for the cloud.
Snowflake-Specific Features and Limitations
Skyvia has the following limitations for Snowflake:
- Skyvia supports the following types of import operations for Snowflake: INSERT, UPDATE, DELETE.
- To create a Replication, specify the Schema and Files Storage for Bulk fields.
- Synchronization is not supported for Snowflake.
Establishing Connection
To create a connection to Snowflake, select the authentication type and specify the required connection parameters. Skyvia supports the following authentication types for Snowflake connection:
OAuth Authentication
To connect to Snowflake using OAuth, you have to create an OAuth security integration in Snowflake first and obtain the Client Id and Client Secret.
Creating Snowflake OAuth Security Integration
If you want to use OAuth authentication in Skyvia, create a Snowflake OAuth Security Integration first. To do that, run the following script in Snowflake.
1
2
3
4
5
6
7
8
9
10
USE ROLE ACCOUNTADMIN;
CREATE SECURITY INTEGRATION Skyvia
TYPE = OAUTH
ENABLED = TRUE
OAUTH_CLIENT = CUSTOM
OAUTH_CLIENT_TYPE = 'CONFIDENTIAL'
OAUTH_REDIRECT_URI = 'https://app.skyvia.com/oauthcallback/snowflake'
OAUTH_ISSUE_REFRESH_TOKENS = TRUE
OAUTH_REFRESH_TOKEN_VALIDITY = 7776000;
The refresh token validity default value is 7776000 (90 days). If you need to change the refresh token validity value, ask your Snowflake account administrator to send a request to Snowflake Support.
Viewing OAuth Security Integration
To view the created integration, run the following command:
USE ROLE ACCOUNTADMIN;

DESC SECURITY INTEGRATION SKYVIA;
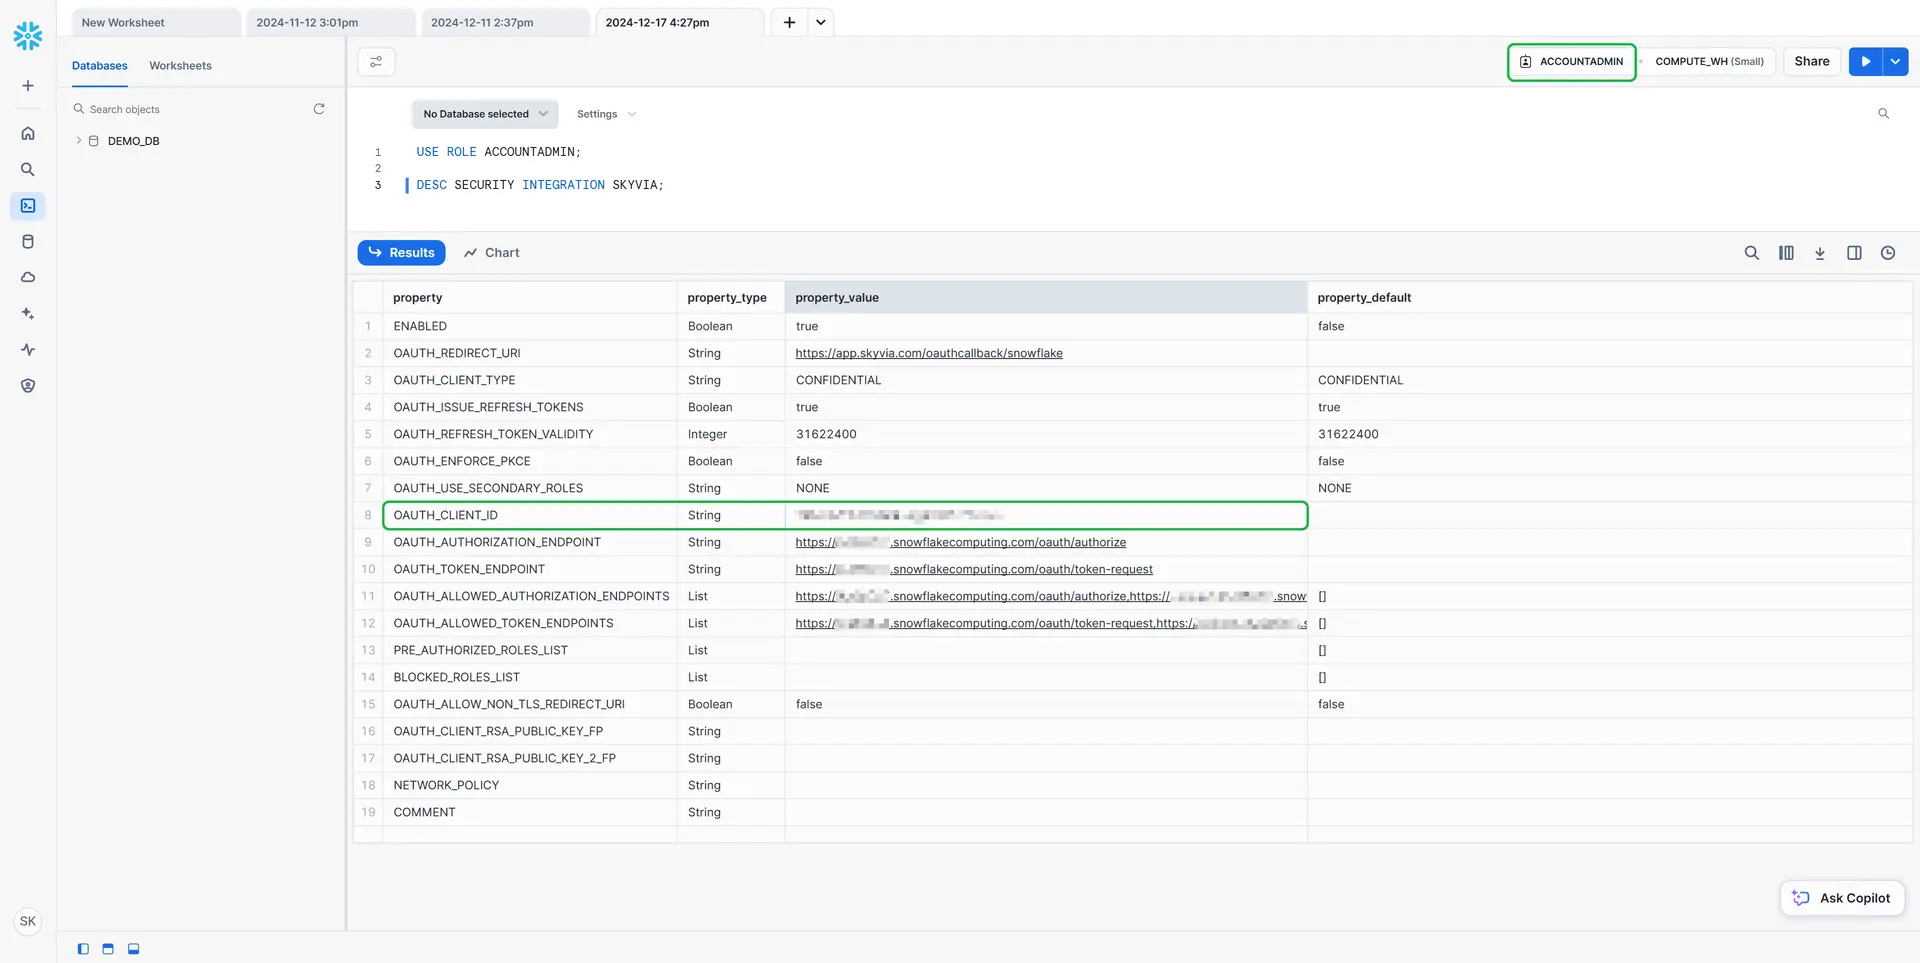
See more information about Snowflake security integrations here.
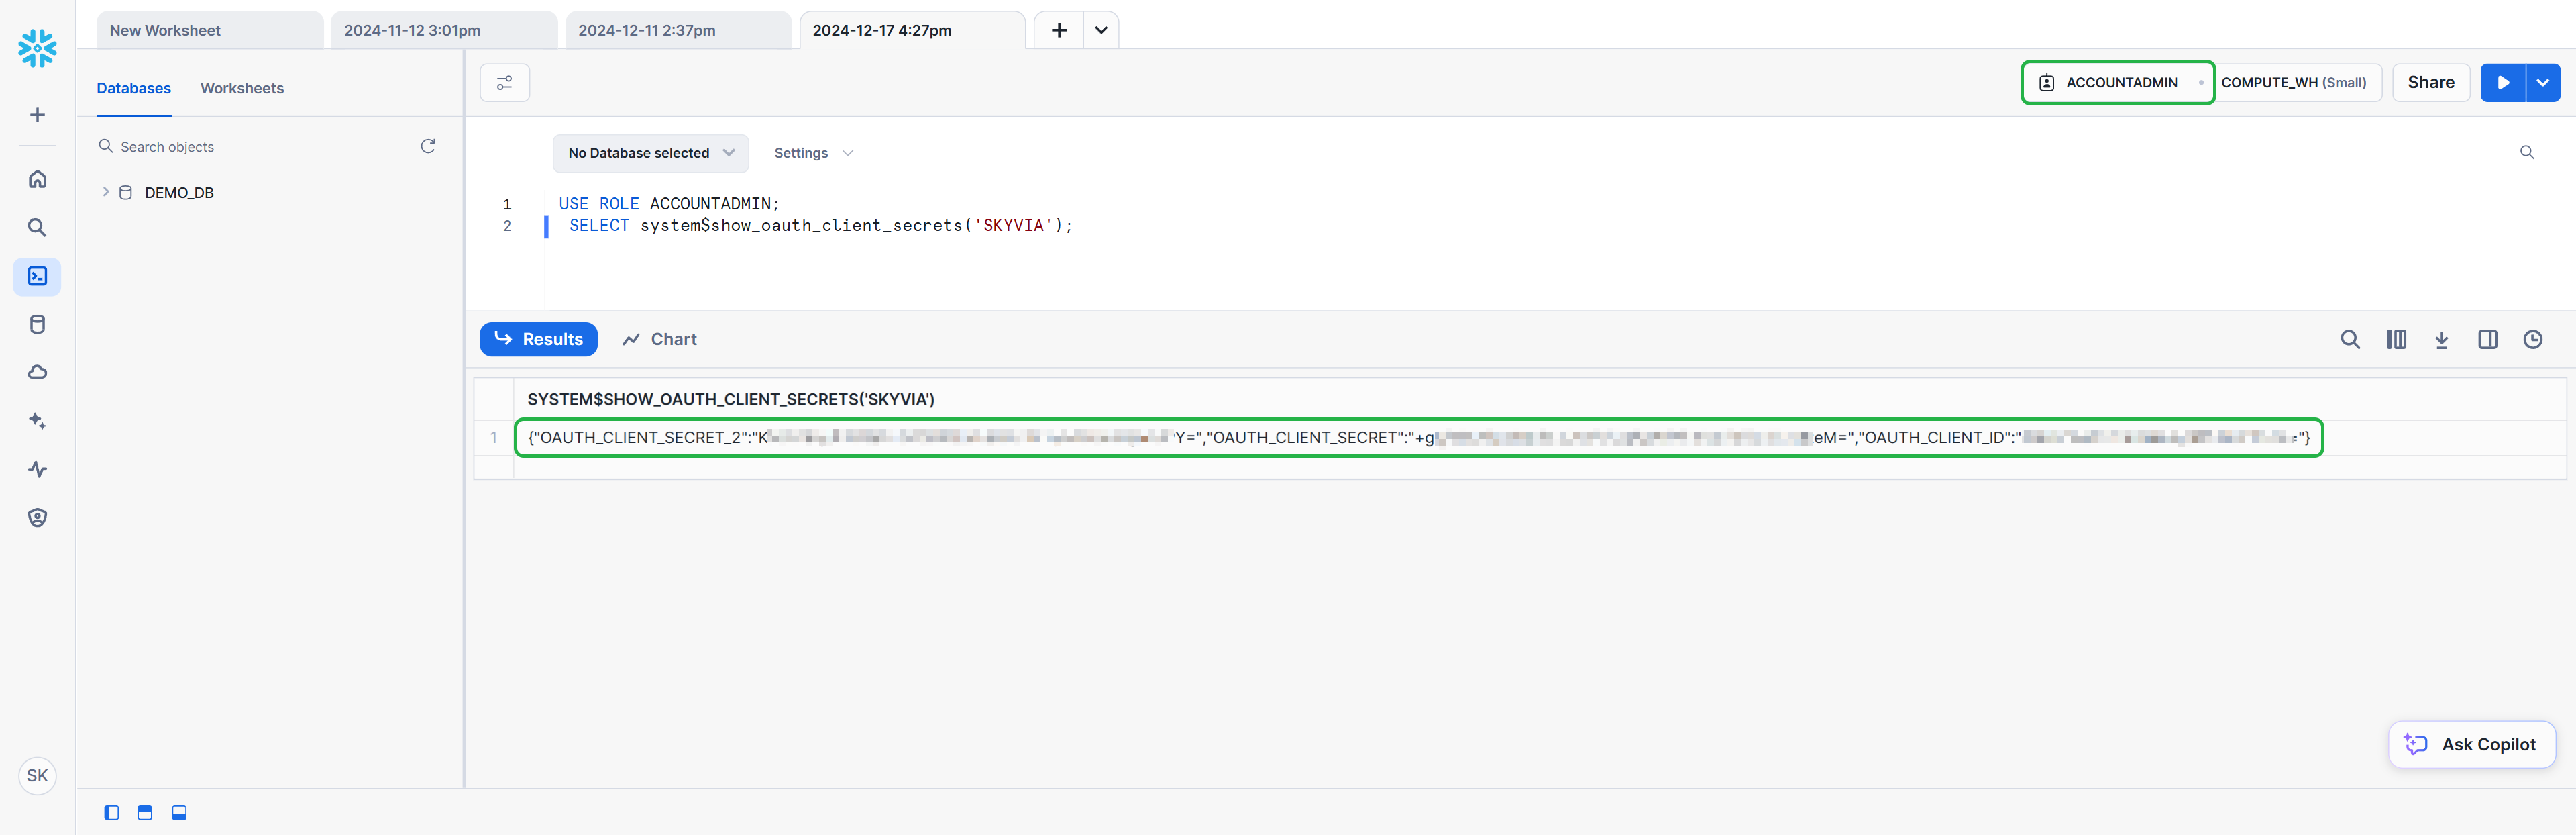
Getting Client Id and Client Secret
To obtain the Client Secret and Client Id, run the following command.
USE ROLE ACCOUNTADMIN;

SELECT system$show_oauth_client_secrets('SKYVIA');
Creating OAuth Connection
To connect to Snowflake using the OAuth 2.0, create the OAuth Security Integration and perform the following steps:
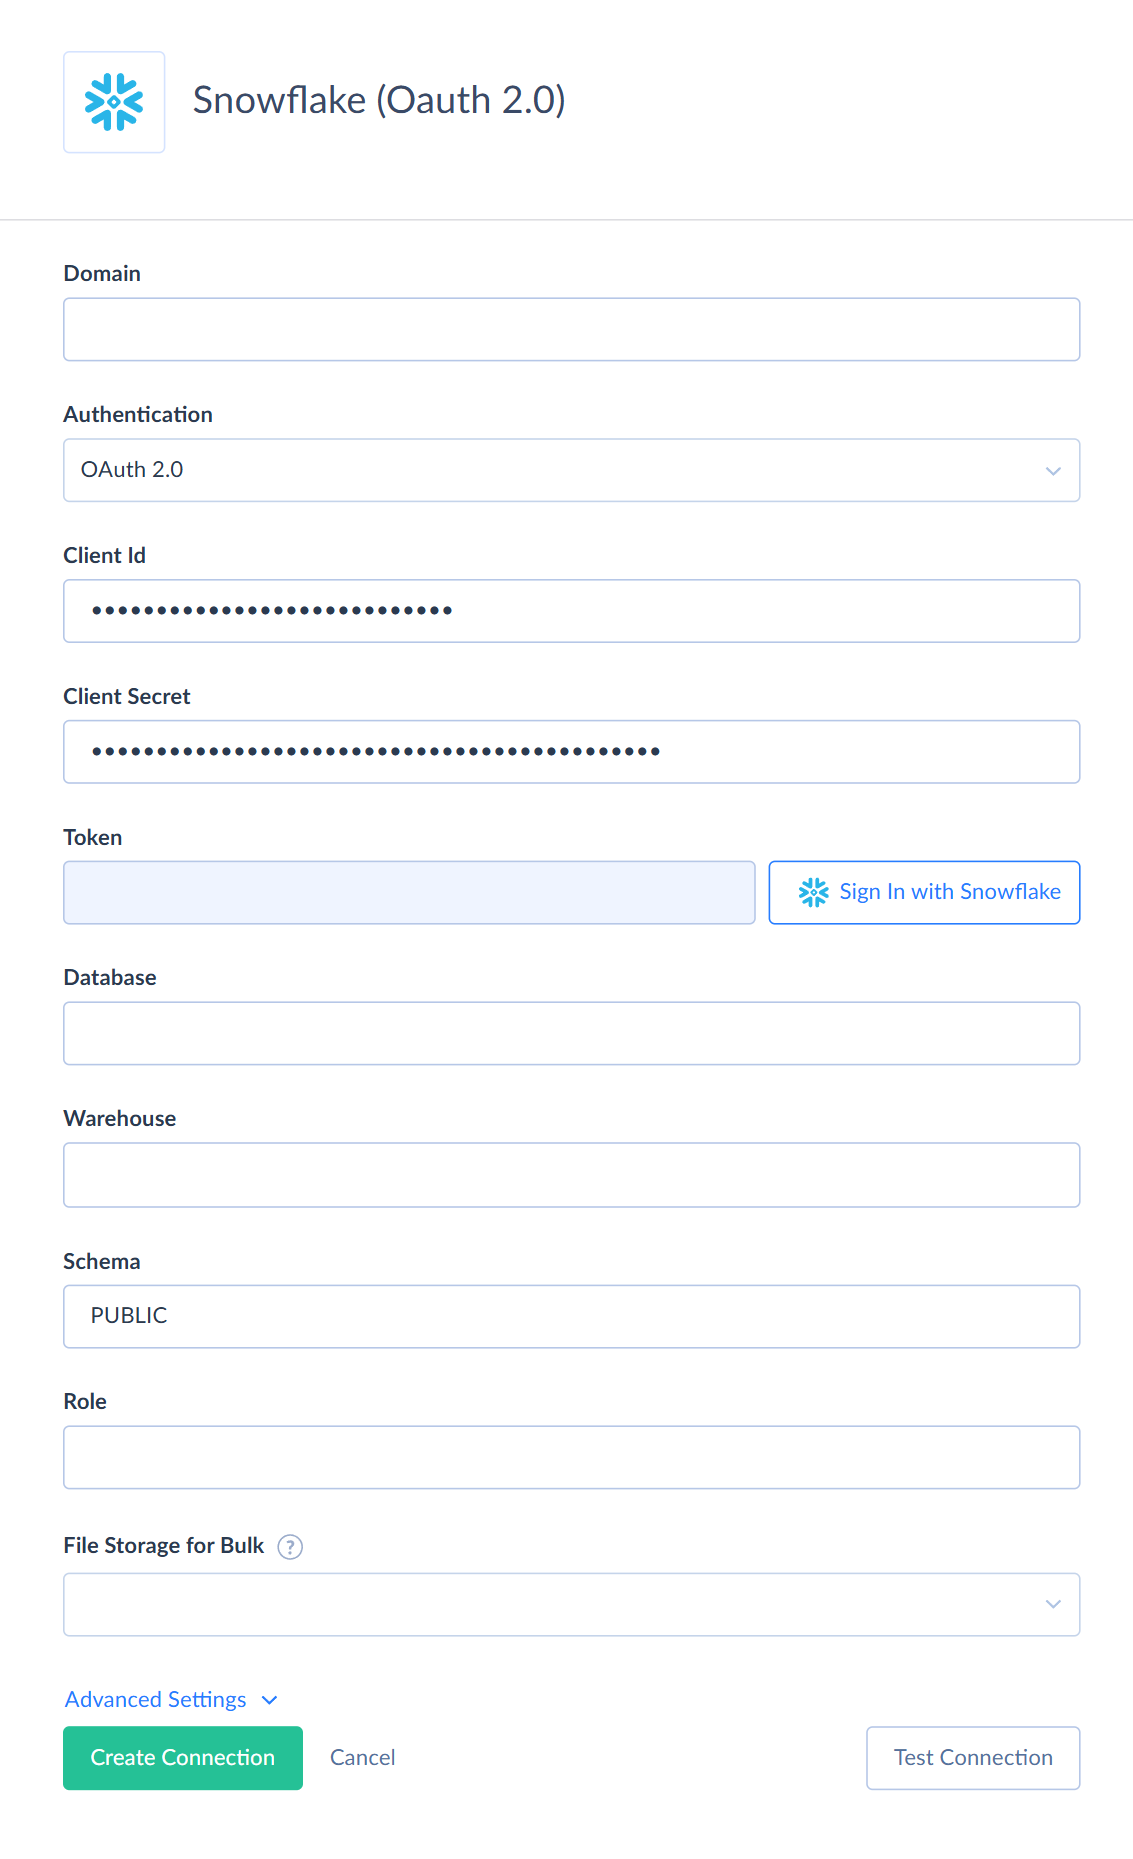
- Specify the Snowflake account domain.
- Enter Client Id.
- Enter Client Secret.
- Click Sign In with Snowflake and enter your credentials.
- Specify the name of the database you want to connect to.
Basic Authentication
To connect to Snowflake using basic authentication, specify the following required connection parameters:
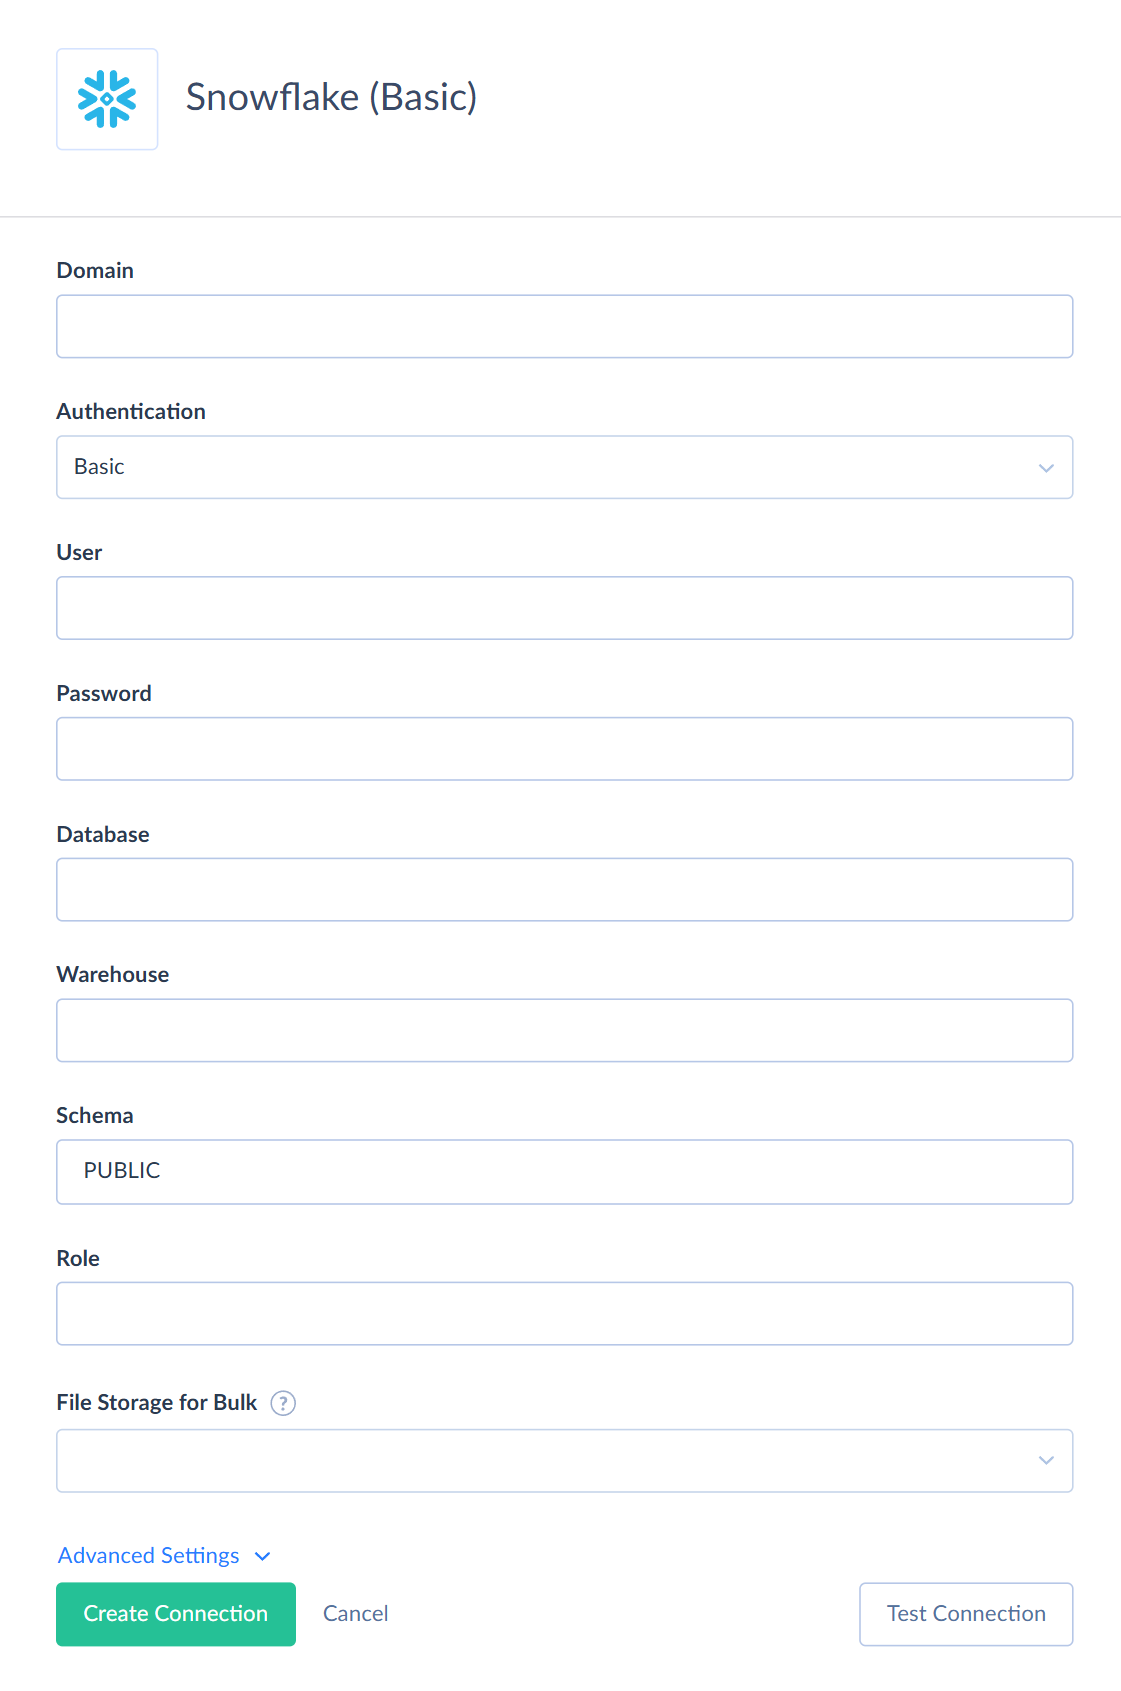
- Domain is a Snowflake account domain.
- User is a user name to log in with.
- Password is a password to log in with.
- Database is a database name.
Key-pair Authentication
To connect to Snowflake using the key pair, enter your Snowflake domain, user name, private key and passphrase.
Getting Credentials for Key-pair Authentication
To obtain the public-private key pair, perform the following steps:
- Generate a private key using OpenSSL tool.
- Generate the public key for your private key.
- Assign the public key to your Snowflake user.
Generating a Private Key
You can use an encrypted or unencrypted private key. To generate an unencrypted private key, run the following command.
openssl genrsa 2048 | openssl pkcs8 -topk8 -inform PEM -out <key_name> -nocrypt
To generate an encrypted private key, run the command below and set an encryption password, the passphrase that you need to provide while connecting to Snowflake using the key pair authentication.
openssl genrsa 2048 | openssl pkcs8 -topk8 -v2 des3 -inform PEM -out <key_name>
Replace the <key_name> placeholder values in the commands above with your own key name.
The private key is generated in the PEM format.
—--BEGIN ENCRYPTED PRIVATE KEY—--
MIIFHDBOBgk...
—-END ENCRYPTED PRIVATE KEY—--
Save the private key file in a secure location.
Generating a public key
To use key-pair authentication, generate a public key for the private key created earlier. To do that open a terminal window, and on the command line, run the following command.
openssl rsa -in <private_key_file> -pubout -out <public_key_file>
Replace the placeholder values in the command above with your own public key file name. If you are generating a public key for an encrypted private key, you will need to provide the encryption password used to create the private key. The public key is generated in the PEM format.
—--BEGIN PUBLIC KEY—--
MIIBIjANBgk...
—--END PUBLIC KEY—--
Save the public key file in a secure location.
Associating Public Key with Snowflake User
To associate the created public key with the Snowflake user, go to Snowflake and run the following command.
ALTER USER <your_snowflake_user> SET RSA_PUBLIC_KEY='MIIBIjANBgk...';
Replace the <your_snowflake_user> placeholder with your user name values. Specify the public key value omitting the —--BEGIN PUBLIC KEY—-- and —--END PUBLIC KEY—-- comments.
Creating Key-pair Connection
To connect to Snowflake using the key-pair authentication, specify the following required connection parameters.
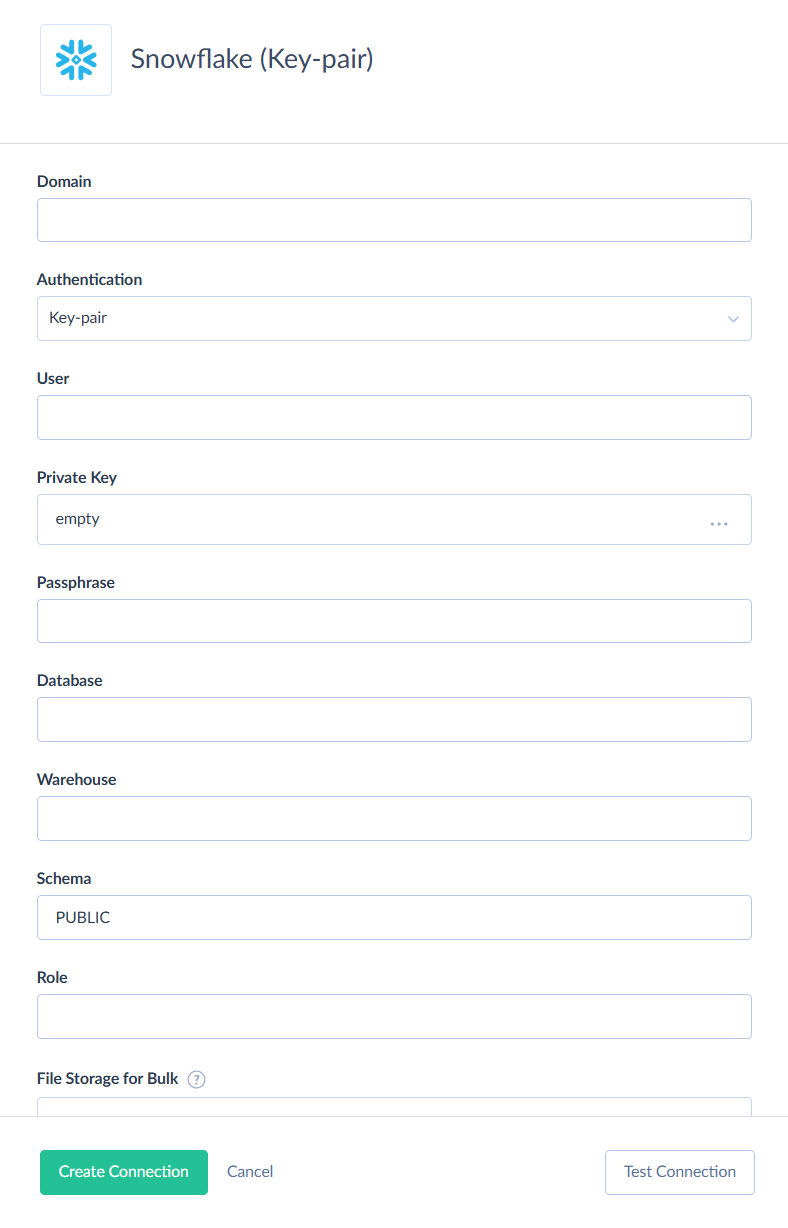
- Domain is a Snowflake account domain.
- User is a user name to log in with.
- Private Key is an RSA private key. If you use the encrypted private key, also specify the Passphrase - the password for RSA encrypted private key.
Additional Connection Parameters
If you need to perform import or replication, you will also have to specify some additional parameters described below.
- Schema is a current schema name in the database. Although this parameter is optional, you need to specify it when using replication or import in the Bulk Load mode.
- Warehouse is a name of the warehouse used for a database.
- Role is a role name used to connect.
Advanced Settings
Command Timeout
Specifies how long to wait for a server response after sending a command, excluding the time needed to fetch any selected data.
STRING(38) As Guid
Specifies whether values in columns of type STRING (38) should be interpreted as GUIDs.
File Storage for Bulk
Allows you to choose a file storage service for bulk loads: None, Internal, Amazon S3, or Azure. Depending on the selected service, additional parameters may be required for connection.
| Option | Description |
|---|---|
| None | When None is selected, Skyvia uses INSERT, UPDATE, and DELETE statements for importing data. This enables per-record error logging but significantly reduces performance. Using this option is not recommended unless you're importing a small number of records, need detailed error logs, or prefer not to use storages for temporary files. |
| Internal | When Internal is selected, Skyvia uses built-in storage for temporary files during bulk import. This option offers good performance without requiring external storage configuration. |
| Amazon S3 | When selecting Amazon S3 Storage from Files Storage for Bulk, you need to specify the following additional parameters: AWS Access Key ID — first part of your Amazon Web Services access key. AWS Secret Key — second part of your Amazon Web Services access key. Read more about AWS access keys here. AWS Security Token — an alternative option to AWS Access Key ID and AWS Secret Key pair. The Amazon Web Services security token is a temporary limited-privilege credential. S3 Region — AWS region, where your S3 storage is hosted. S3 Bucket Name — it is an optional parameter. You may specify the name of your S3 bucket to temporarily load the file with imported or replicated data to. If you leave it empty, Skyvia will create a new bucket when importing or replicating data and delete it after the operation is finished. |
| Azure | When selecting Azure Blob Storage from Files Storage for Bulk, you need to specify the following additional parameters: Azure Storage Account — Azure storage account name. Azure Storage Account Key — your 512-bit storage access key. Azure Storage Endpoints Protocol — this parameter determines the protocol to use (HTTPS or HTTP). |
Use Bulk Import
When selected, Skyvia imports data by creating temporary CSV files, uploading them to the storage of your choice, and then instructing Snowflake to load the data from those files. This process runs in parallel for better performance. Once done, the CSV files are deleted. However, this method doesn't provide detailed error logs for individual records.
If you clear this checkbox, Skyvia will use standard SQL commands (INSERT, UPDATE, DELETE) to load data. Disabling bulk import provides a per-record error logs, but significantly reduces integration performance. You can disable it if you're importing a small number of records or need a detailed error log.
This option is not available when None is selected in File Storage for Bulk and affects only import integrations with the INSERT, UPDATE and DELETE operation and with Snowflake as a target.