How to Perform UPSERT Operation
Skyvia supports UPSERT operation in data import for all the supported cloud applications and relational databases, except for Google BigQuery and Amazon Redshift. UPSERT operation requires the primary key to be auto-generated.
What is UPSERT?
The UPSERT operation updates a record if it exists or inserts a new record. This allows you to avoid inserting duplicate data. You need to map the target ID/Primary key columns for performing UPSERT.
In Skyvia, UPSERT determines what action to perform in the following way: if a Null value is specified for the ID or primary key, UPSERT operation inserts the record, and if a non-null value is specified, UPSERT operation tries to update the record with the specified ID or primary key. Skyvia does not actually check if such record exists, and if you provide invalid ID/PK values, it will result in failed records.
What if ID/Primary Key Values Are Unknown?
If you import CSV files, you can get the necessary values using Export or Query. However, it's often not an option, especially when you import data from a database or cloud application directly. For this Skyvia provides a more convenient way — UPSERT operation, even without knowing the ID values. You can use Lookup Mapping for ID/primary key columns and get the IDs or primary key values from the target object itself by some other field that uniquely identifies a record.
When using lookup mapping for ID or primary key columns in UPSERT, do not forget to select the Set null when no match found checkbox in Lookup Options. Otherwise, lookup will produce errors if no such record is found, and there would be failed records instead of inserted new ones.
How to Configure UPSERT
In order to create an UPSERT import task, specify source settings as you need. Then, in target settings, select the target object and click Upsert. After this, in Mapping settings, map the target columns. Primary key columns must be mapped, they are marked as Required for UPSERT. If you have the corresponding primary key values in your source, map PK columns to the corresponding source columns using Column Mapping, and make sure that for records you want to perform INSERT for, there are NULL values in these columns. Otherwise, you can use Lookup Mapping.
UPSERT in Salesforce and Zoho CRM
Unlike other data sources, Salesforce and Zoho CRM offer native support for UPSERT. They perform UPSERT by an External ID field. When you perform UPSERT to a Salesforce or Zoho CRM object with an External ID field in Skyvia, you can choose whether to use the ID field as described above, or External ID. If you select Use External ID, you need to select the External ID field to use since a Salesforce/Zoho CRM object can have more than one custom External ID field.
When using External ID, you do not need to map the ID field. Instead you need to map the selected External ID field, which is mapped as Required on the Mapping Definition page.
When you use Upsert target operation with Use External ID, only target primary key fields are available for mapping on the Returning tab.
Upserting Salesforce Contacts from Mailchimp
Suppose we need to import subscribers from a mailing list in Mailchimp to Salesforce contacts, and part of the corresponding contacts is already present in Salesforce. We do not want to make duplicate records, so we perform UPSERT instead of usual INSERT. So, to perform such an import, let's do the following:
Creating an integration
-
Click +NEW in the top menu.
-
In the Integration column, click Import. The import details page will open.
-
Rename your integration by clicking and editing the integration name. The default integration name is Untitled. Please note, if you omit this step, the integration name will remain Untitled in the list of created integrations.
-
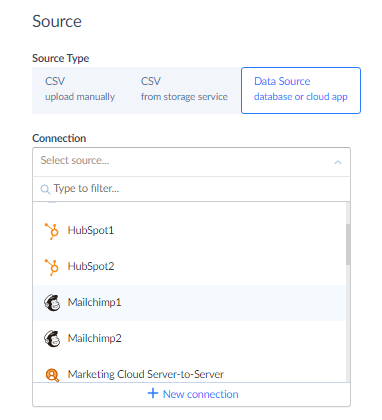
Under Source, in Source Type, click Data Source database or cloud app and select your Mailchimp connection from the drop-down list
-
Under Target, in the Connection list, select your Salesforce connection from the drop-down list.
-
Click the Add new link
Configuring Source
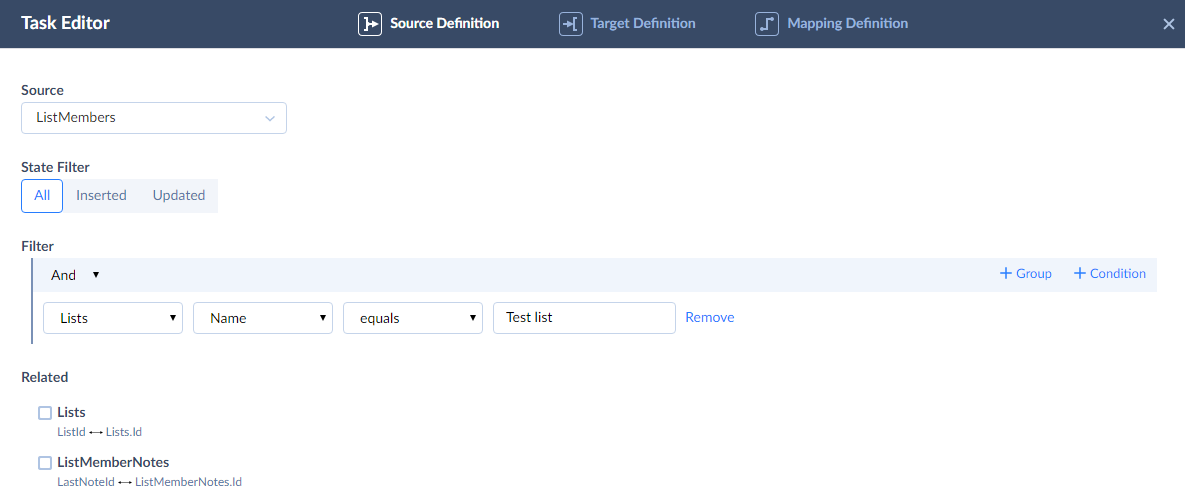
When configuring the source data, we need not only to select the source table, but also to configure data filtering in order to import subscribers only from one of the lists. In our example, the name of this list is "Test list".
-
In the Source list, select ListMembers.
-
Click +Condition.
-
In the first (leftmost) list of the condition, select Lists.
-
In the second list of the condition, select Name.
-
Enter "Test list" to the rightmost box of the condition.
-
Click Next step.
Configuring Destination
-
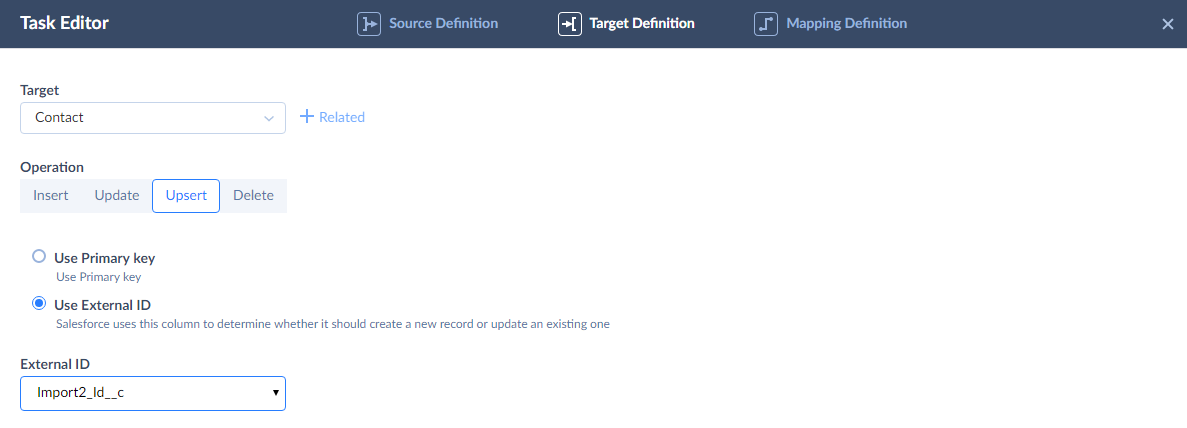
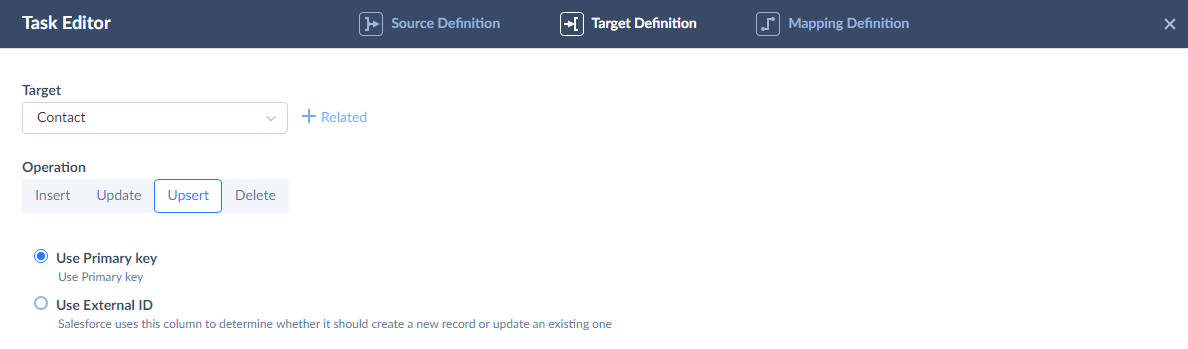
In the Target list, select Contact.
-
Click Upsert.
-
Click Next step.
Configuring Mapping
First we need to map the Id column of Salesforce Contact. As we can see, it is automatically mapped to the Id column of the Mailchimp ListMembers table, because these columns have the same name. However, Salesforce and Mailchimp Ids have different format and are completely different things, so we cannot map Salesforce Ids to Mailchimp Ids. We will use the lookup mapping to map the target Id field and determine the necessary Contact Ids by email.
-
Click Id.
-
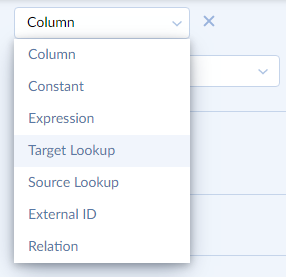
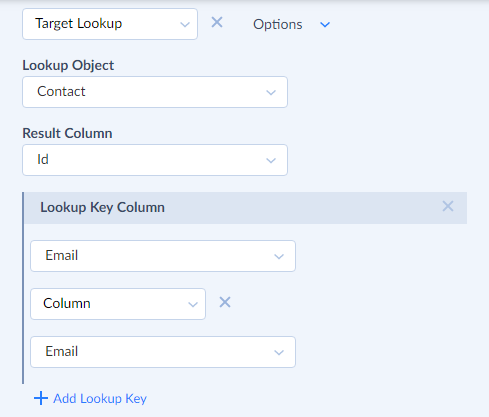
Click Column and then select Target Lookup from the drop-down list.
-
In the Lookup Object list, select Contact.
-
In the Result Column list, select Id.
-
In the Lookup Key Column list, select the Email target column.
-
In the bottom drop-down list, select the Email source column.
-
Click Options.
-
Select the Set null when no match found checkbox
-
Click the LastName target column and map it to the Last Name source column using column mapping.
-
In the same way map the FirstName target column to the First Name source column.
-
Click Save.
Now our integration is ready, and you can execute it.