Working With Nested Types
With the help of components in Data Flow you can create new, and modify existing nested arrays and objects. You may find the list of the most common use cases in the examples below. Every example is created with the use of Demo Connections.
To create a Demo Connection, do the following:
- Click +New at the top.
- Choose Discover Platform.
- Click Create Demo Connections.
Once that is done you can start following the examples.
Create a Nested Object Type
With the help of Data Flow components, you can transform input data to include nested objects. Let's take a closer look at the example. We have a Customers table as an input.

We want to receive a JSON with an array of company objects as an output. Each object in the array should contain a nested BillingAddress object with Address, City, and Country properties. You may find the JSON example below:
1
2
3
4
5
6
7
8
9
10
11
12
13
14
15
16
17
18
[
{
"CompanyName": "Alfreds Futterkiste",
"BillingAddress": {
"Address": "Obere Str. 57",
"City": "Berlin",
"Country": "Germany"
}
},
{
"CompanyName": "Berglunds snabbkop",
"BillingAddress": {
"Address": "Berguvsvagen 8",
"City": "Lulea",
"Country": "Sweden"
}
}
]
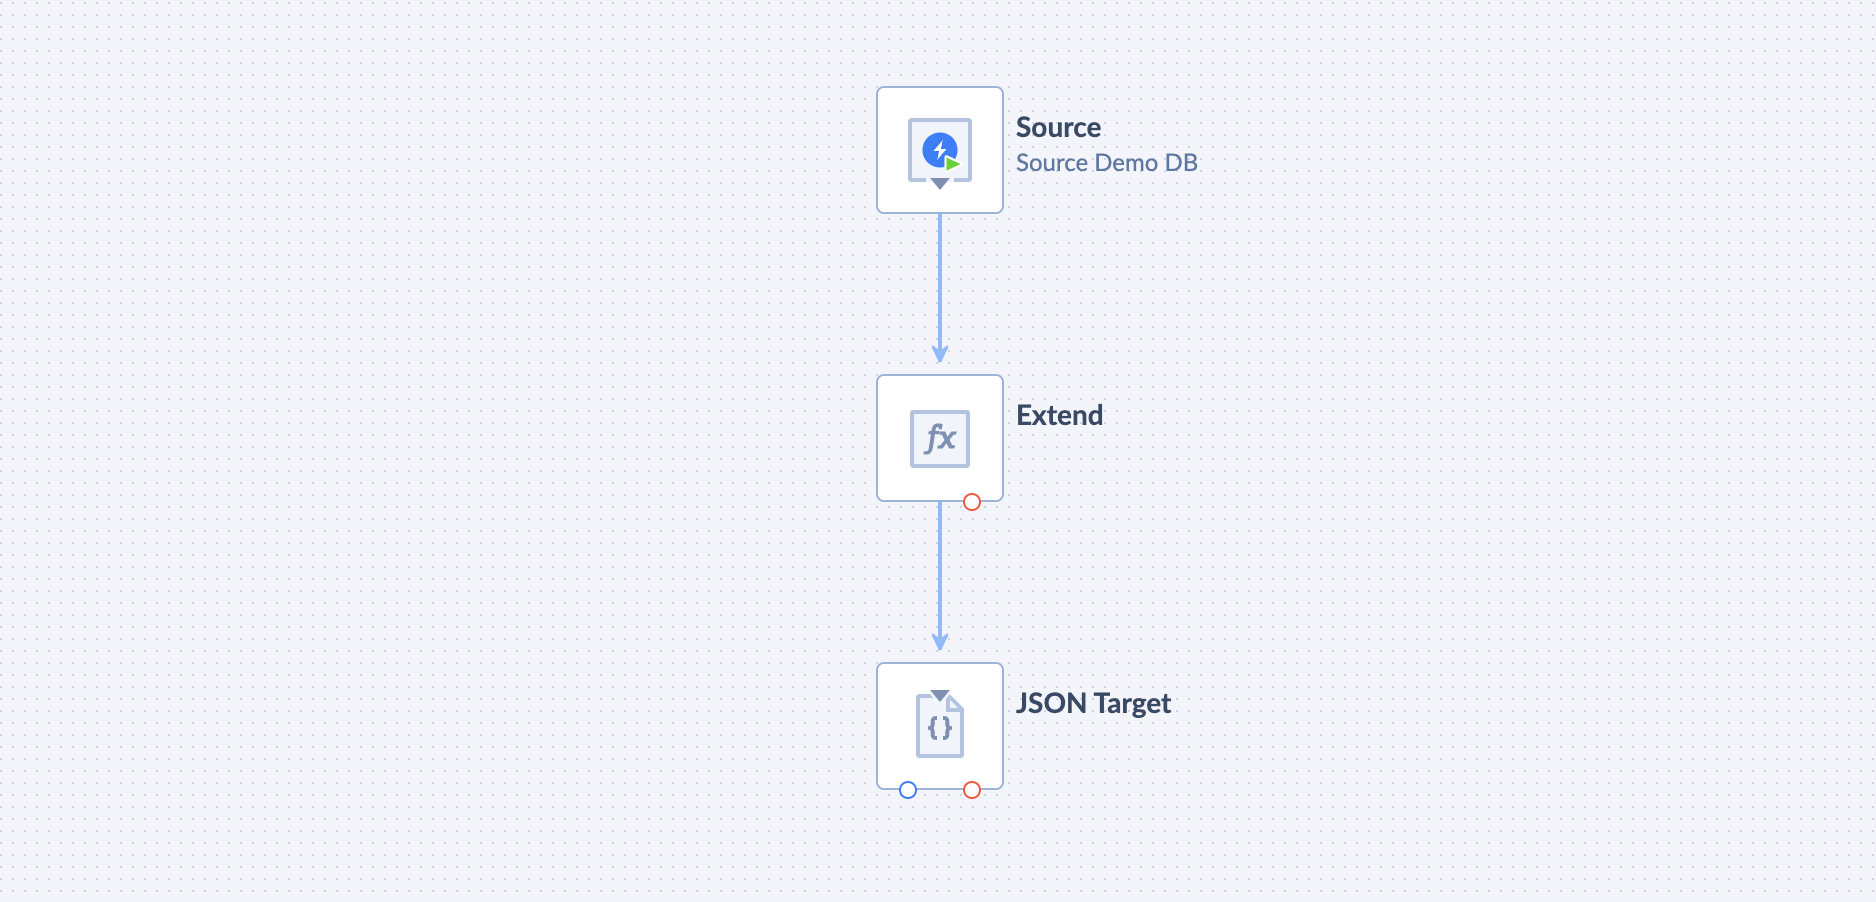
To accomplish the task we use 3 components:
- Source, to define the data we work with.
- Extend, to add a new BillingAddress (object) property.
- JSON Target, to define the structure of the output data.
-
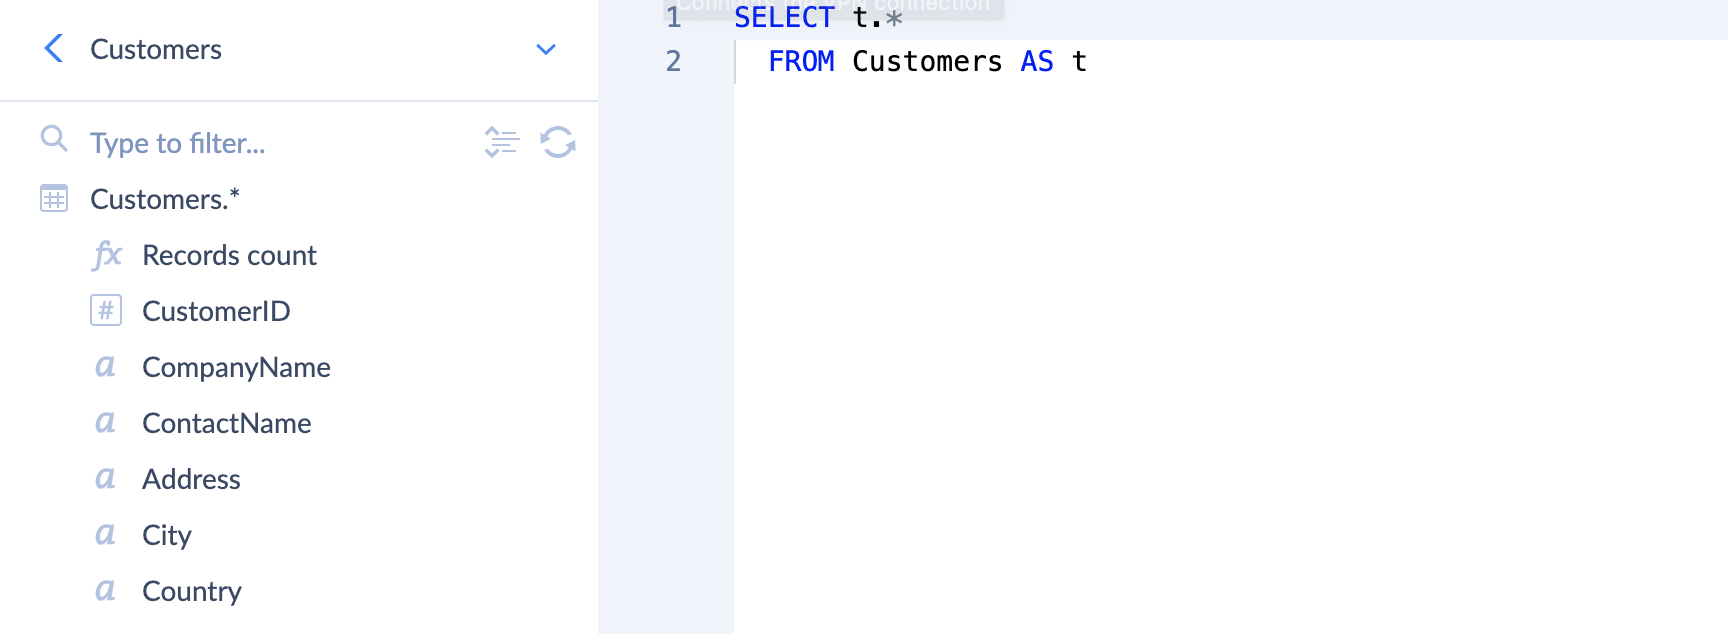
In the Source component we use Execute Query to get properties from the Customers table.
-
In the Extend component we build an Output Schema for the nested BillingAddress object with a help of Object Map and map its properties to the corresponding properties that we receive from Source. As a result BillingAddress object will be accessible in Properties in the JSON Target component.

-
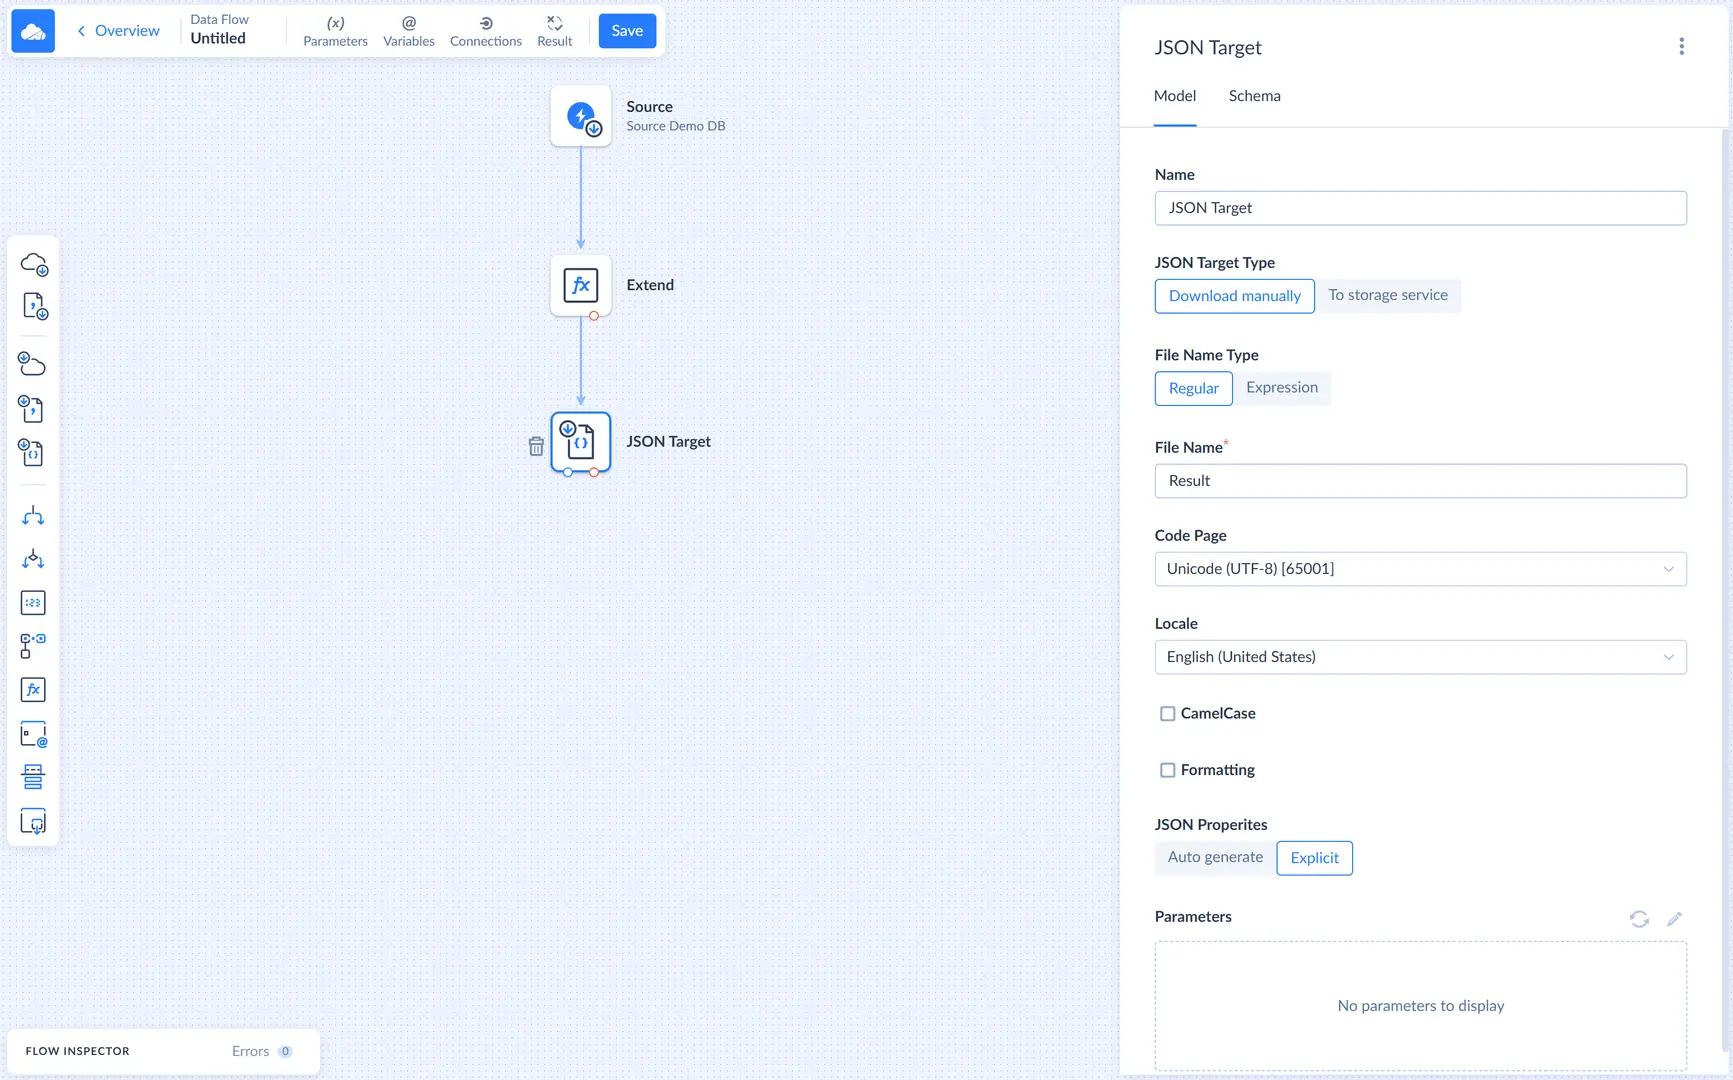
By default, JSON target automatically generates schema, based on input. To define schema ourselves, we need to select Explicit under JSON Properties in JSON Target component settings.
-
We build an Output Schema in JSON Target to define the look of our output object. It has two properties: CompanyName and BillingAddress. Note, that BillingAddress in the properties list is an object, and when we map BillingAddress in the Output Schema to the BillingAddress property, we do not use ObjectMap anymore.
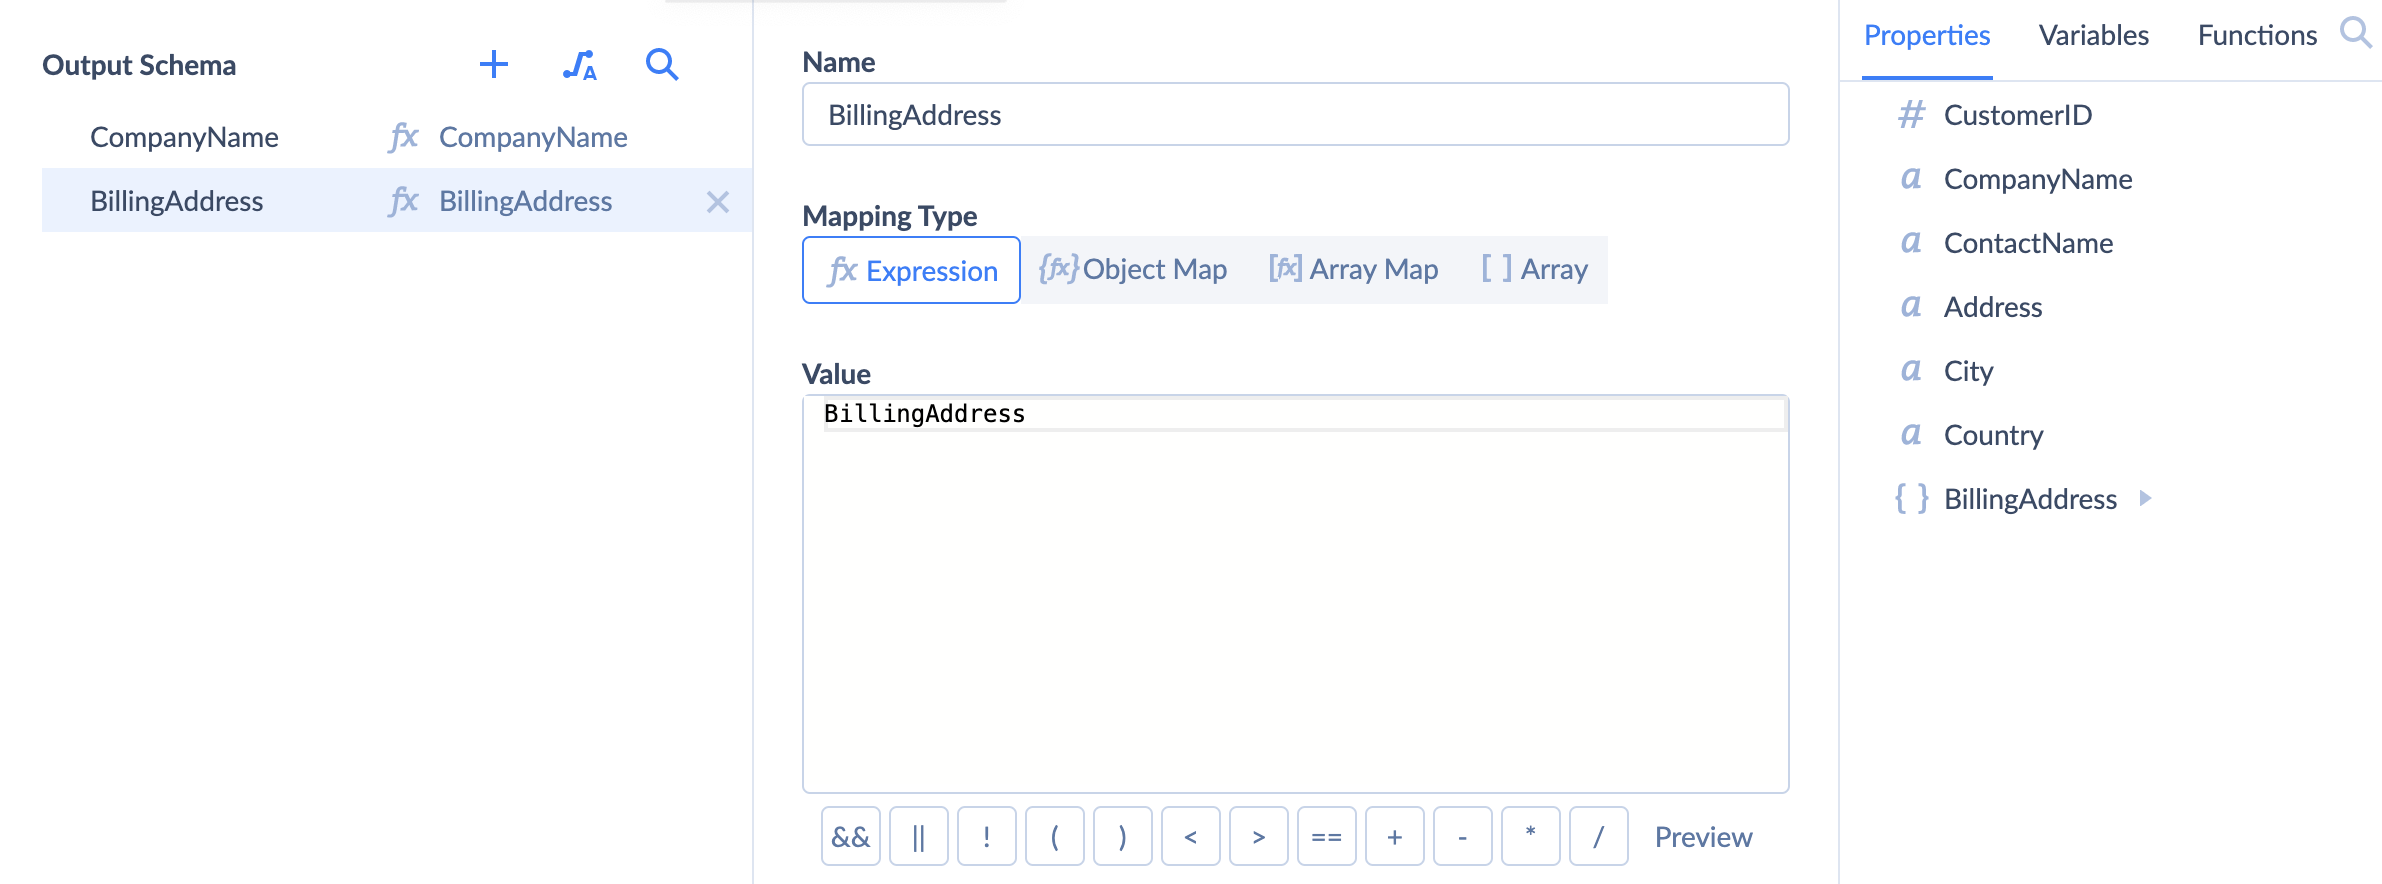
After Output Schema for the JSON Target is ready and properties are mapped, we can save and run our integration. As a result, we will receive a JSON file with the same file structure as shown in the JSON example above.
Lookup Object
With the help of the Lookup component in Data Flow, you can transform input data to include a nested object that was looked up in a related table. Let's take a closer look at the example. We have an Orders table as an input and a lookup Customers table.
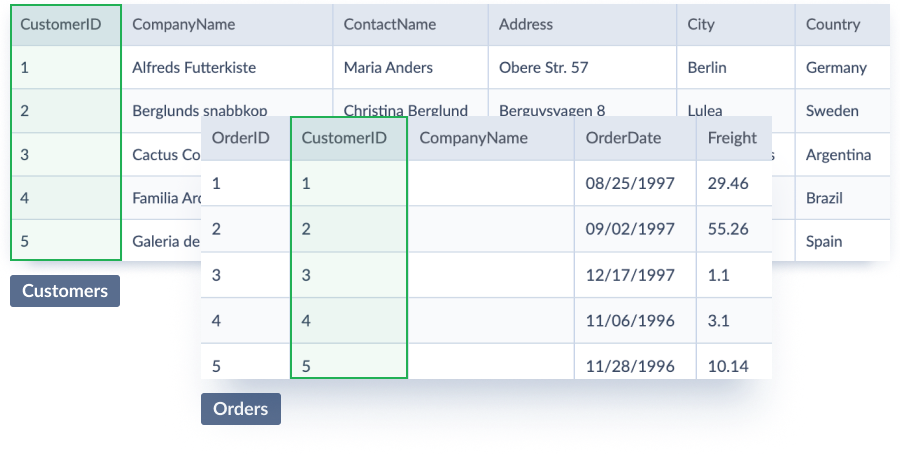
We want to receive a JSON with an array of order objects as an output. Each object in the array should contain a nested Customer object with Address, City, and CompanyName properties that were looked up in a related Customers table. You may find the JSON example below:
1
2
3
4
5
6
7
8
9
10
11
12
13
14
15
16
17
18
[
{
"OrderID": 1,
"Customer": {
"CompanyName": "Alfreds Futterkiste",
"Address": "Obere Str. 57",
"City": "Berlin"
}
},
{
"OrderID": 2,
"Customer": {
"CompanyName": "Berglunds snabbkop",
"Address": "Berguvsvagen 8",
"City": "Lulea"
}
}
]
To accomplish the task we use 3 components:
- Source, to define the data we work with.
- Lookup, to add a new Customer (object) property by performing a lookup based on CustomerId.
- JSON Target, to define the structure of the output data.
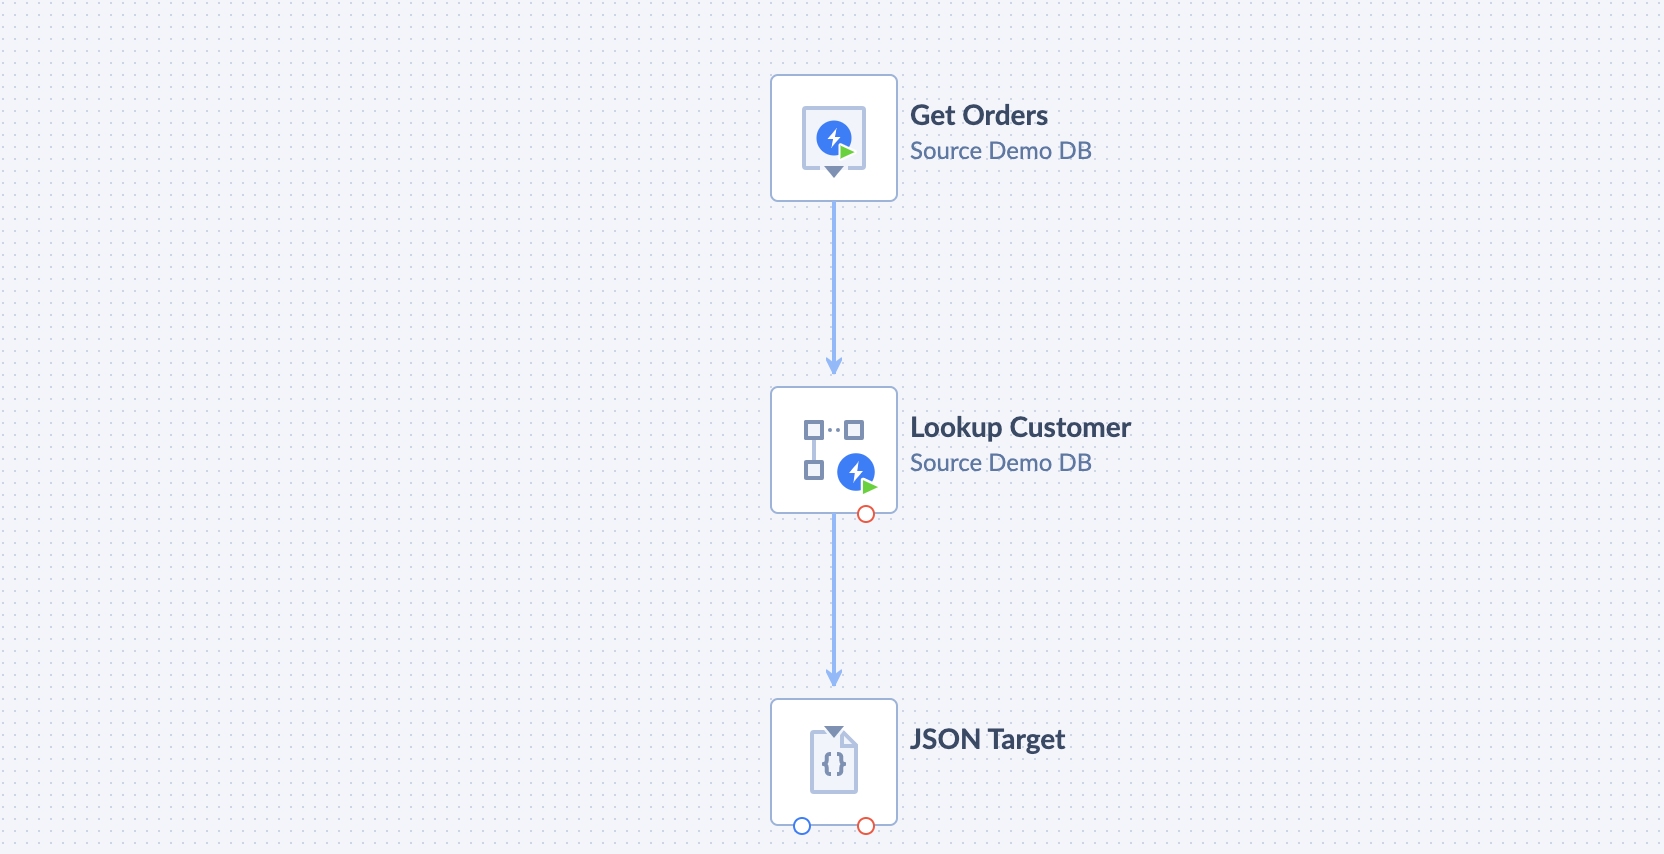
-
In the Source component we use Execute Query to get properties from the Orders table.

-
In Lookup component we are looking up for CompanyName, Address, and City columns in Customers table by CustomerId and assign them to Customer object property. As a result, the Customer object will be accessible in Properties in the JSON Target component.
-
We build an Output Schema in JSON Target to define the look of our output object. It has two properties: OrderId and Customer. We map them to the according properties from the list on the right: OrderId from the Source component and Customer object from the Lookup component.
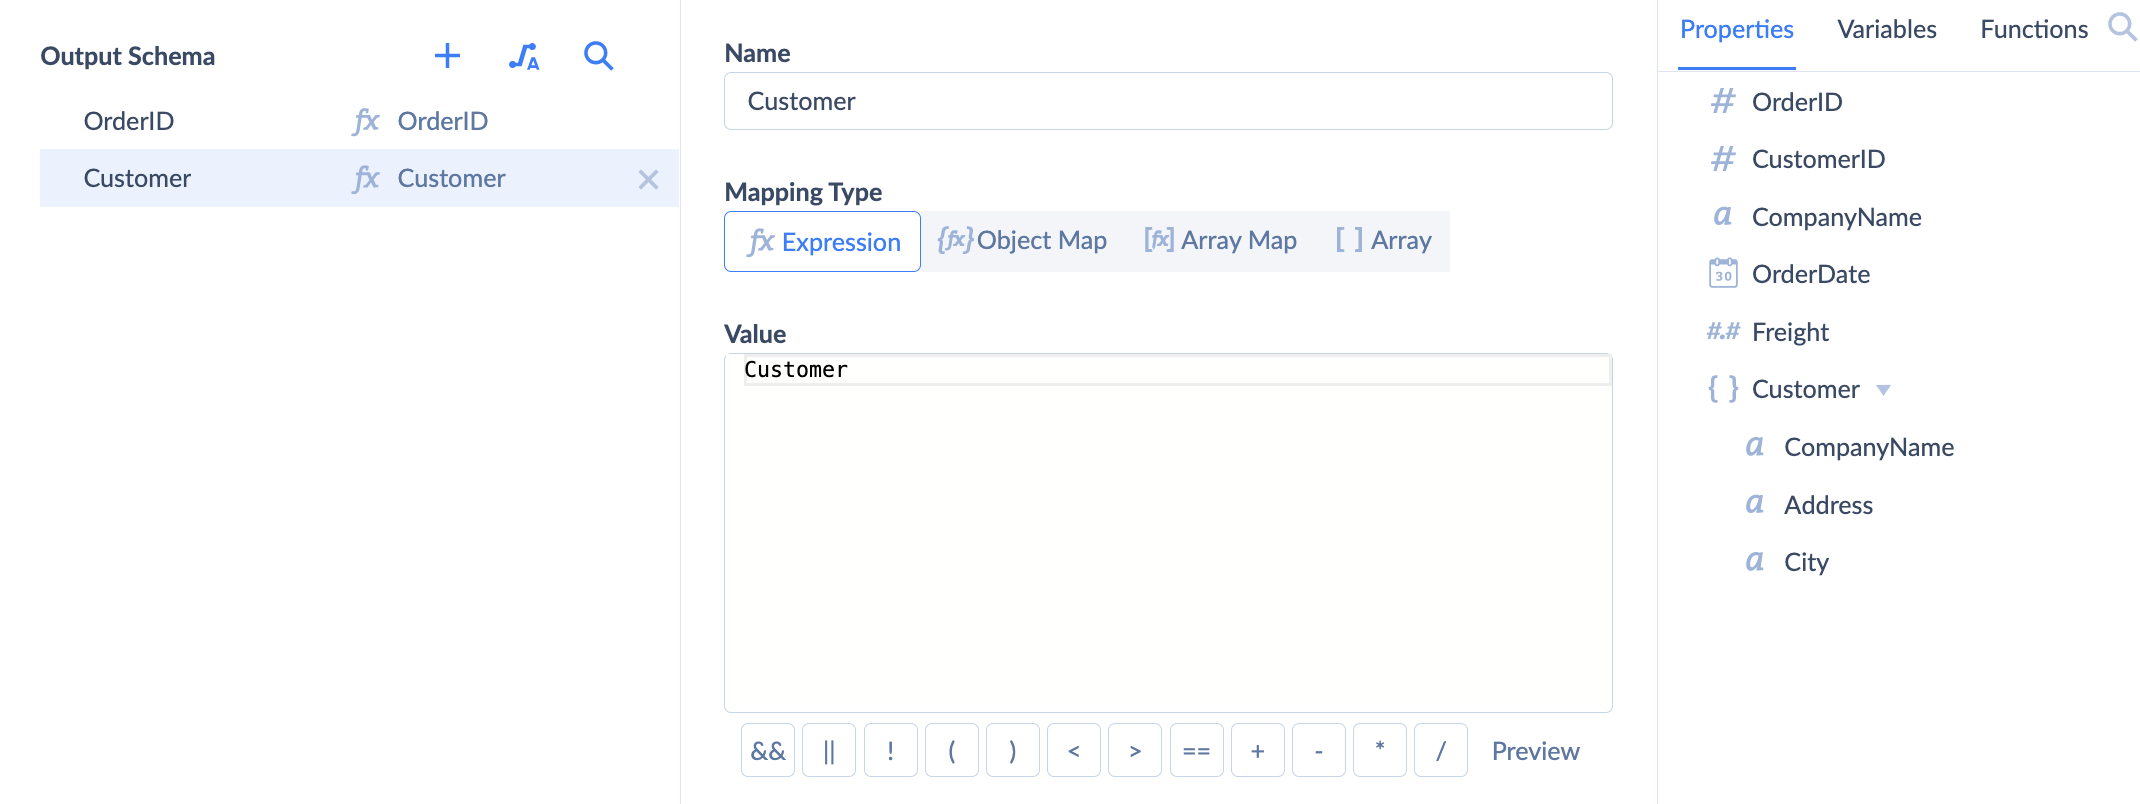
After Output Schema for the JSON Target is ready and properties are mapped, we can save and run our integration. As a result, we will receive a JSON file with the same file structure as shown in the JSON example above.
Extend a Nested Object
With the help of the Extend component, you can extend a nested object with additional properties. Let's take a closer look at the example. We have an Orders table as an input and a Customers lookup table.
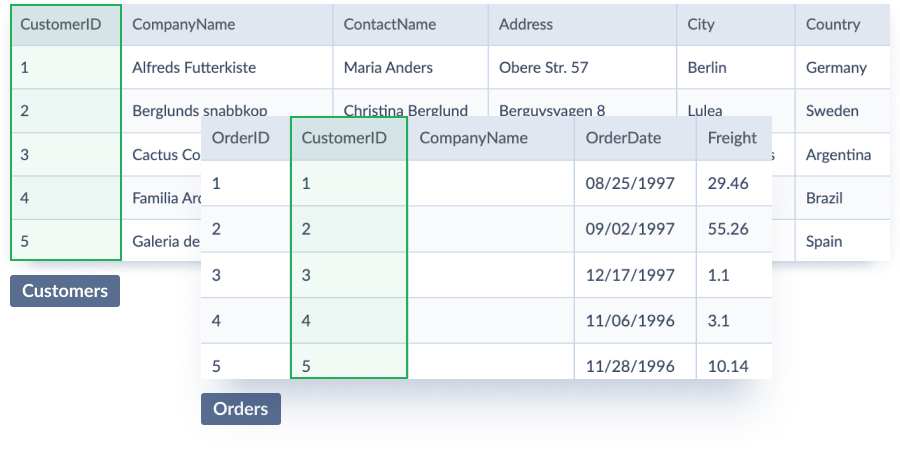
We want to receive a JSON with an array of order objects as an output. Each object in the array should contain a nested Customer object with Address, City, CompanyName, and CityWithAddress properties. You may find the JSON example below:
1
2
3
4
5
6
7
8
9
10
11
12
13
14
15
16
17
18
19
20
[
{
"OrderID": 1,
"Customer": {
"CompanyName": "Alfreds Futterkiste",
"Address": "Obere Str. 57",
"City": "Berlin",
"CityWithAddress": "Berlin, Obere Str. 57"
}
},
{
"OrderID": 2,
"Customer": {
"CompanyName": "Berglunds snabbkop",
"Address": "Berguvsvagen 8",
"City": "Lulea",
"CityWithAddress": "Lulea, Berguvsvagen 8"
}
}
]
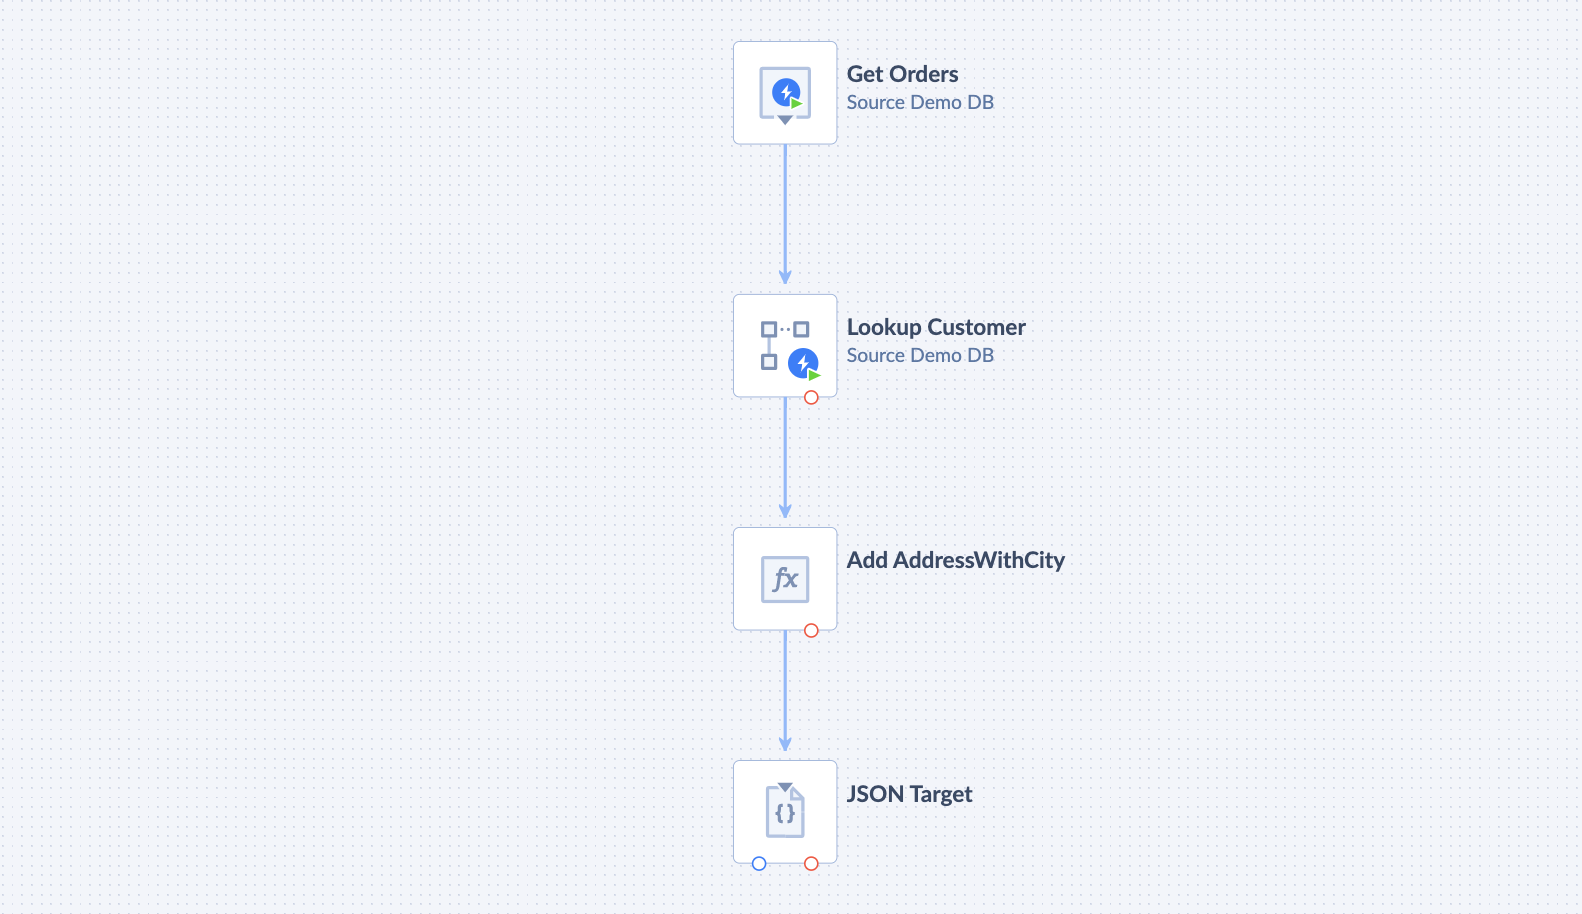
To accomplish the task we use 4 components:
- Source, to define the data we work with.
- Lookup, to add a new Customer (object) property by performing a lookup based on CustomerId.
- Extend, to extend the Customer object with a new property — AddressWithCity.
- JSON Target, to define the structure of the output data.
-
In the Source component we use Execute Query to get properties from the Orders table.

-
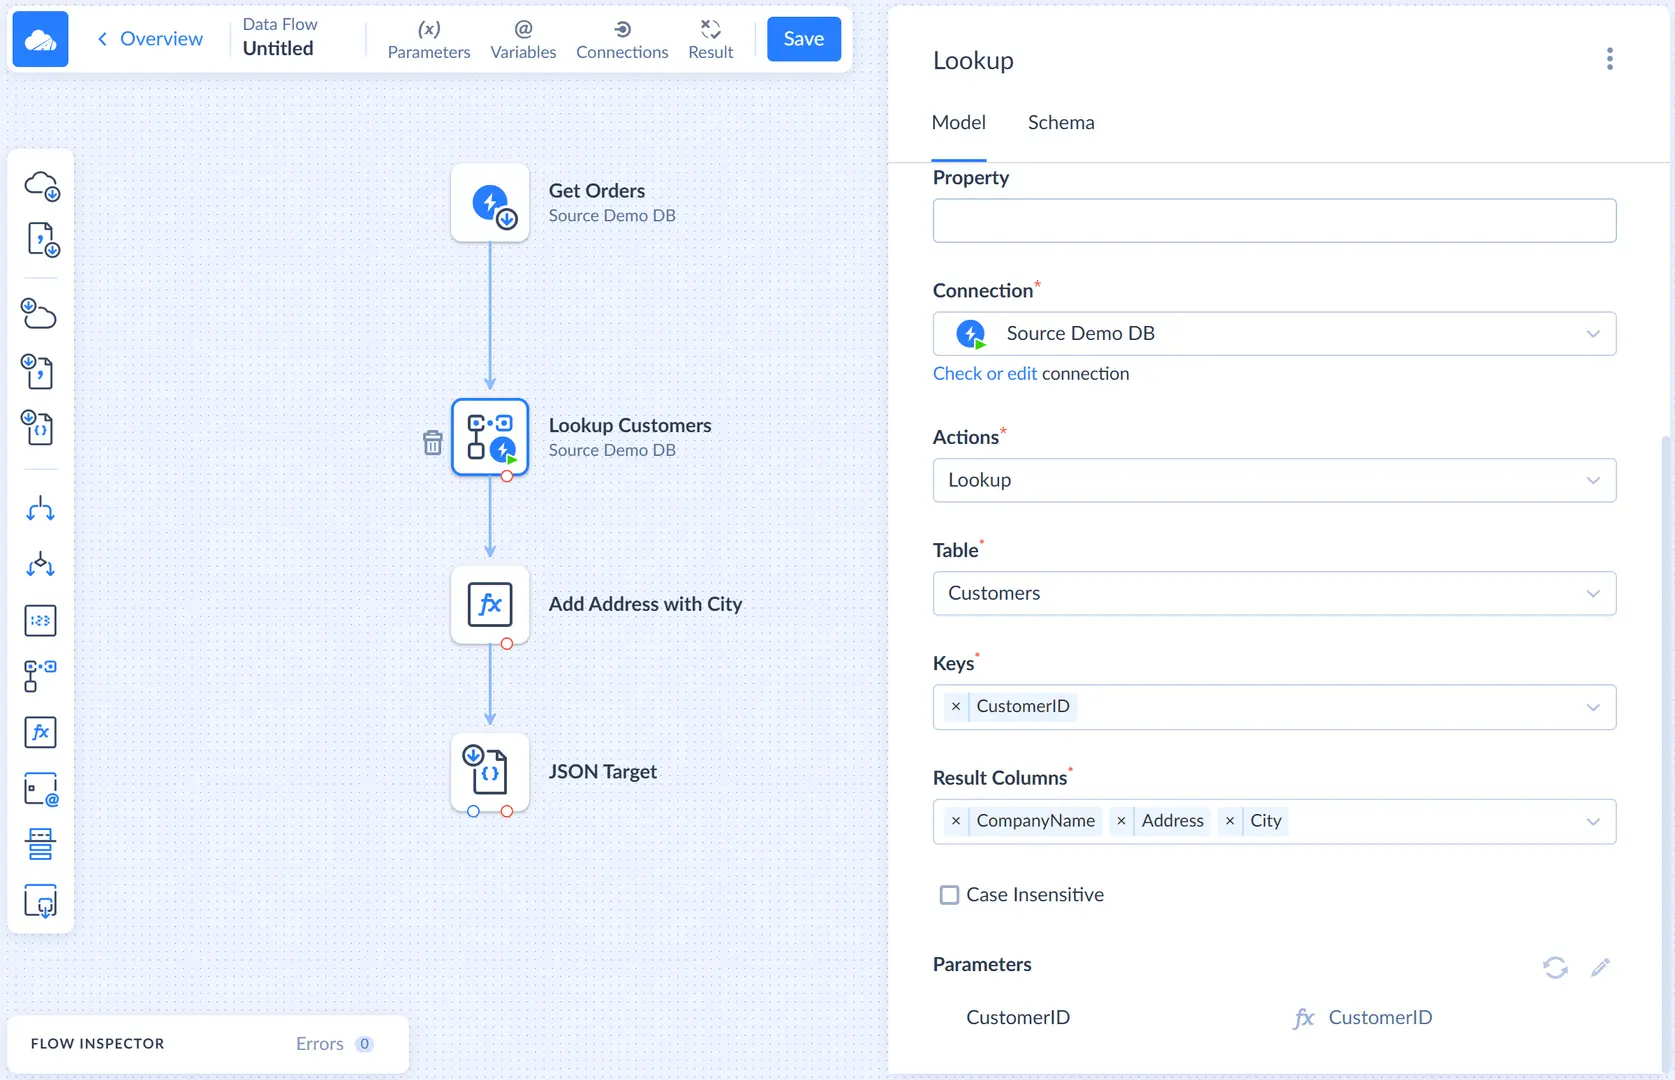
In the Lookup component we are looking up for CompanyName, Address, and City columns in the Customers table by CustomerId and assign them to the Customer object property. As a result, the Customer object will be accessible in Properties in the Extend component.
-
In the Extend component we set Scope to Customer to extend Customer object with a new property—AddressWithCity—and map it to the
City + ', ' + Addressexpression.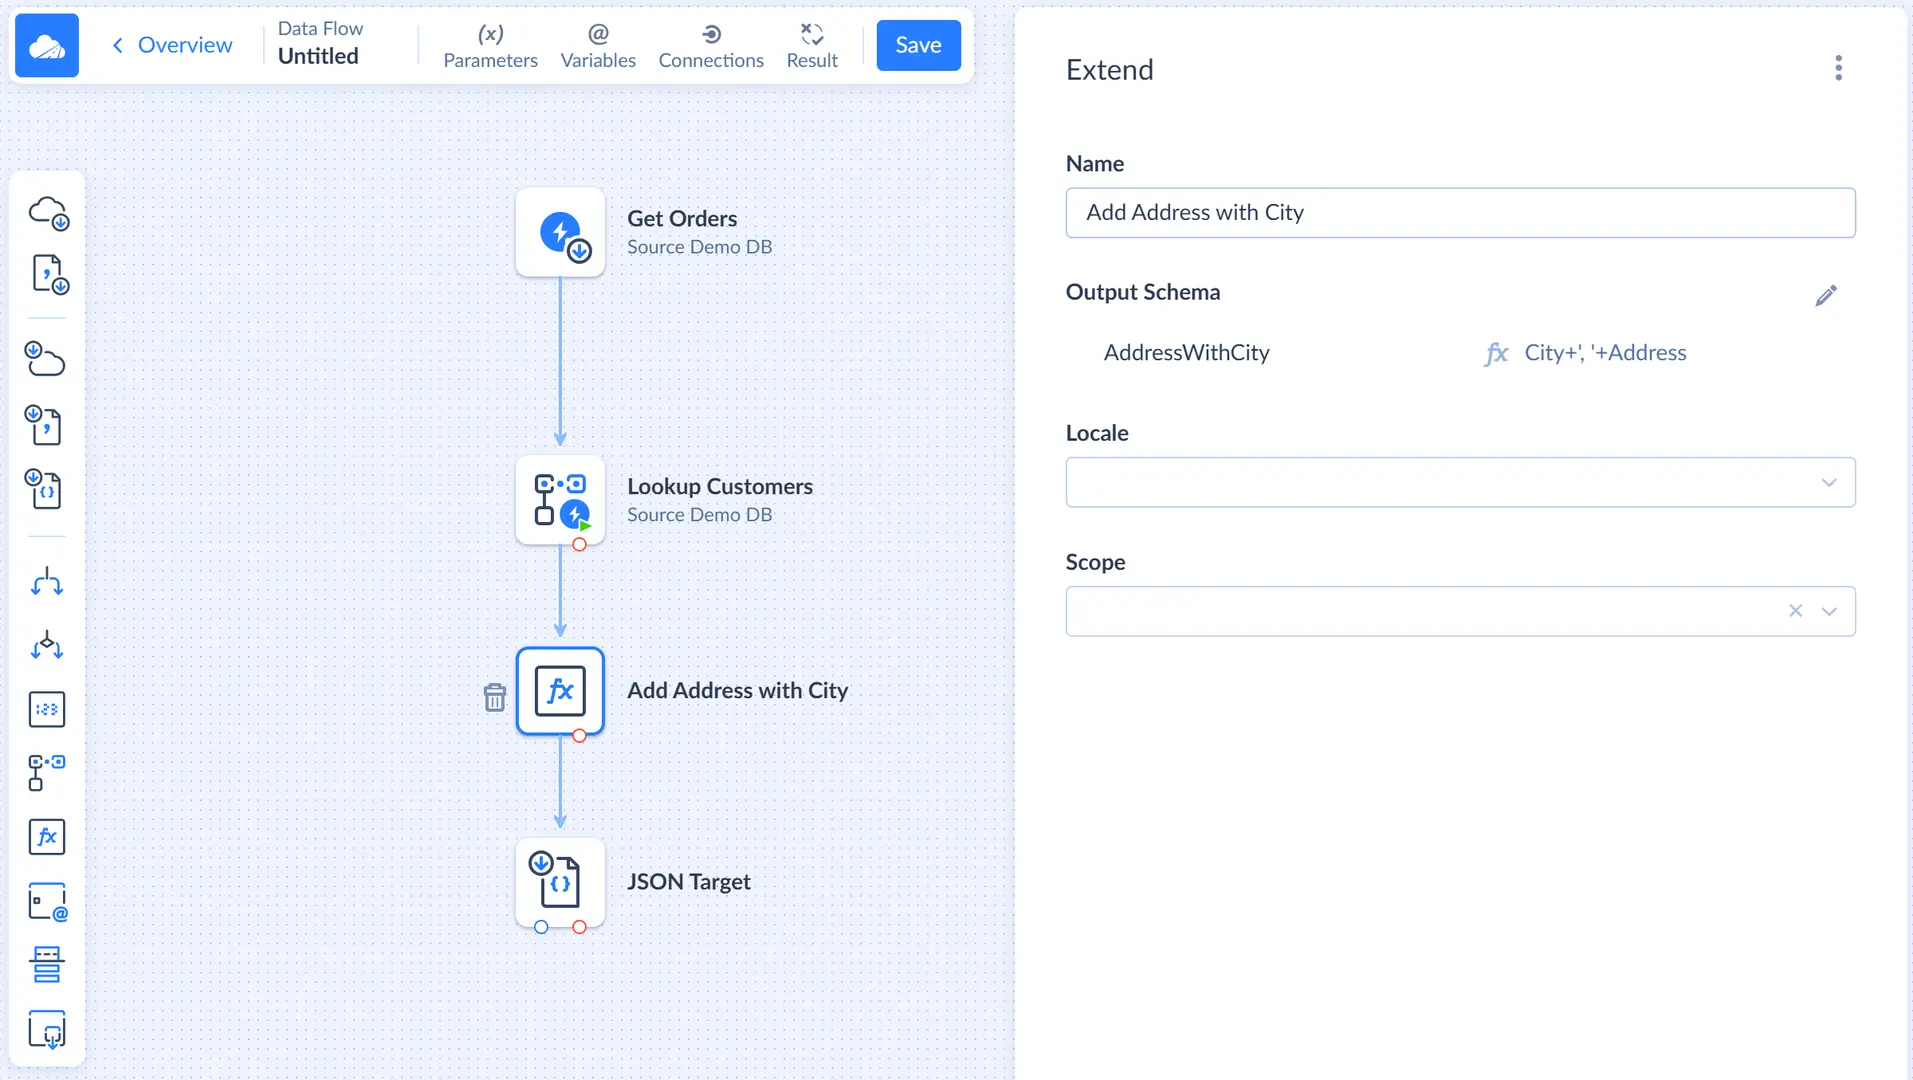
-
We build an Output Schema in JSON Target to define the look of our output object. It has two properties: OrderId and Customer. We map them to the according properties from the list on the right. Note, that the Customer object in the list of properties already includes an AddressWithCity property that we added in the Extend component.

After Output Schema for the JSON Target is ready and properties are mapped, we can save and run our integration. As a result, we will receive a JSON file with the same file structure as shown in the JSON example above.
Rebuild a Nested Object
With the help of the Extend component, you can rebuild an object by replacing its properties. Let's take a closer look at the example. We have a Customers table as an input.

We want to receive a JSON with an array of order objects as an output. Each object in the array should contain a nested Customer object with Address, City, CompanyName, and CityWithAddress properties. You may find the JSON example below:
1
2
3
4
5
6
7
8
9
10
11
12
13
14
15
16
[
{
"CompanyName": "Alfreds Futterkiste",
"BillingAddress": {
"Country": "Germany",
"AddressWithCity": "Berlin, Obere Str. 57"
}
},
{
"CompanyName": "Berglunds snabbkop",
"BillingAddress": {
"Country": "Sweden",
"AddressWithCity": "Lulea, Berguvsvagen 8"
}
}
]
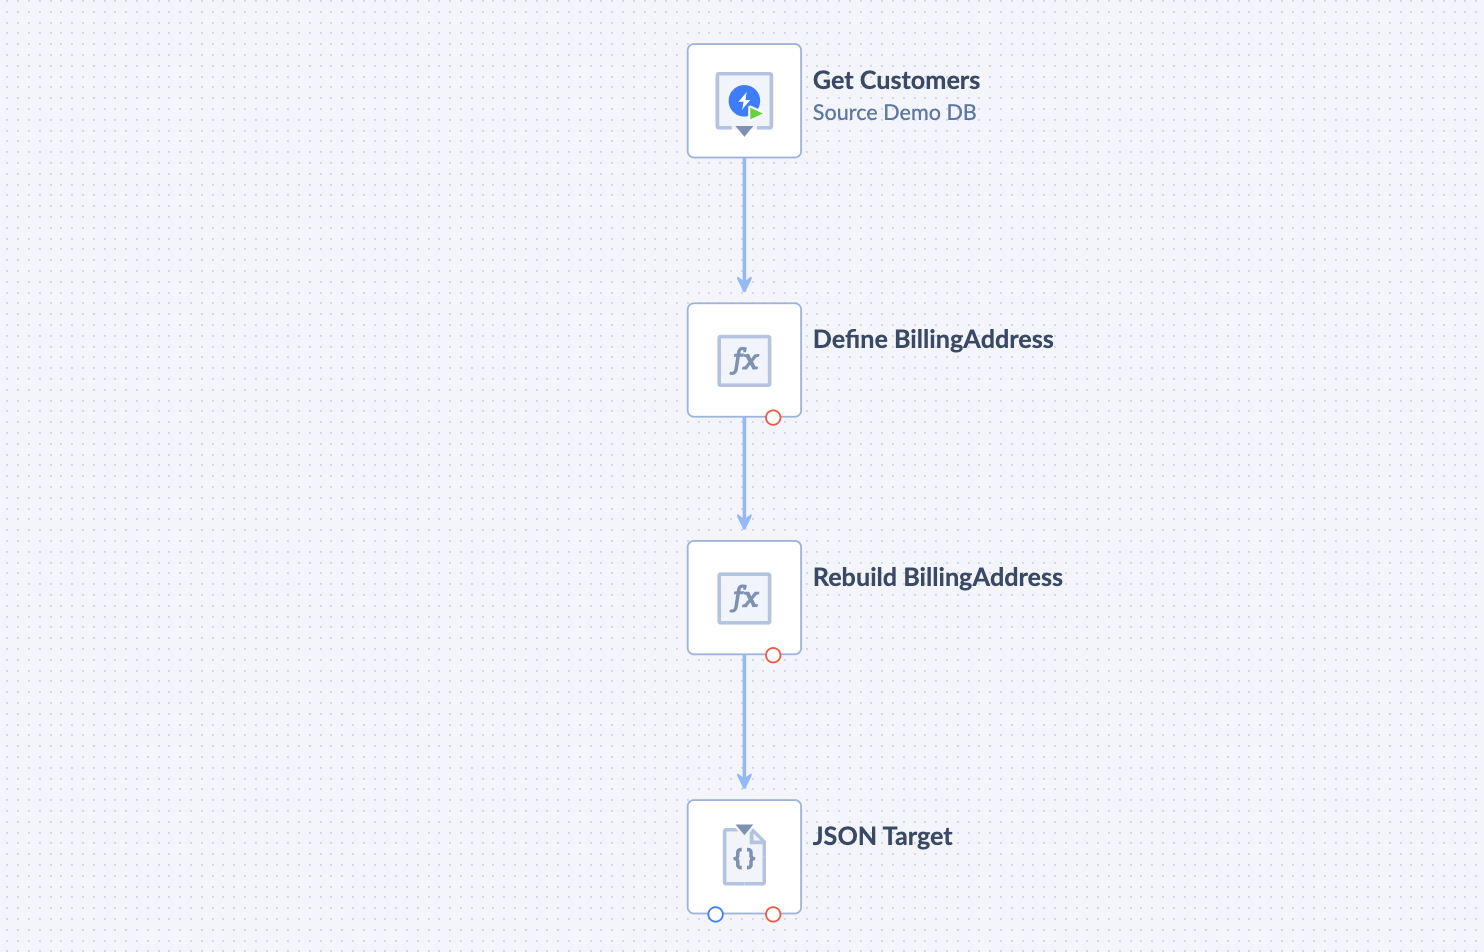
In this example we use 4 components:
- Source, to define the data we work with.
- Extend, to add a new BillingAddress (object) property with Address, City, and Country properties inside.
- Extend, to rebuild the structure of BillingAddress object by replacing Address and City properties with a single AddressWithCity property.
- JSON Target, to define the structure of the output data.
-
In the Source component we use Execute Query to get properties from the Customers table.
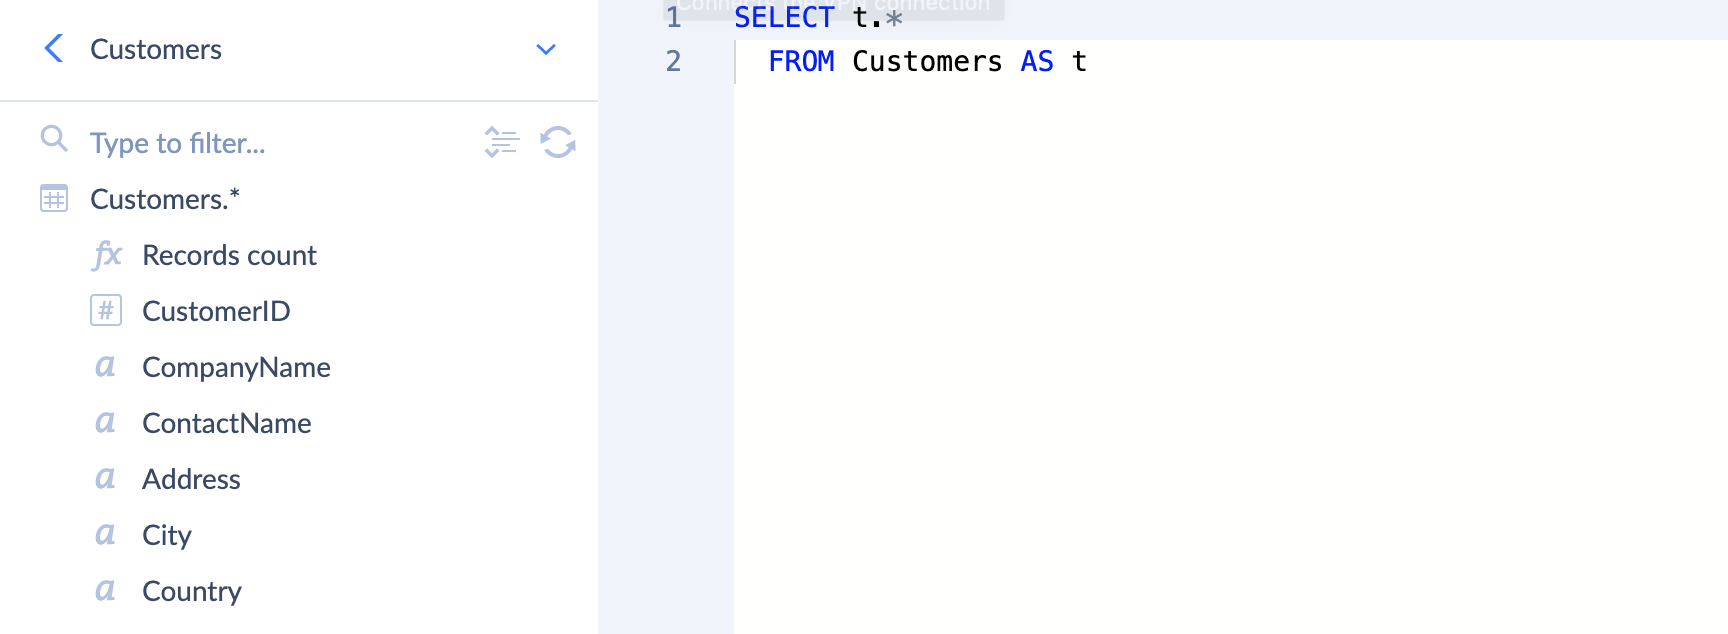
-
In the first Extend component we build an Output Schema for the BillingAddress object with Address, City, and Country properties by using Object Map. As a result BillingAddress object will be accessible in the next Data Flow component.

-
In the second Extend component we create a new Output Schema for the same BillingAddress object to rebuild it and replace Address and City properties for AddressWithCity. Note, that we do not set Scope when we want to rebuild the BillingAddress object.
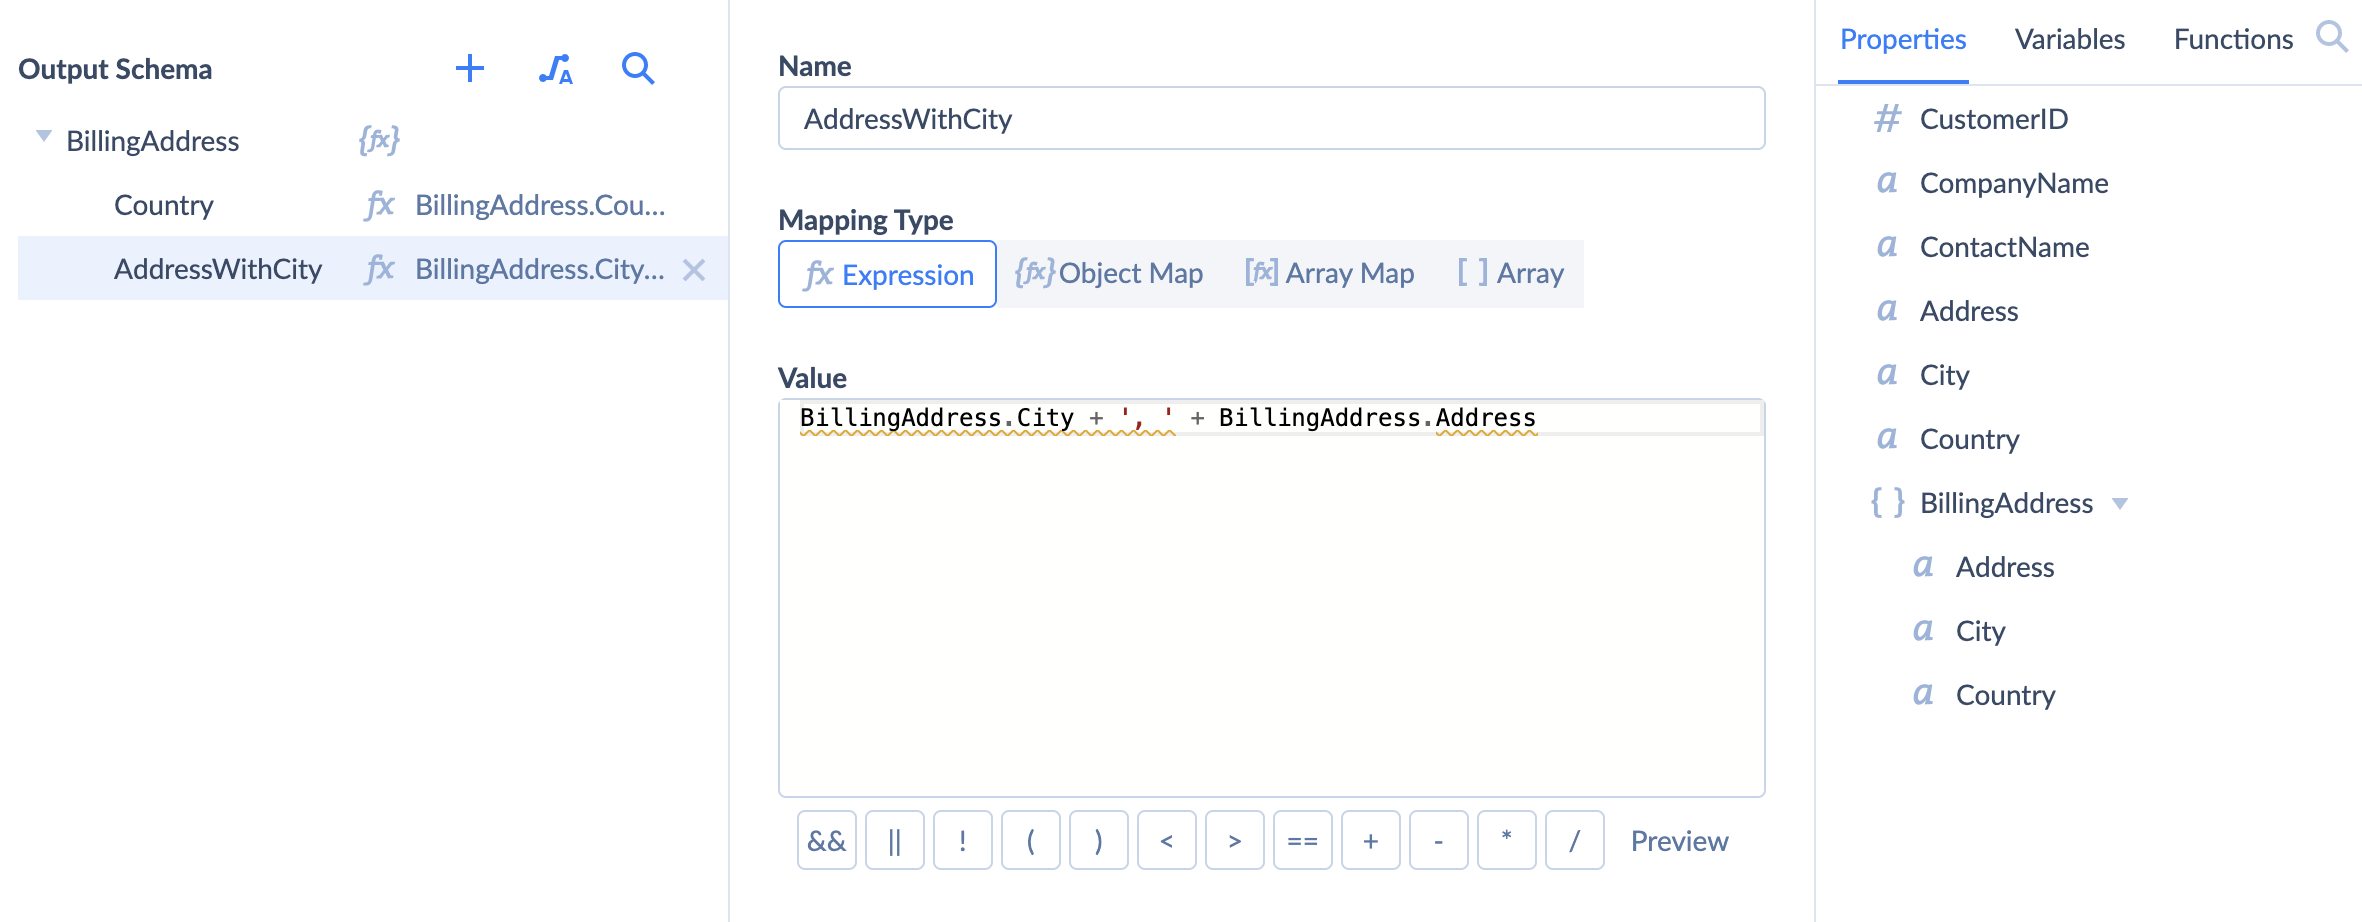
-
We build an Output Schema in JSON Target to define the look of our output object. It has two properties: CompanyName and BillingAddress. We map them to the according properties from the list on the right. The BillingAddress object was rebuilt and now includes a new set of properties: Country, and AddressWithCity.
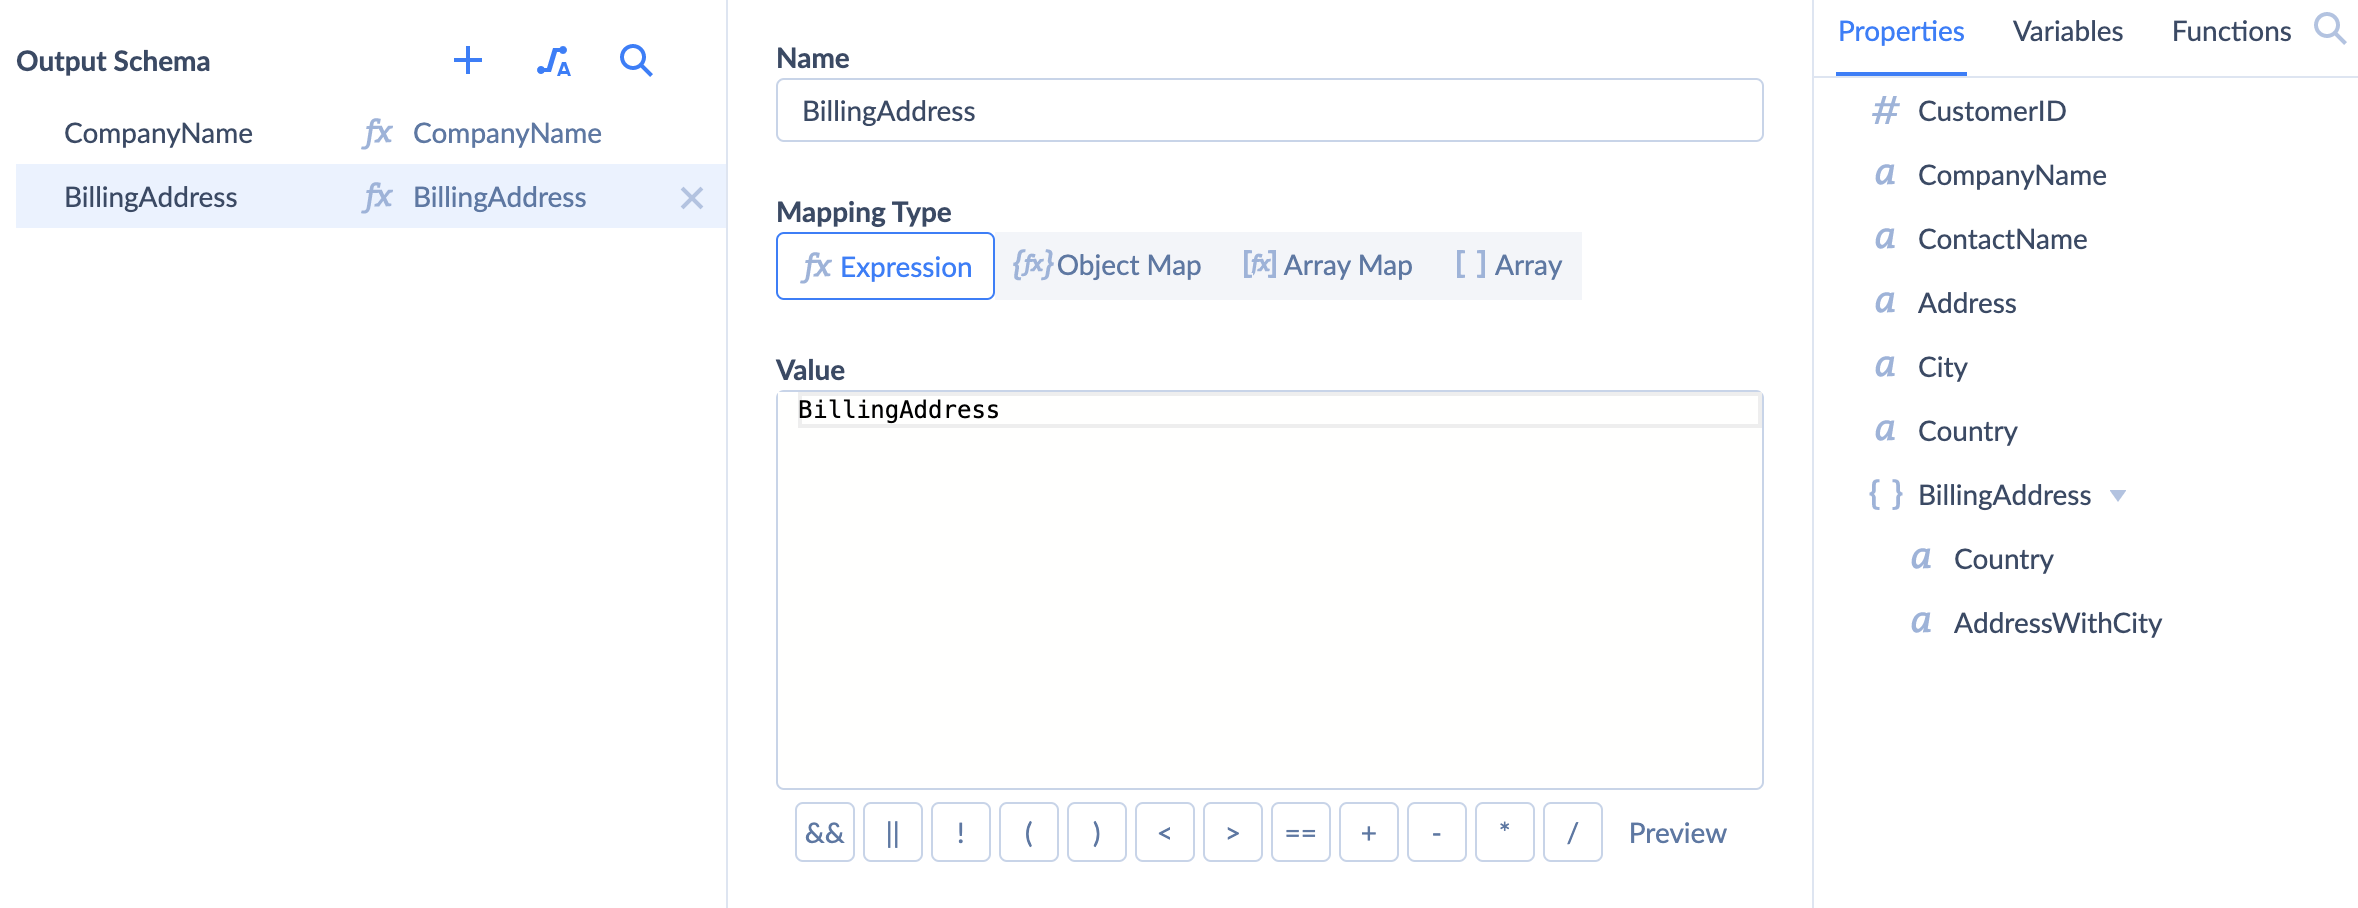
After Output Schema for the JSON Target is ready and properties are mapped, we can save and run our integration. As a result, we will receive a JSON file with the same file structure as shown in the JSON example above.
Lookup Array
With the help of the Lookup component, you can transform input data to include a nested array that was looked up in a related table. Let's take a closer look at the example. We have a Categories table as an input and a Products lookup table.
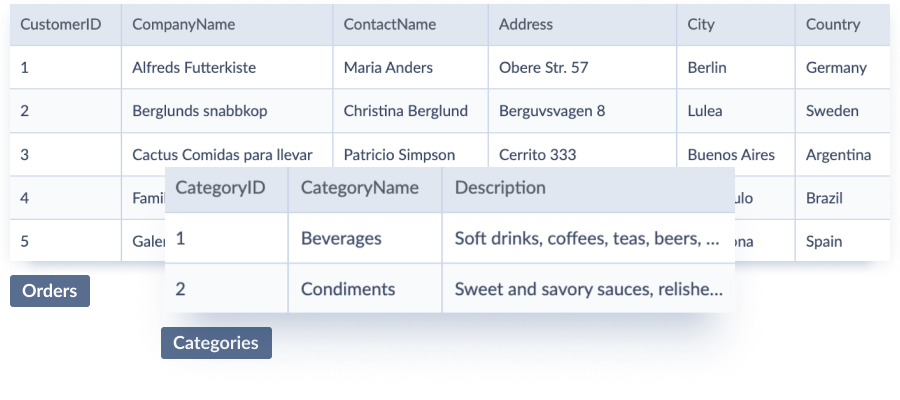
We want to receive a JSON with an array of category objects as an output. Each object in the array should contain CategoryId and a nested Products array. You may find the JSON example below:
1
2
3
4
5
6
7
8
9
10
11
12
13
14
15
16
17
18
19
20
21
22
23
24
25
26
27
28
29
30
31
32
[
{
"CategoryID": 1,
"Products": [
{
"ProductName": "Chai",
"CategoryID": 1,
"UnitPrice": 18.0
},
{
"ProductName": "Aniseed Syrup",
"CategoryID": 1,
"UnitPrice": 10.0
}
]
},
{
"CategoryID": 2,
"Products": [
{
"ProductName": "Sasquatch Ale",
"CategoryID": 2,
"UnitPrice": 14.0
},
{
"ProductName": "Queso Cabrales",
"CategoryID": 2,
"UnitPrice": 21.0
}
]
}
]
To accomplish the task we use 3 components:
- Source, to define the data we work with.
- Lookup, to lookup for the ProductName, UnitPrice, QuantityPerUnit properties by CategoryId and assign them to the objects inside the Products array.
- JSON Target, to define the structure of the output data.
-
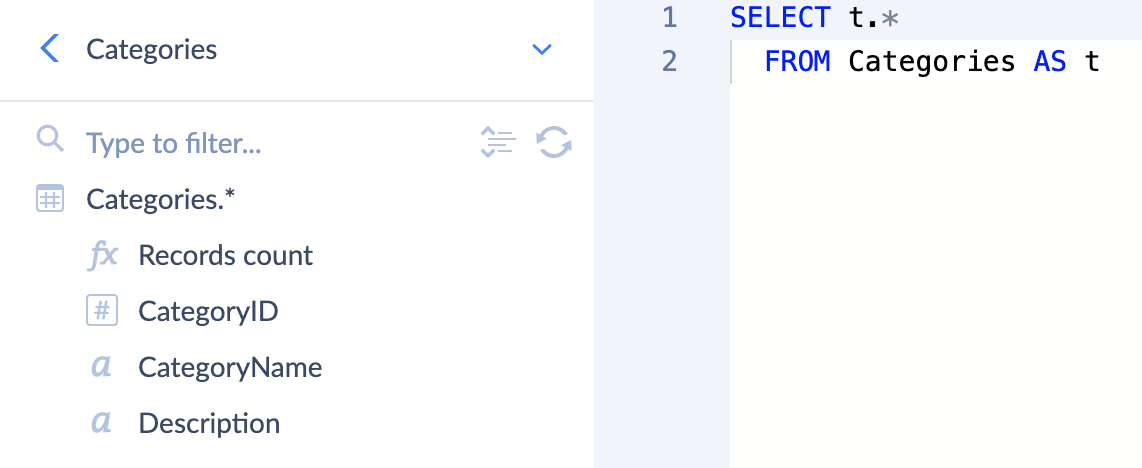
In the Source component we use Execute Query to get properties from the Categories table.
-
In the Lookup component we set Property to Products and select Array as its Behaviour. We are looking up for ProductName, UnitPrice, and QuantityPerUnit columns in the Products table by CategoryId and assign them to objects inside the Products array. As a result, the Products array will be accessible in Properties in the JSON Target component.
-
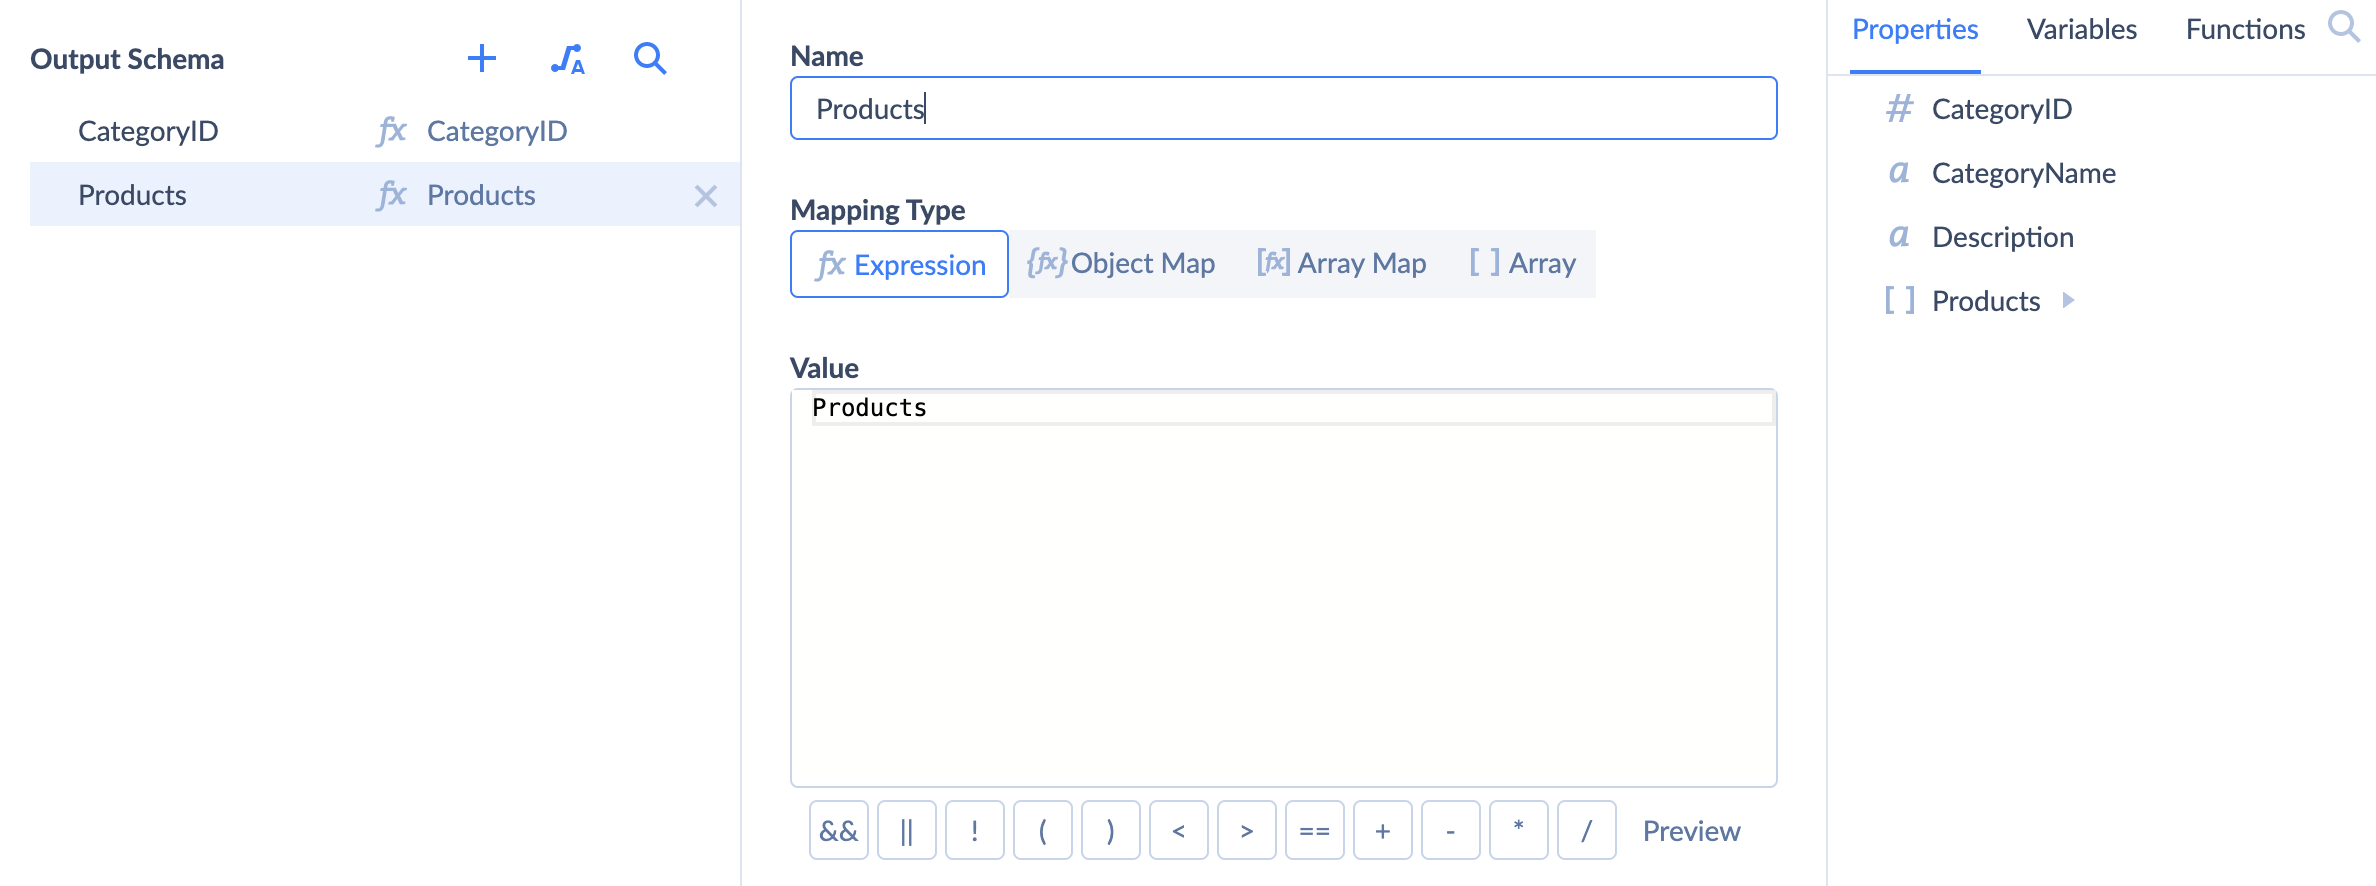
We build an Output Schema in JSON Target to define the structure of the output object. It has two properties: CategoryId and Products. We map them to the according properties from the list on the right: CategoryId that we get from the Source component and Products array from the Lookup component.
After Output Schema for the JSON Target is ready and properties are mapped, we can save and run our integration. As a result, we will receive a JSON file with the same file structure as shown in the JSON example above.
Extend a Nested Array
With the help of Data Flow components, you can transform input data to include an extended nested array. Let's take a closer look at the example. We have a Categories table as an input.

We want to receive a JSON with an array of category objects as an output. Each object in the array should contain CategoryId and an extended nested Products array. You may find the JSON example below:
1
2
3
4
5
6
7
8
9
10
11
12
13
14
15
16
17
18
19
20
21
22
23
24
25
26
27
28
29
30
31
32
33
34
35
36
[
{
"CategoryID": 1,
"Products": [
{
"ProductName": "Chai",
"UnitPrice": 18.0,
"QuantityPerUnit": "10 boxes x 20 bags",
"ProductWithQuantityPerUnit": "Chai, 10 boxes x 20 bags"
},
{
"ProductName": "Aniseed Syrup",
"UnitPrice": 10.0,
"QuantityPerUnit": "12 - 550 ml bottles",
"ProductWithQuantityPerUnit": "Aniseed Syrup, 12 - 550 ml bottles"
}
]
},
{
"CategoryID": 2,
"Products": [
{
"ProductName": "Sasquatch Ale",
"UnitPrice": 14.0,
"QuantityPerUnit": "24 - 12 oz bottles",
"ProductWithQuantityPerUnit": "Sasquatch Ale, 24 - 12 oz bottles"
},
{
"ProductName": "Queso Cabrales",
"UnitPrice": 21.0,
"QuantityPerUnit": "1 kg pkg.",
"ProductWithQuantityPerUnit": "Queso Cabrales, 1 kg pkg."
}
]
}
]
To accomplish the task we use 4 components:
- Source, to define the data we work with.
- Lookup, to lookup for the ProductName, UnitPrice, and QuantityPerUnit properties by CategoryId.
- Extend, to add a new ProductWithQuantityPerUnit property to each object within the Products array.
- JSON Target, to define the structure of the output data.
-
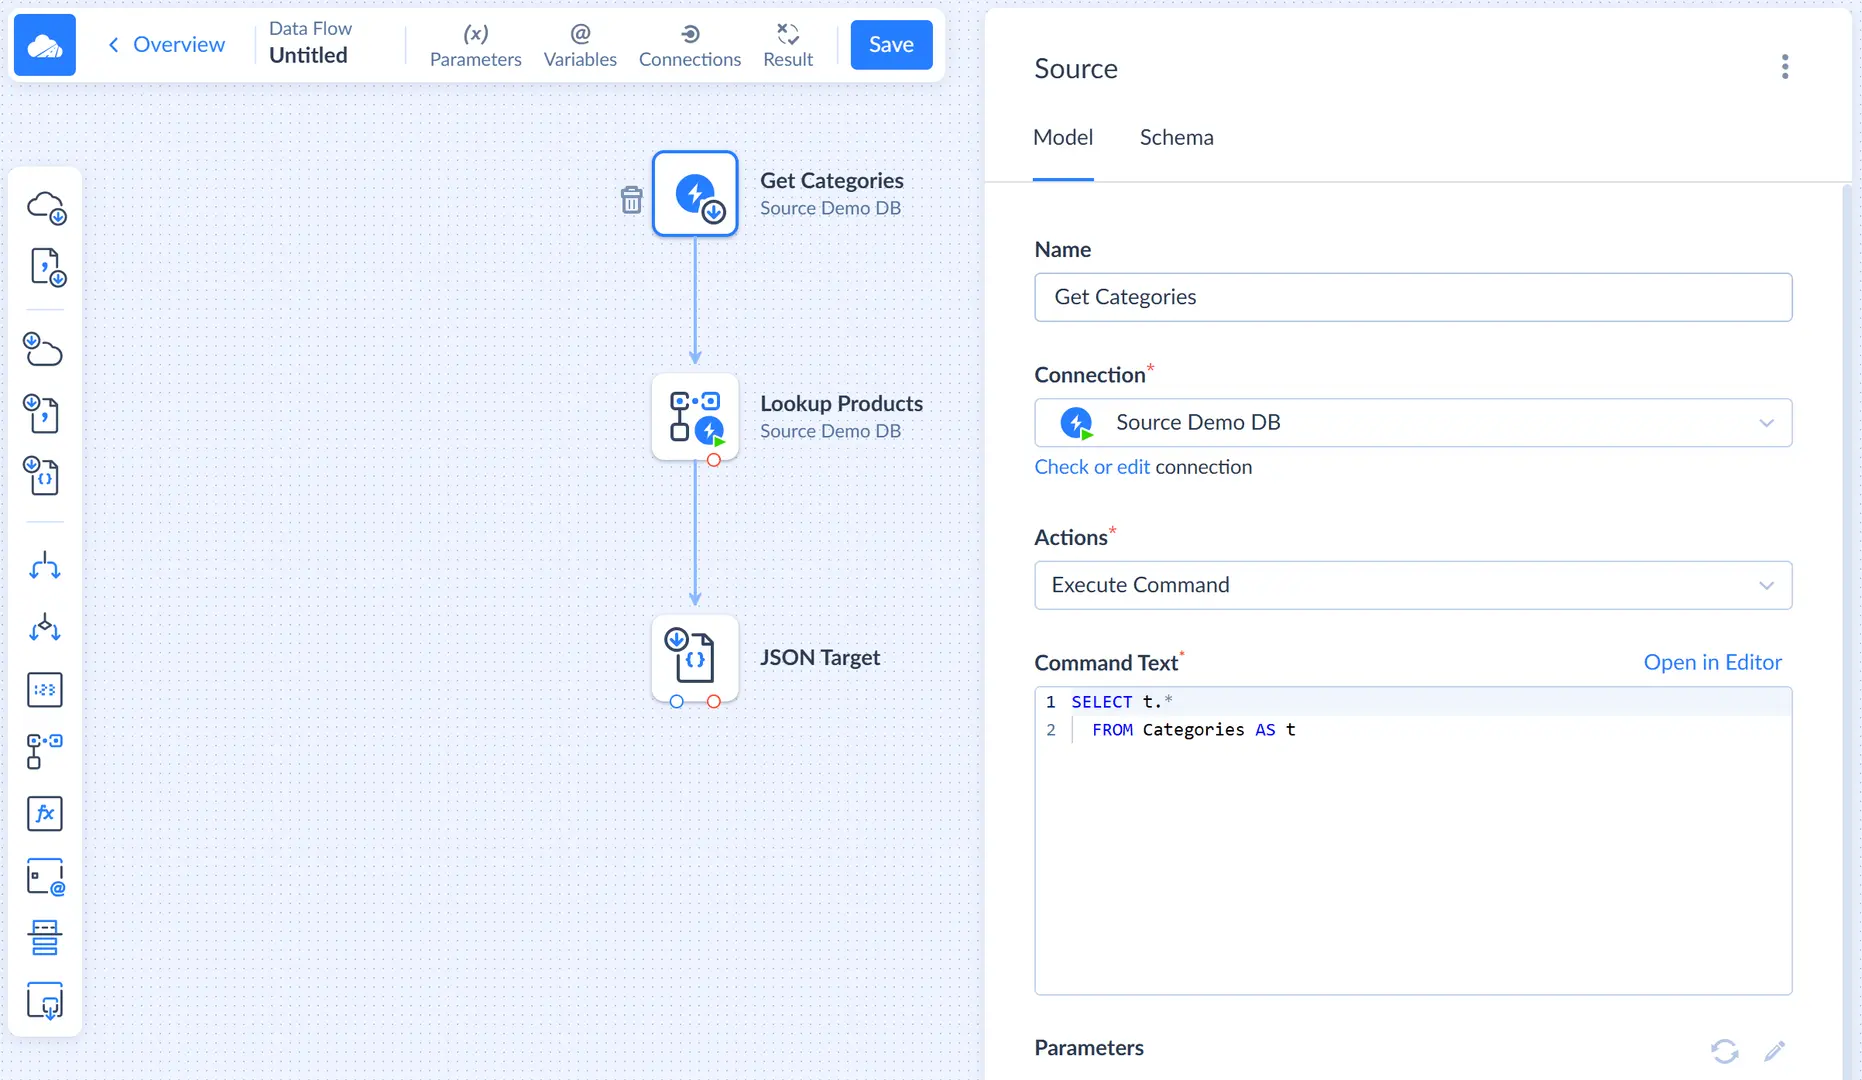
In the Source component we use Execute Query to get properties from the Categories table.
-
In the Lookup component we set Property to Products and select Array as its Behaviour. We are looking up for ProductName, UnitPrice, and QuantityPerUnit columns in the Products table by CategoryId and assign them to objects inside the Products array. As a result, we receive the Products array in the output of the Lookup component.
-
In the Extend component we set Scope to Products to extend the Products array, define our new ProductWithQuantityPerUnit property and map it to
ProductName + ', ' + QuantityPerUnitexpression.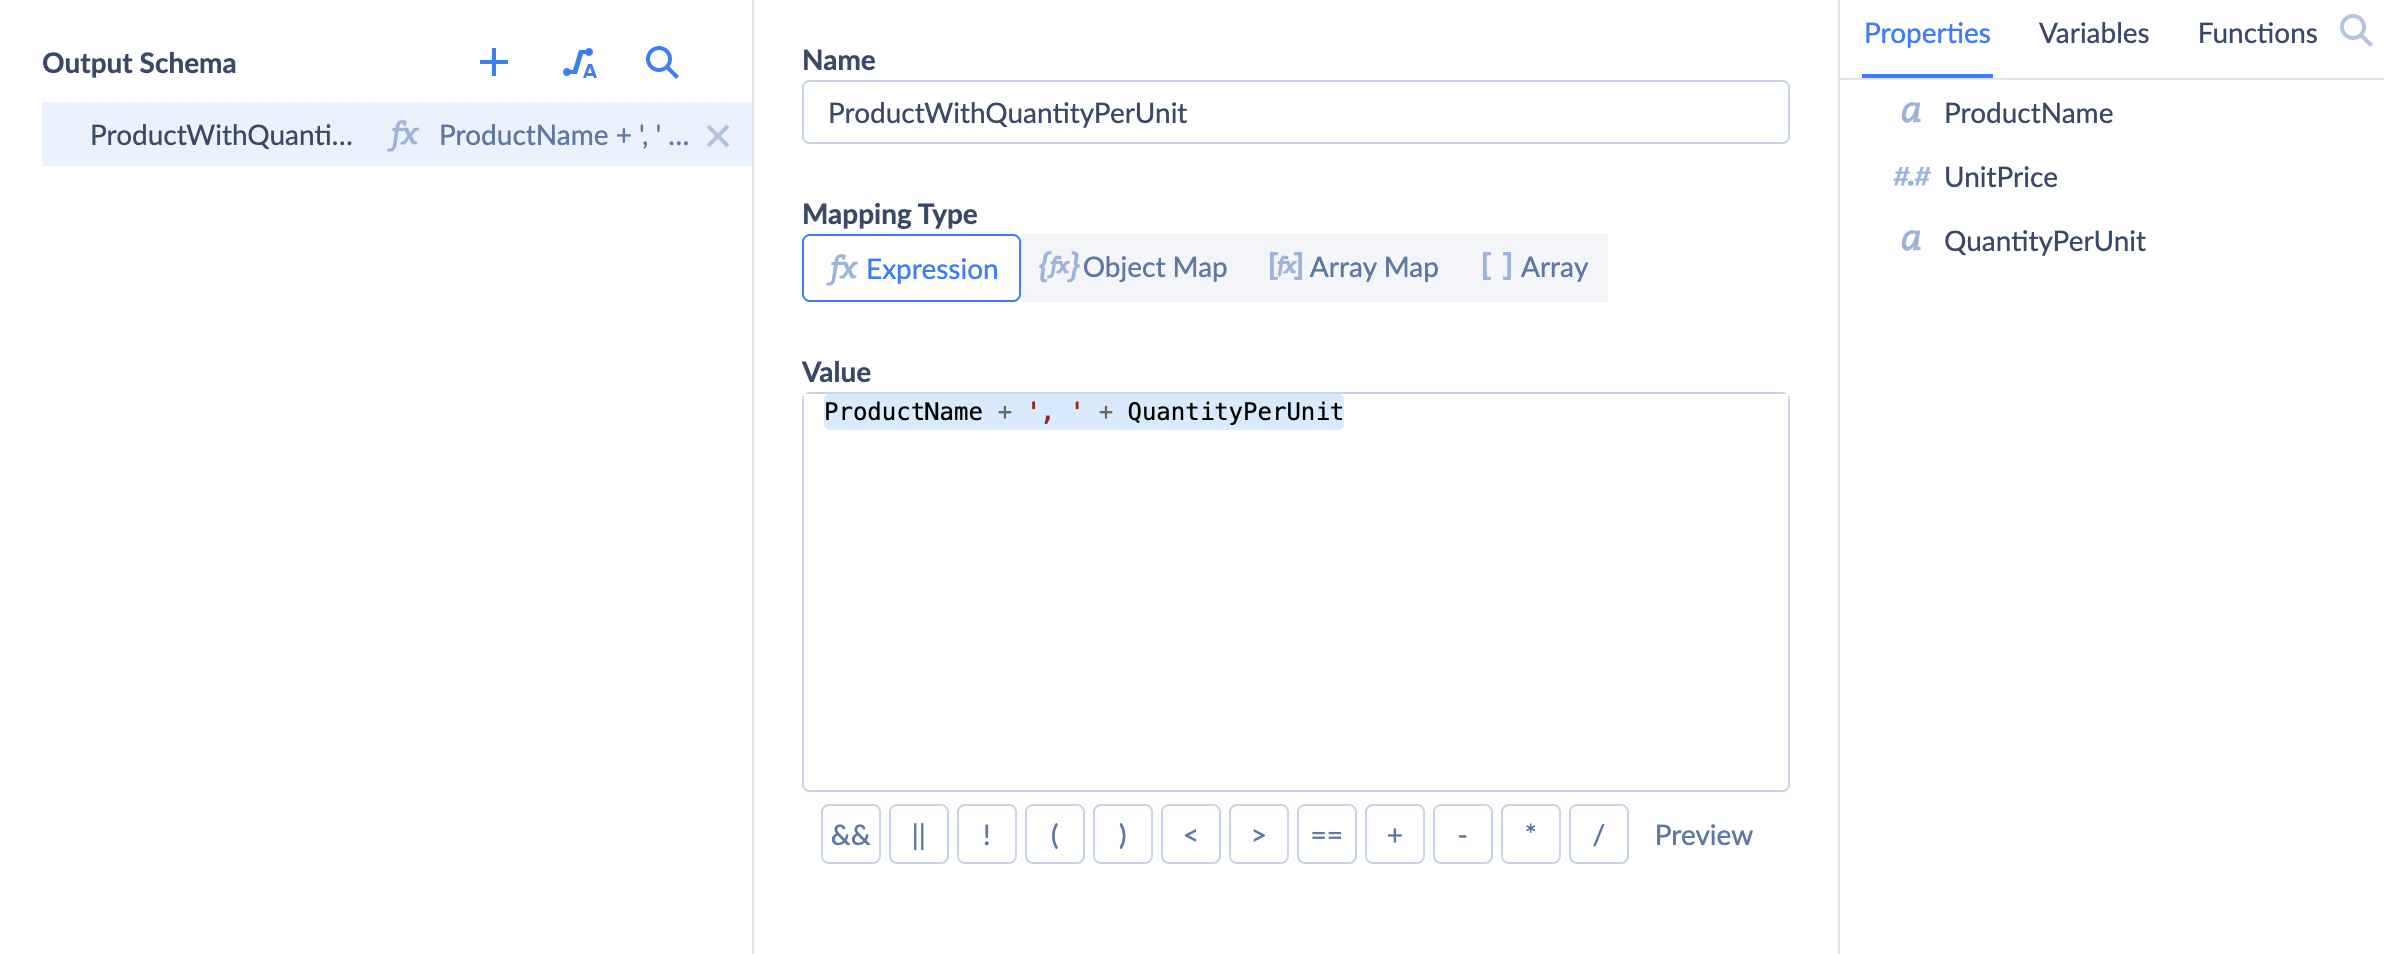
-
We build an Output Schema in JSON Target to define the structure of the output object. It has two properties: CategoryId and Products. We map them to the according properties from the list on the right: CategoryId that we get from the Source component and the extended Products array from the Extend component.
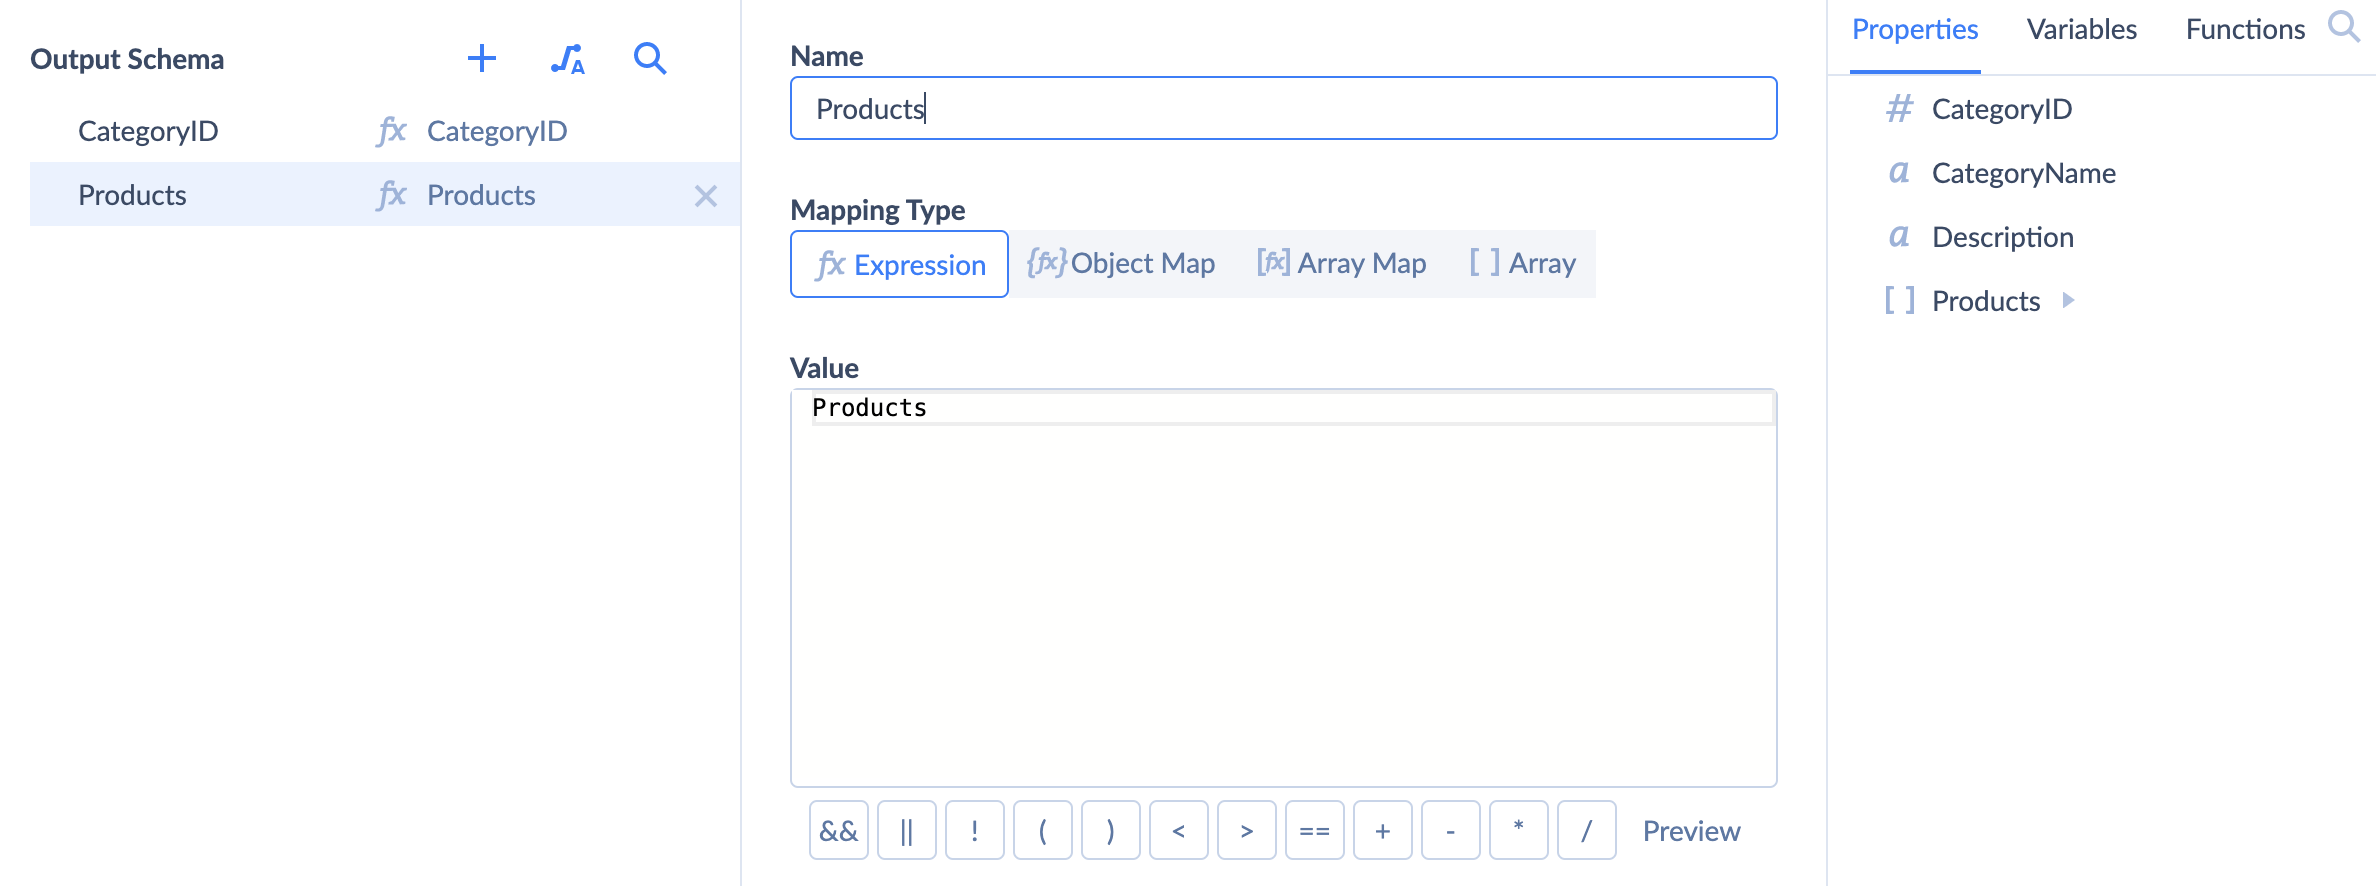
After Output Schema for the JSON Target is ready and properties are mapped, we can save and run our integration. As a result, we will receive a JSON file with the same file structure as shown in the JSON example above.
Rebuild a Nested Array
With the help of Extend component, you can rebuild a nested array by replacing its properties. Let's take a closer look at the example. We have a Categories table as an input.

We want to receive a JSON with an array of category objects as an output. Each object in the array should contain CategoryId and a rebuilt nested Products array. You may find the JSON example below:
1
2
3
4
5
6
7
8
9
10
11
12
13
14
15
16
17
18
19
20
21
22
23
24
25
26
27
28
[
{
"CategoryID": 1,
"Products": [
{
"Name": "Chai, 10 boxes x 20 bags",
"Price": 18.0
},
{
"Name": "Aniseed Syrup, 12 - 550 ml bottles",
"Price": 10.0
}
]
},
{
"CategoryID": 2,
"Products": [
{
"Name": "Sasquatch Ale, 24 - 12 oz bottles",
"Price": 14.0
},
{
"Name": "Queso Cabrales, 1 kg pkg.",
"Price": 21.0
}
]
}
]
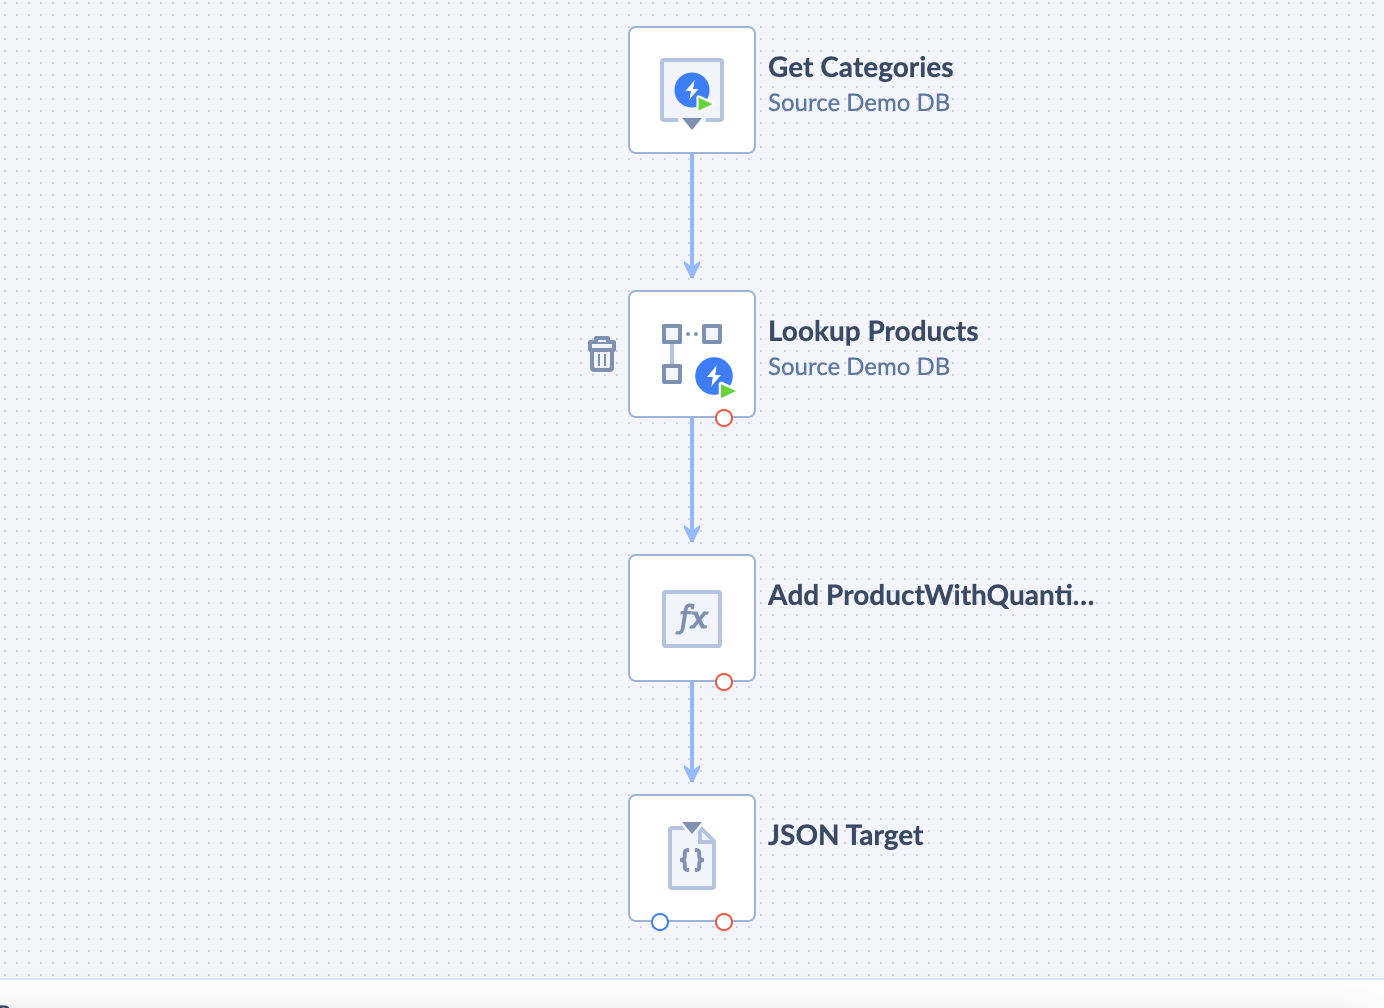
To accomplish the task we use 4 components:
- Source, to define the data we work with.
- Lookup, to lookup for the ProductName, UnitPrice, QuantityPerUnit properties by CategoryId.
- Extend, to rebuild nested Products array and replace ProductName, UnitPrice, QuantityPerUnit properties with Name and Price in each object within Products array.
- JSON Target, to define the structure of the output data.
-
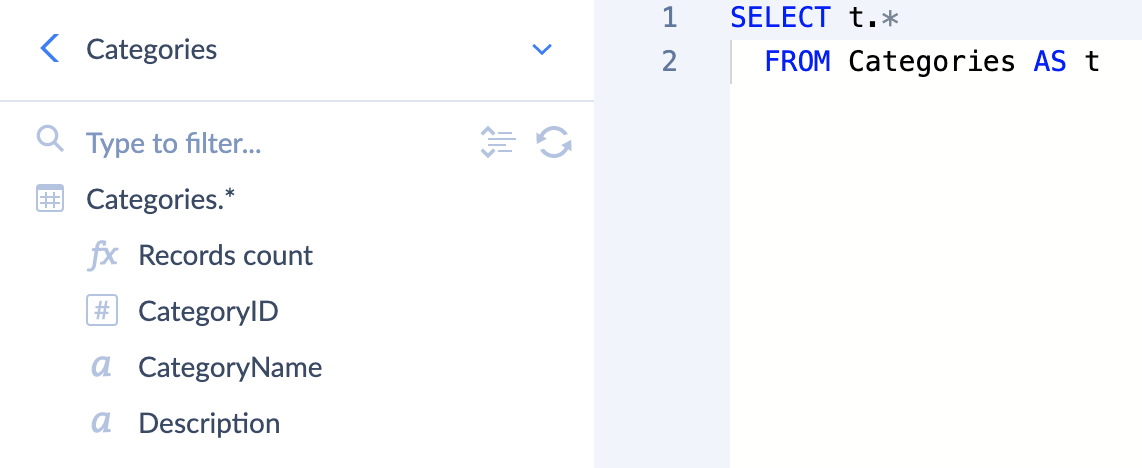
In the Source component we use Execute Query to get properties from the Categories table.
-
In the Lookup component we set the property name to Products and select Array as its Behaviour. We are looking up for ProductName, UnitPrice, and QuantityPerUnit columns in the Products table by CategoryId and assign them to objects inside the Products array. As a result, the Products array will be accessible in Properties in the Extend component.
-
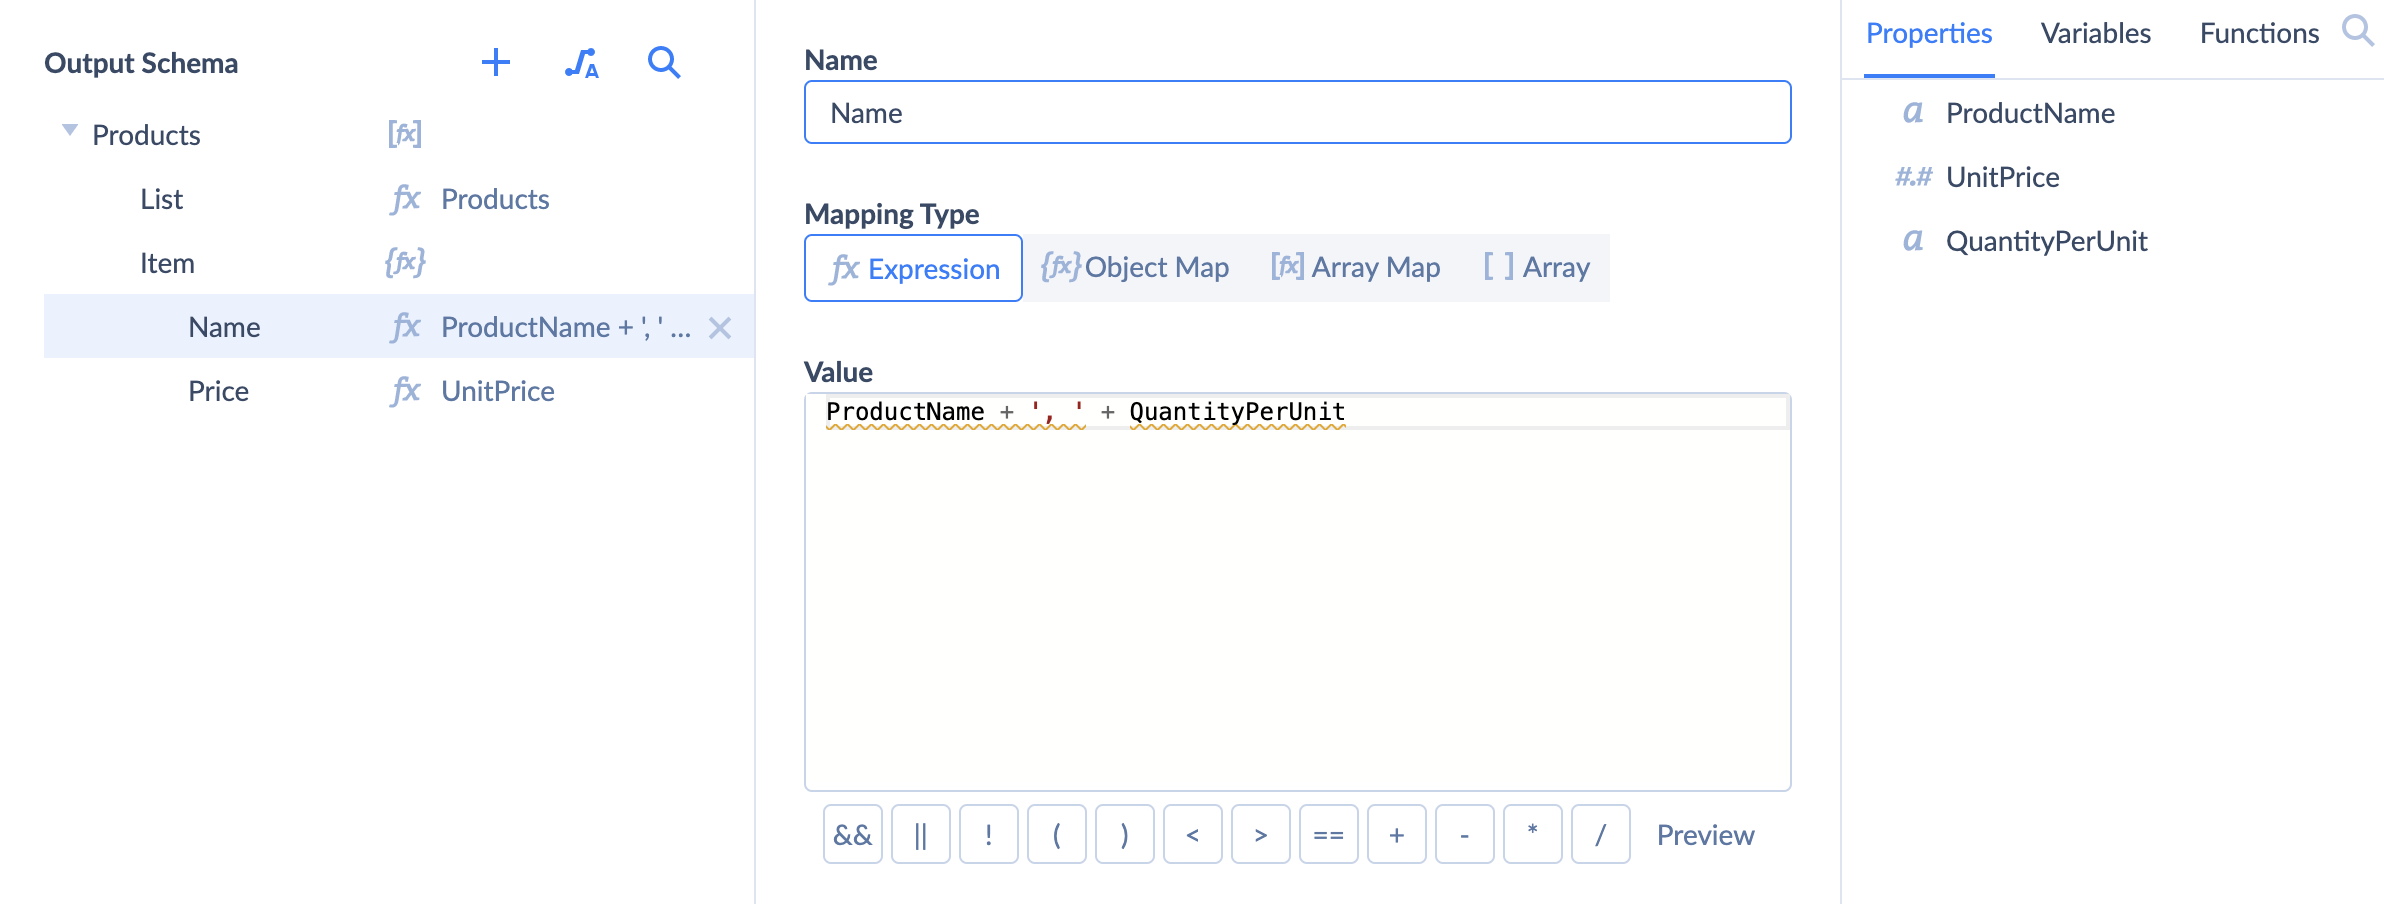
In the Extend component we create a new Output Schema for the same Products array to rebuild it and replace ProductName, UnitPrice, QuantityPerUnit properties with Name and Price in each object within the Products array. Note, that we do not set Scope when we rebuild the Products array.
-
We build an Output Schema in JSON Target to define the look of our output object. It has two properties: CategoryId and Products. We map them to the according properties from the list on the right. The Products array was rebuilt and now objects inside it have a different set of properties: Name, and Price.
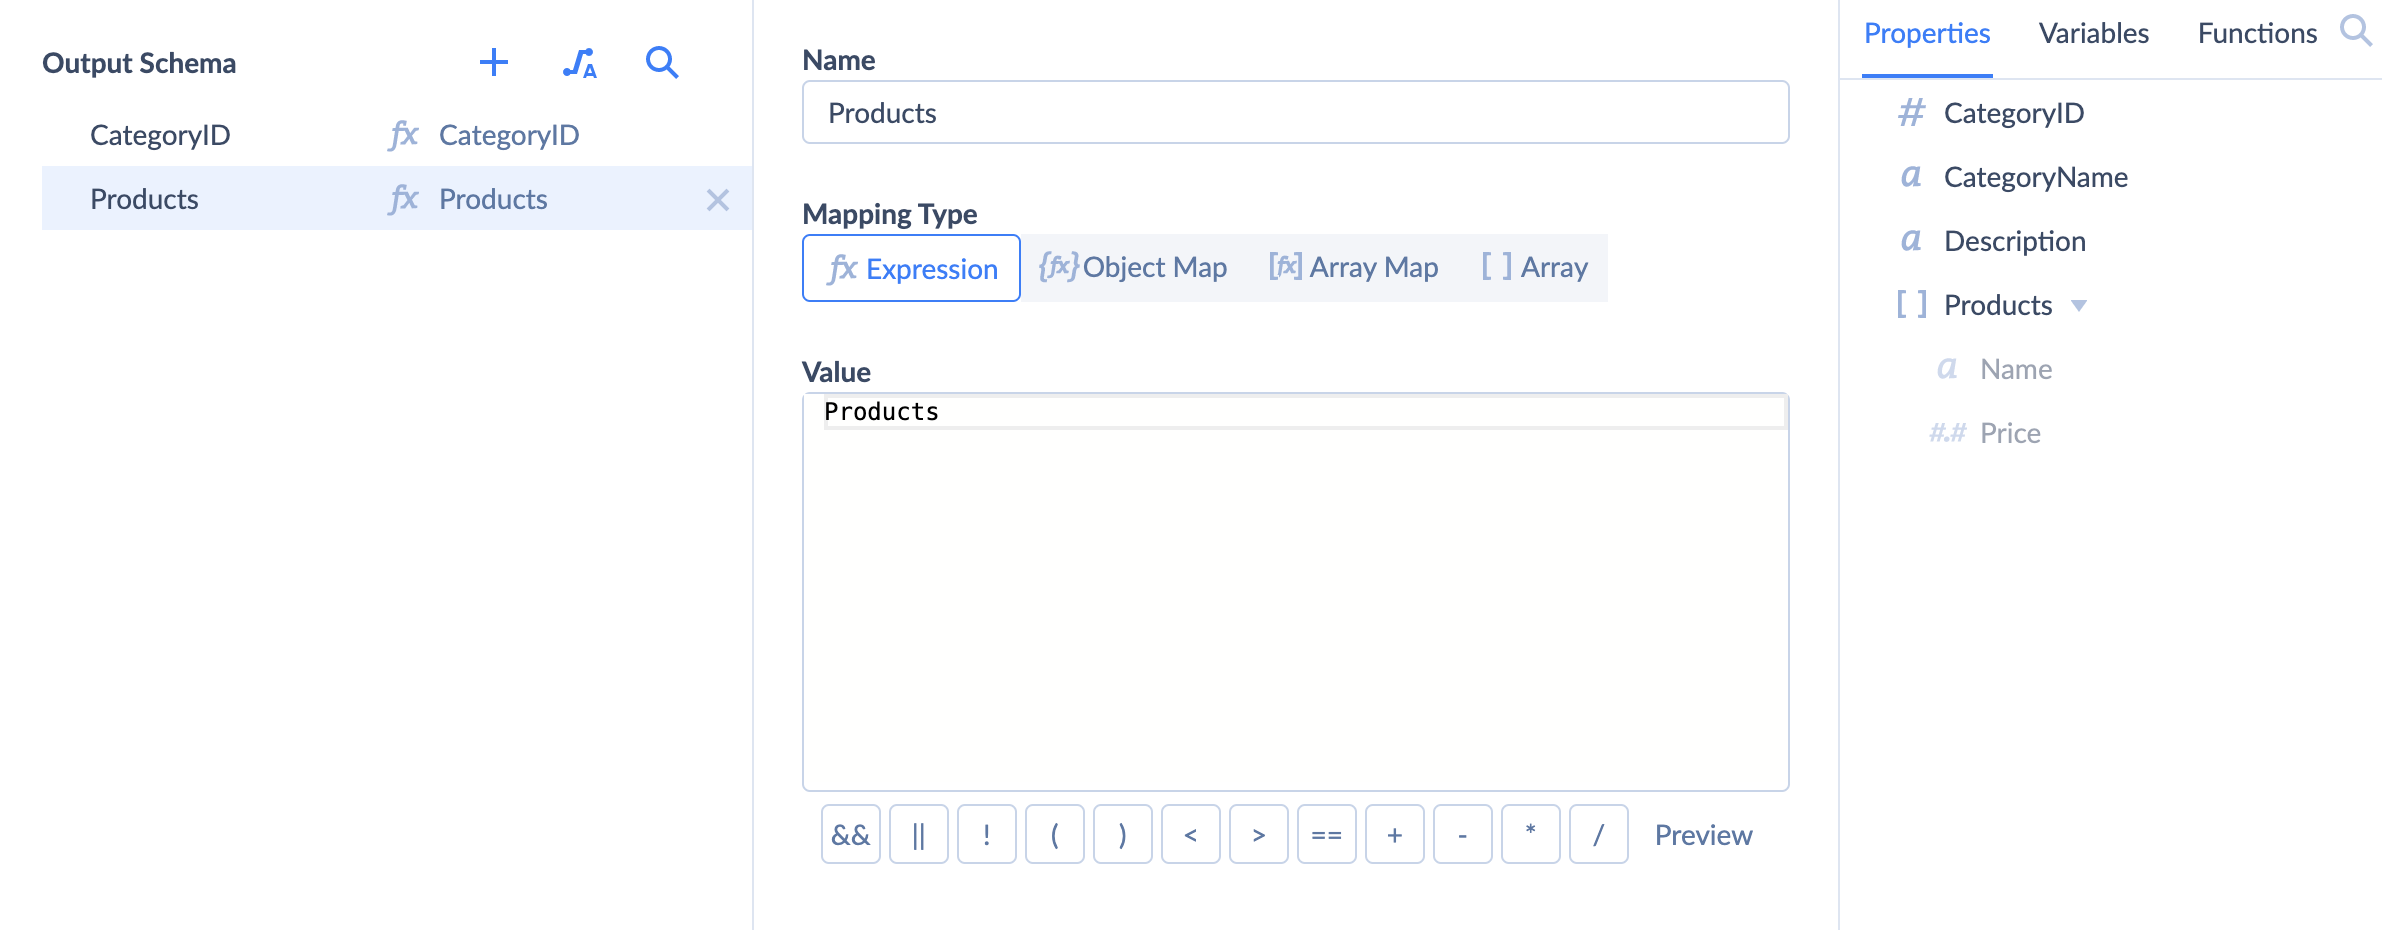
After Output Schema for the JSON Target is ready and properties are mapped, we can save and run our integration. As a result, we will receive a JSON file with the same file structure as shown in the JSON example above.
Flatten a Nested Array
With the help of the Unwind component, you can flatten a nested array and get the list of its properties. Let's take a closer look at the example. We have a Categories table as an input and a Products lookup table.
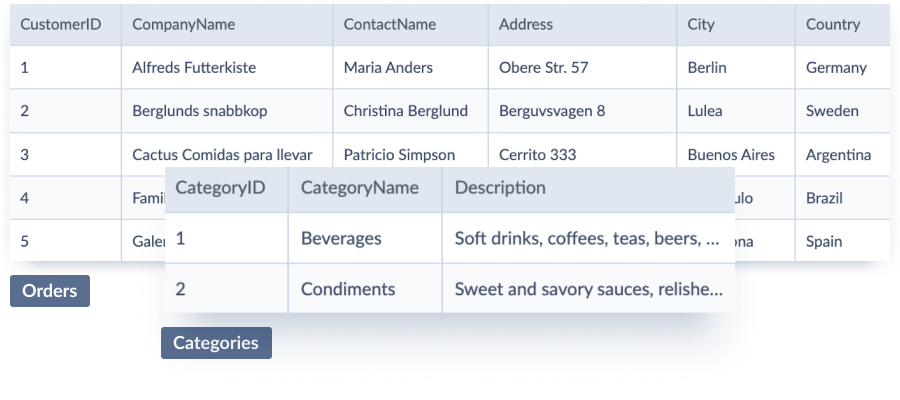
We want to receive two JSONs: the array of category objects, and the array of product objects. You may find JSON examples below:
Categories
1
2
3
4
[
{ "CategoryID": 1, "CatgoryName": "Beverages" },
{ "CategoryID": 2, "CatgoryName": "Condiments" }
]
Products
1
2
3
4
5
6
7
8
9
10
11
12
13
14
[
{
"ProductName": "Chai",
"UnitPrice": 18.0
},
{
"ProductName": "Aniseed Syrup",
"UnitPrice": 10.0
},
{
"ProductName": "Northwoods Cranberry Sauce",
"UnitPrice": 40.0
}
]
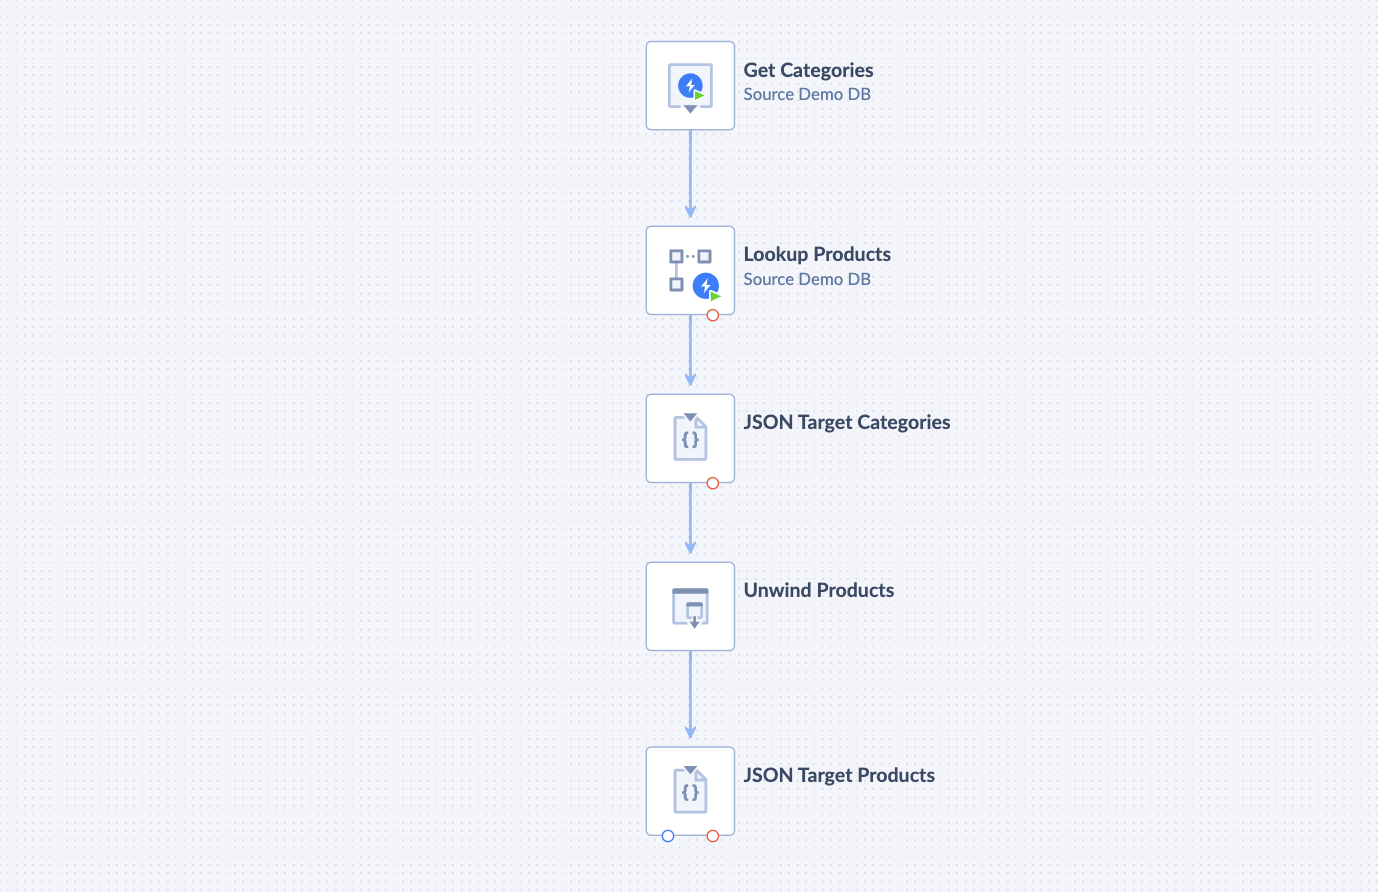
To accomplish the task we use 5 components:
- Source, to define the data we work with.
- Lookup, to lookup for the ProductName, UnitPrice and QuantityPerUnit properties by CategoryId in Products table.
- JSON Target, to define the structure of the first JSON file.
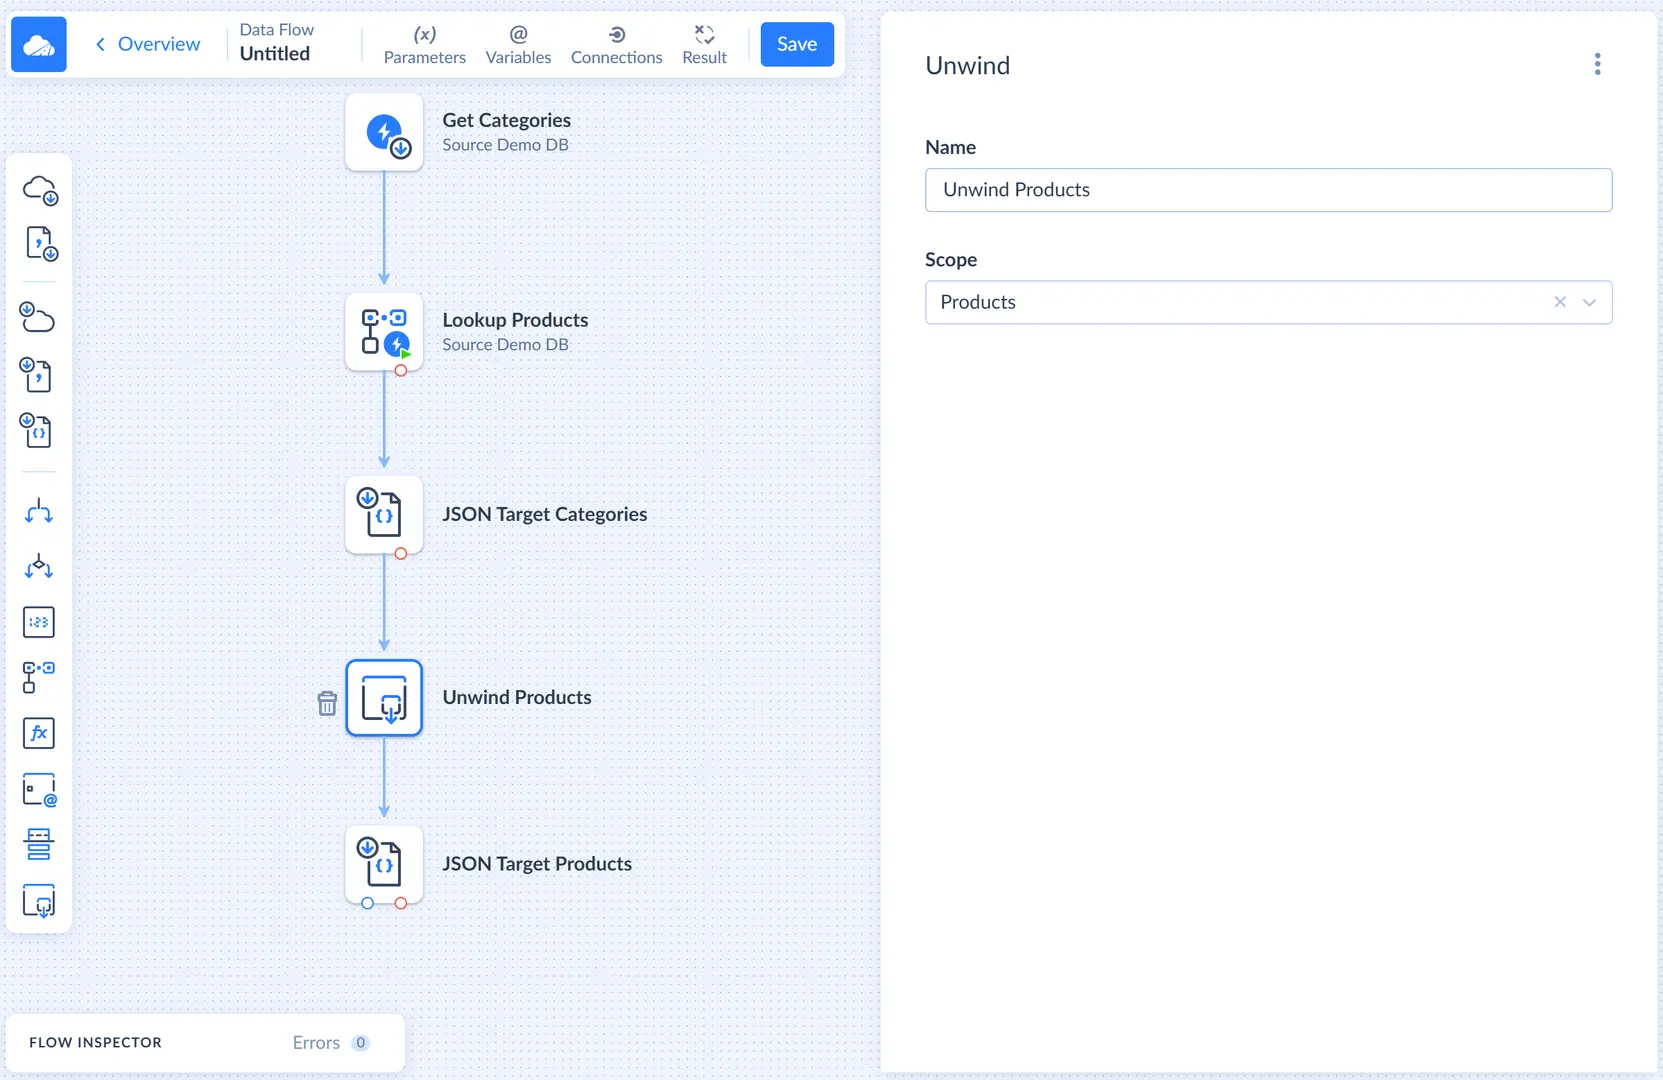
- Unwind, to flatten the Products array we received after the lookup.
- JSON Target, to define the structure of the second JSON file.
-
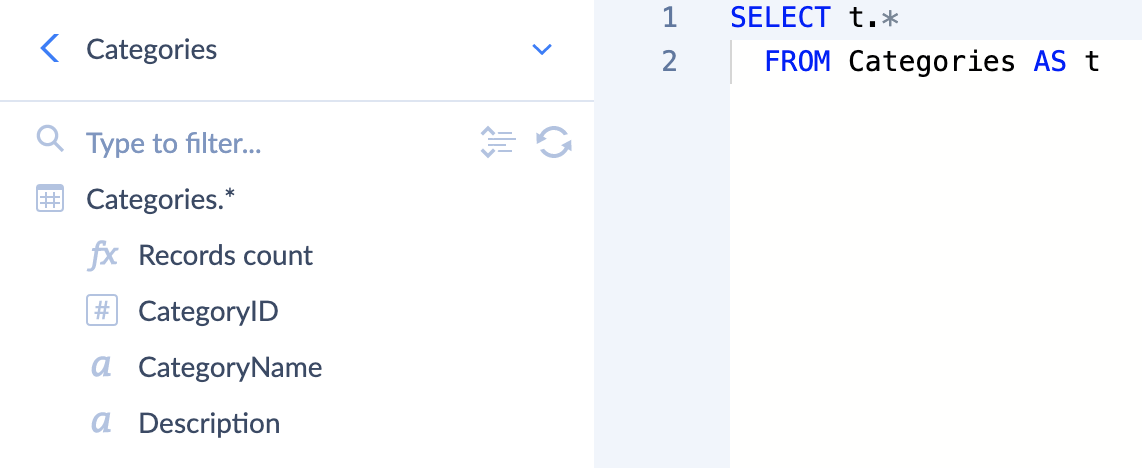
In the Source component we use Execute Query to get properties from the Categories table.
-
In the Lookup component we set the property name to Products and select Array as its Behaviour. We are looking up for ProductName, UnitPrice, and QuantityPerUnit columns in the Products table by CategoryId and assign them to objects inside the Products array. As a result, the Products array will be accessible in Properties for the first JSON Target and Unwind components.
-
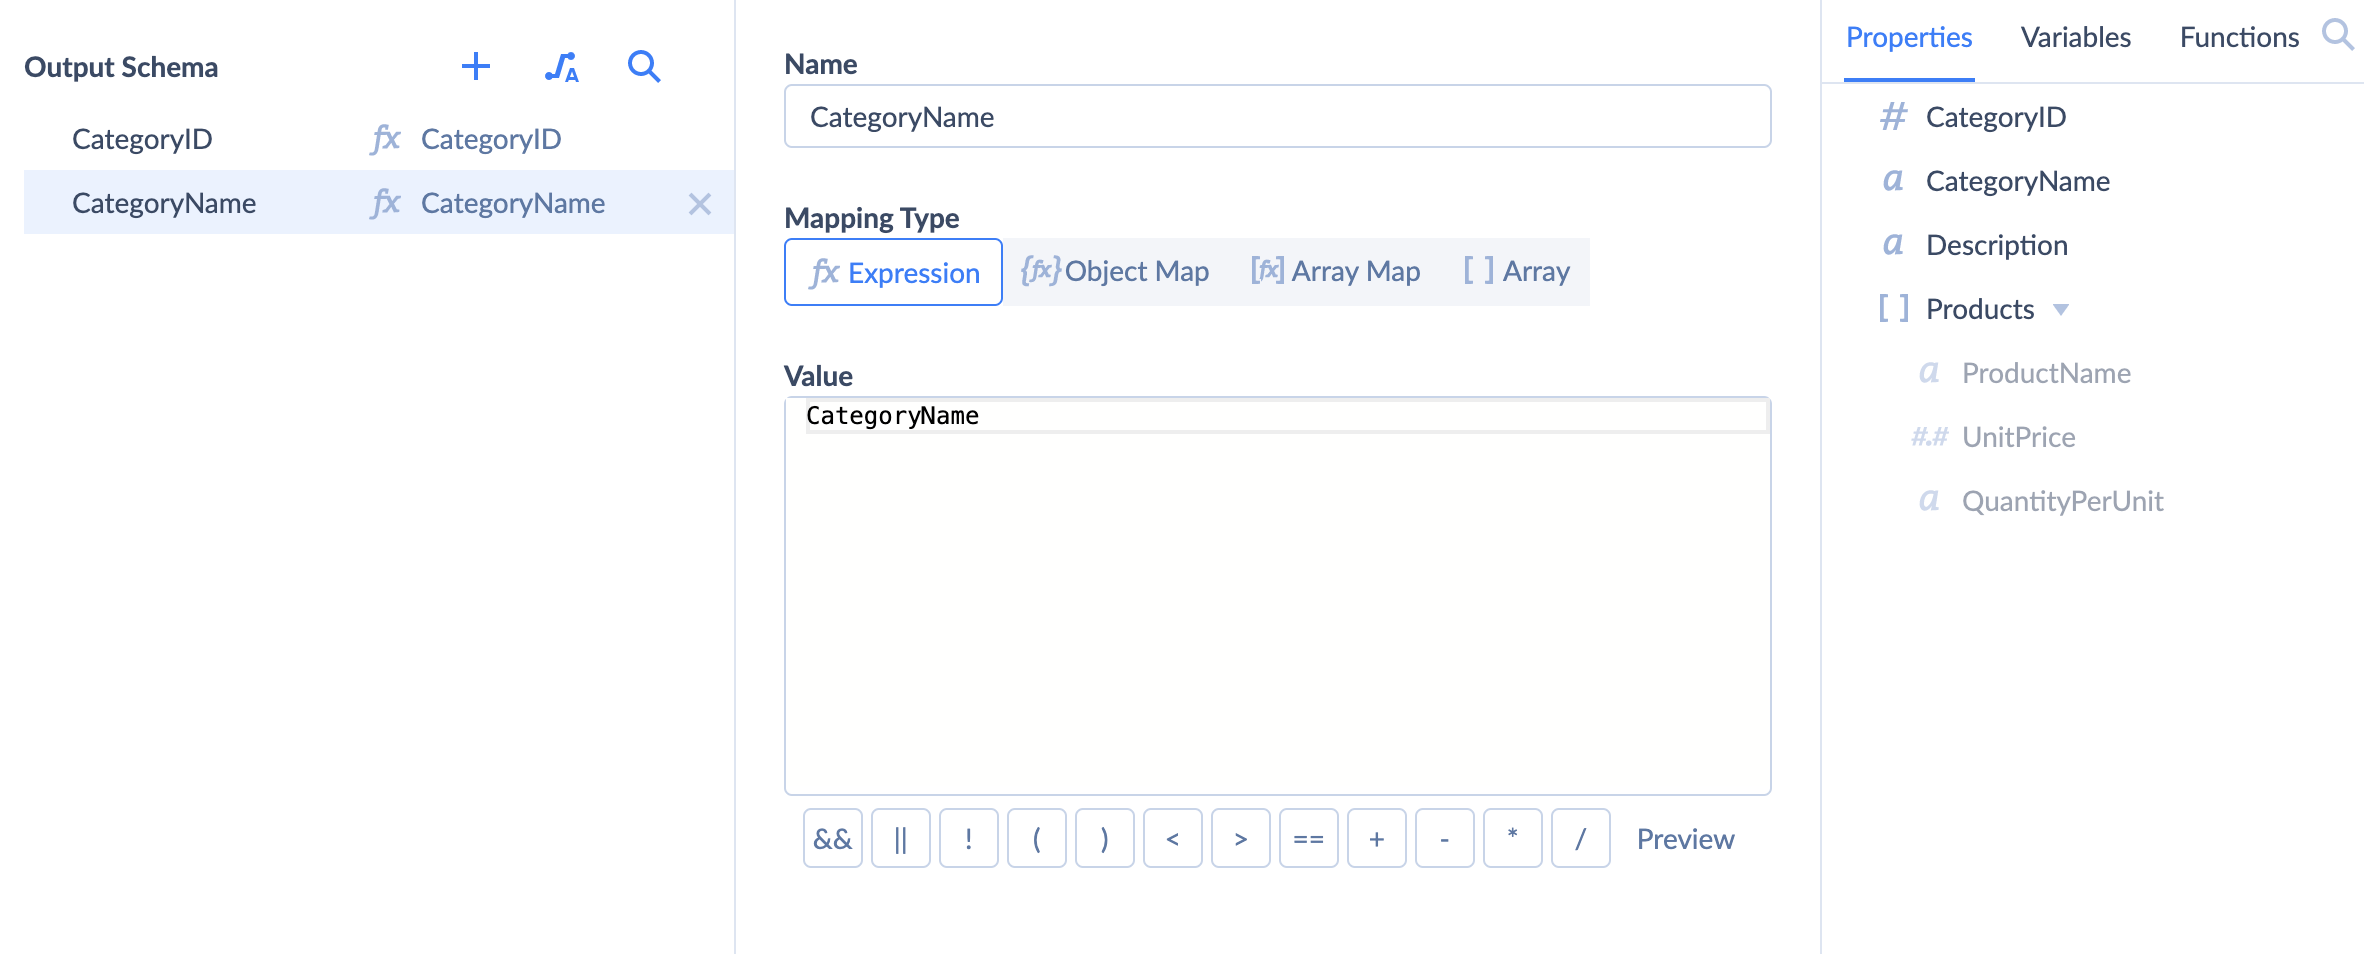
In the first JSON Target we create an Output Schema to define the structure of the first JSON file. It has two fields: CategoryId and CategoryName. Note, that the Products array is an accessible property but it shouldn't be part of the first file, so we skip it for now.
-
We set Scope in the Unwind component to Products to flatten Products and receive the list of its properties.
-
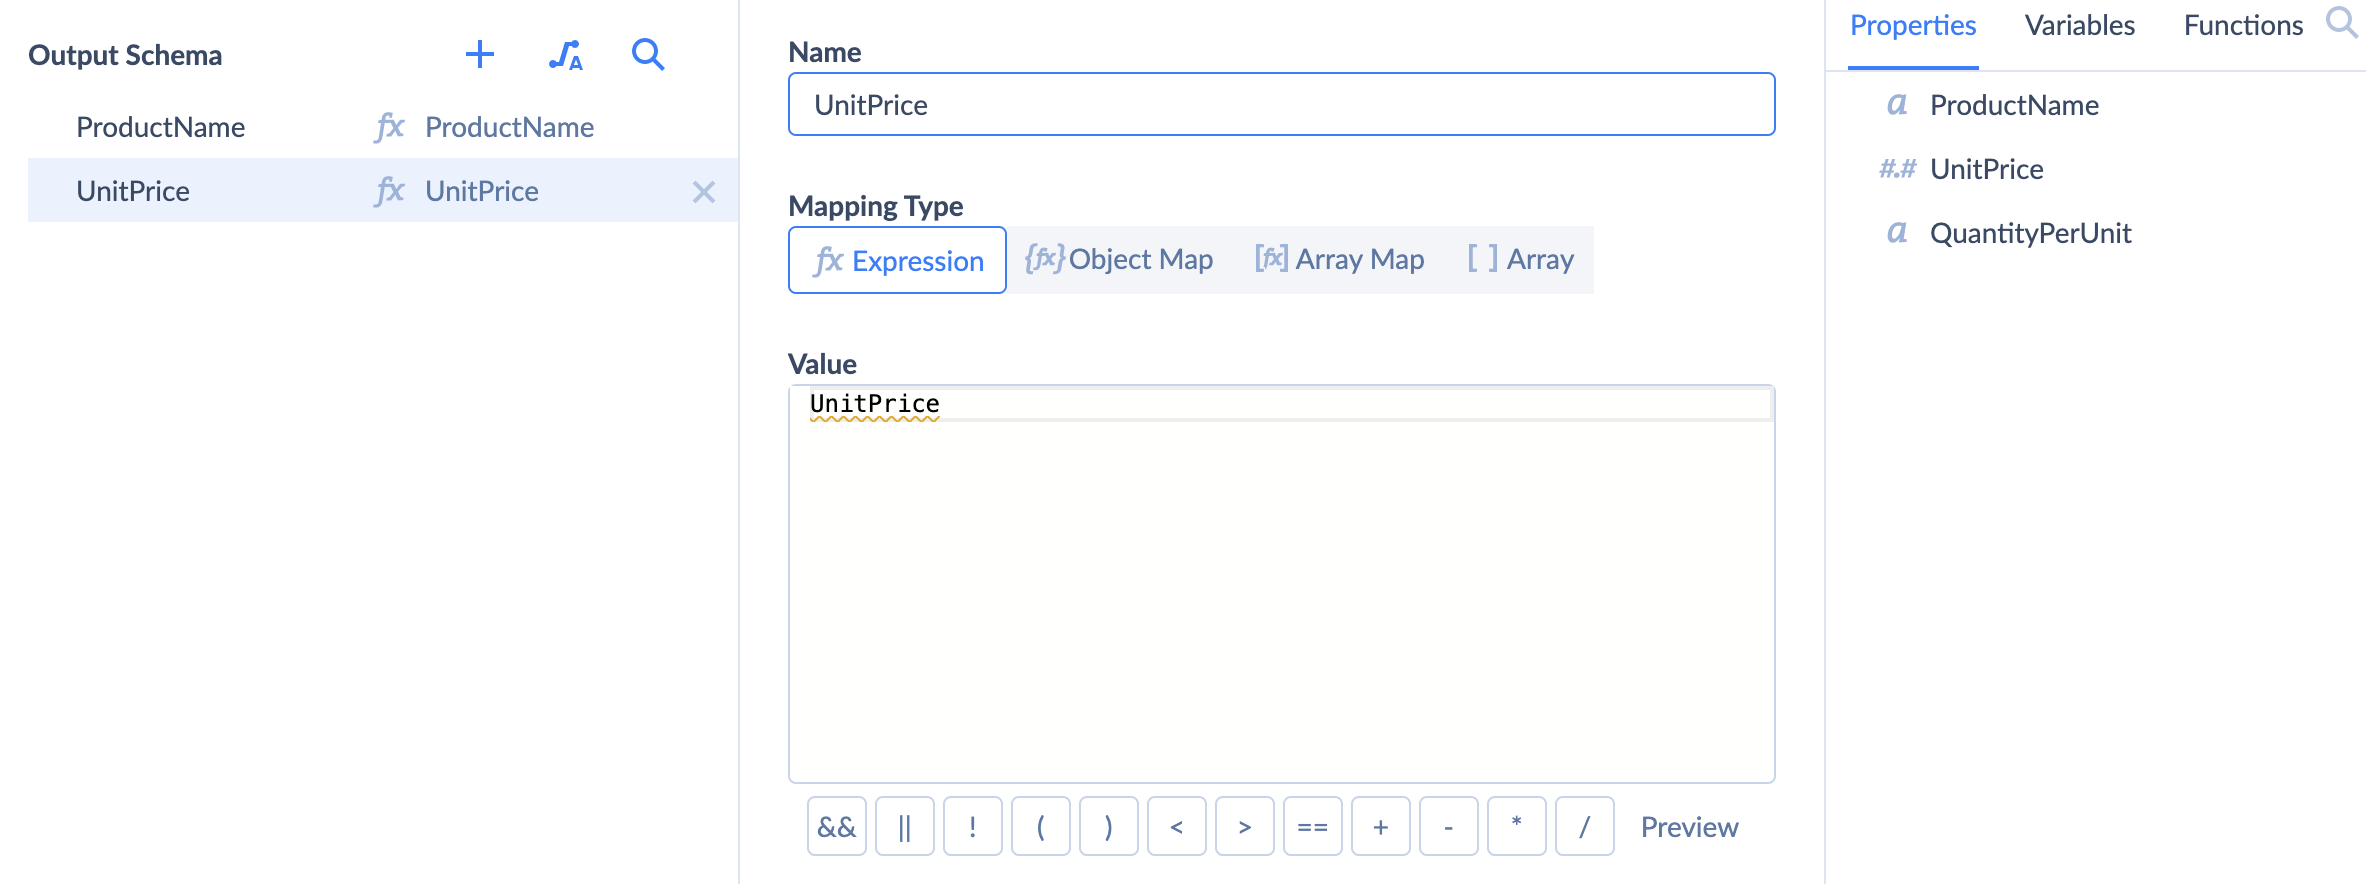
In the second JSON Target we create an Output Schema to define the structure of the second JSON file. Output Schema has two properties: ProductName and UnitPrice We map them to the according properties from the list on the right. Note, that properties there are not part of the Products array anymore.
After Output Schema for the JSON Target is ready and properties are mapped, we can save and run our integration. As a result, we will receive two JSON files with the file structure shown in the JSON example above.