How to Import CSV Files via File Masks
When you import CSV files from Dropbox, Amazon S3, FTP, SFTP, and Azure File Storage you can specify a file mask using a date/time template instead of selecting a file. When integration runs, it will search the file to import by substituting the current date to the mask.
With this functionality you can, for example, configure a regular upload of files to Dropbox and schedule import for automatic execution so that it imports a new CSV file every time, and you don't need to overwrite old files. All the files must have the same set of columns.
File Mask Format
The file mask uses the following format: a name fragment enclosed in braces "{}" is considered a date/time format string. When integration runs, the date/time of the run is converted to the specified timezone, the specified date/time format string is applied to it, and the result string is substituted with the name fragment enclosed in braces.
The date/time format string is specified in the same format and applied in the same way as .NET Framework custom date and time format strings.
For example, if the following mask "export_{MM_dd_yyyy}.csv" is used, when an integration is executed on September 19, 2019, it will try to load a file export_09_19_2019.csv. If no such file is found, the integration run will fail.
Here is another example, including hours: "MyFile_{yyyy-MM-dd HH}.csv". A integration with such a mask, which should run on September 19, 2019, at 18:15, will try to load a file "MyFile_2019-09-19 18.csv". The timezone used is specified in the task editor together with the mask.
It's not recommended to use seconds or fractions of seconds, and even minutes in the mask, since it's not guaranteed that integration will run exactly at the specified time. When Skyvia is under peak load, integration run may be delayed for a few seconds or even minutes. And even if the difference of the integration run time and the date/time in the file name is minor, the integration run will fail.
This means that files that are exported with various tools, that have full datetime masks, including minutes, seconds, and often even fractions of seconds, currently cannot be imported using this file mask feature. For such cases try configuring these tools to produce file names without minutes and seconds.
How to Use File Mask
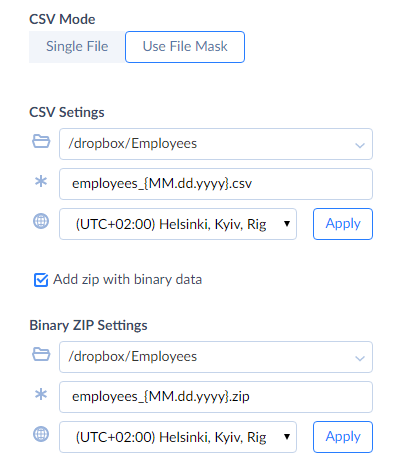
To use the file mask, on the Source Definition page of the Task Editor, click Use File Mask under CSV Mode. Then you need to select the folder to load CSV file(s) from, specify the file mask and timezone to use. Each time the integration runs, a date/time template in the file mask will be substituted with the current date and time of a file.

To expand a folder in order to select its subfolder, click the icon of this folder in the list.
After you have specified the folder, file mask, and timezone, click Apply.
Please note that Skyvia requires a CSV file with the name corresponding to the file mask with the current date/time (when you click Apply) to be present in the specified folder. This file is used to determine the columns, which will be used in mapping. All the files that will be loaded by the import task must have the same set of columns as the file used during task creation. Without clicking Apply and loading the file to determine the columns, you cannot proceed to further import task editing.
If you need to change the set of columns for an existing import task, you can edit the task and click Apply again. The list of source columns will be reloaded from the file with the name corresponding to the current date/time.
If you want to import a CSV file together with a ZIP archive with binary files, you need to specify the file mask, folder, and timezone for ZIP files separately. Click Add zip with binary data and then select the folder to load ZIP files from, specify the File Mask and timezone to convert the integration run date/time to before substituting to the mask. Then click Apply.
After you have configured your file mask settings, proceed to setting up your target and mapping settings and save the task.